


ROS 2 Transform Trees and Odometry#
Learning Objectives#
In this example, you:
Add a transform publisher to publish the camera positions as part of the transform tree.
Publish relative poses of objects.
Publish the odometry of a robot.
Use the menu shortcut to create transform and Odometry publishers.
View the transform tree in Isaac Sim.
Getting Started#
Prerequisite
Completed the URDF Import: Turtlebot, ROS 2 Cameras, and RTX Lidar Sensors tutorials.
Completed ROS 2 installation so that ROS 2 is available and the ROS 2 extension is enabled.
Transform Tree Publisher#
Assuming you’ve already gone through the ROS 2 camera tutorial and have two cameras on stage already, let’s add those cameras to a transform tree, so that you can track the cameras’ positions in the global frame.
Transform Publisher#
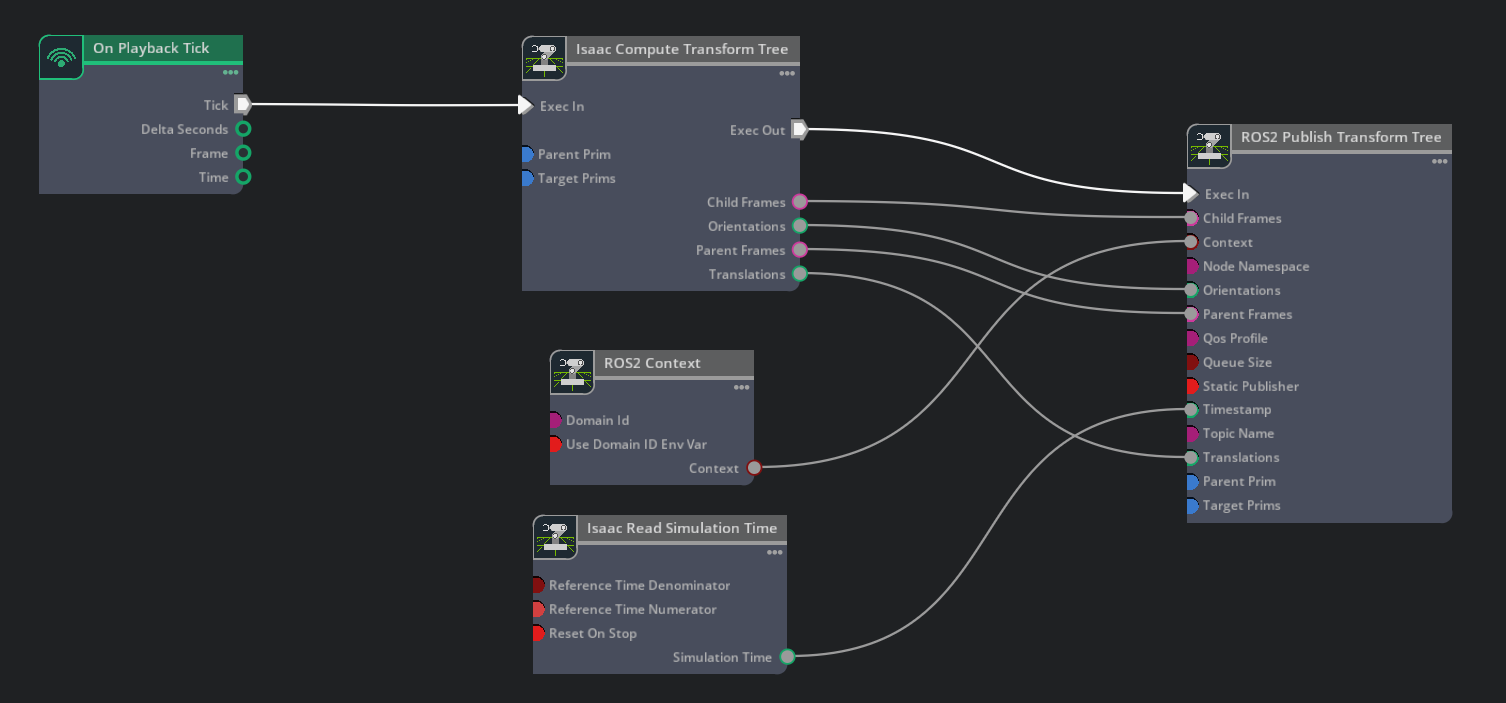
In Isaac Sim 6.0 and later, ROS 2 Publish Transform Tree consumes pre-computed frames from an Isaac Compute Transform Tree node rather than resolving prims internally. See Migrating ROS2 Publish Transform Tree if you are upgrading an older graph.
In the Stage panel, select
/Worldso the new Action Graph is created next to the cameras it publishes for. Open Window > Graph Editors > Action Graph, click New Action Graph, and name itActionGraph_tf_ground_truth(resulting graph path:/World/ActionGraph_tf_ground_truth). Add On Playback Tick, Isaac Read Simulation Time, ROS2 Context, Isaac Compute Transform Tree, and ROS 2 Publish Transform Tree nodes. Wire the On Playback Tick node’s tick output to the Compute node’s execIn, the ROS2 Context node’s context output to the Publish node’s context, and the Isaac Read Simulation Time node’s simulationTime output to the Publish node’s timeStamp. Compose an Action Graph that matches the following image.Wire the Compute node’s outputs into the Publish node: execOut → execIn, parentFrames → parentFrames, childFrames → childFrames, translations → translations, orientations → orientations.
In the Property tab for the Isaac Compute Transform Tree node, add both Camera_1 and Camera_2 to the targetPrims field.
Examine the transform tree in a ROS 2-enabled terminal:
ros2 topic echo /tf. Verify that both cameras are on the transform tree. Move the camera around inside the viewport and observe how the camera’s pose changes.
Why and how TF publishing works under the hood#
By default, Isaac Sim publishes one merged tf2_msgs/msg/TFMessage for a single simulation timestamp, aggregated across compatible TF publisher nodes in an in-process aggregation group. A group is defined by the ROS domain, topic name, dynamic or static publisher mode, and Quality of Service (QoS) profile.
TF aggregation exists so ROS 2 consumers receive one coherent transform snapshot for each simulation tick. A typical robot graph can have several TF publisher nodes, such as one raw publisher for odom to base_link and another publisher for the robot link tree. If each node publishes independently, downstream TF listeners can observe partial trees from the same simulation time depending on message ordering. Aggregation also reduces ROS 2 publisher discovery and message-processing overhead because Isaac Sim uses one publisher per compatible TF group instead of one publisher per OmniGraph node.
For dynamic TF topics such as /tf, the aggregation manager normally keeps the current timestamp open until it receives a newer timestamp. This gives every publisher node that runs at the same simulation time a chance to contribute before Isaac Sim emits the merged message. Because of this, the most recent submitted timestamp can appear one simulation tick ahead of the most recently published batch. If the timestamp does not advance, such as with a constant/default timestamp input, the pending batch is flushed on the next aggregation flush cycle.
For static TF topics such as /tf_static, the aggregation manager caches the latest static transform from each contributor and republishes only when a static transform changes or a contributor is removed. This preserves the expected transient-local static TF behavior without publishing identical static transforms on every tick.
If two contributors in the same aggregation group publish a transform with the same child frame in one batch, Isaac Sim keeps the transform from the first registered contributor and logs a warning. Keep child frame IDs unique within a TF topic.
To debug individual TF publisher output, disable aggregation with the /exts/isaacsim.ros2.nodes/tfAggregation/enabled setting:
./isaac-sim.sh --/exts/isaacsim.ros2.nodes/tfAggregation/enabled=false
Articulation Transforms#
To get the transforms of each linkage on an articulated robot, add the robot’s articulation root to the targetPrims field on the Isaac Compute Transform Tree node feeding a ROS 2 Publish Transform Tree node. All the linkages subsequent to the articulation root will be published automatically.
Important
If you find that the generated transform tree for an articulated robot chose the wrong link as the root link, use the following step to manually select the articulation root link.
Select the robot’s root prim on the Stage Tree, in its Raw USD Properties tab, find the Articulation Root Section. Delete it by clicking on the X on the right upper corner inside the section.
Select the desired link on the Stage Tree, inside its Raw USD Properties Tab, click on the +ADD button, and add Physics > Articulation Root.
After you change the articulation root, save the file and reload.
Publish Relative Transforms#
By default, the transforms are in reference to the world frame. You can check that the /base_link transform of the Turtlebot is published relative to the /World. If you want to get the transforms relative to something else, such as a camera, set the parentPrim field on the Isaac Compute Transform Tree node. Add Camera_1 in the Compute node’s parentPrim field, Stop and Play the simulation between property changes, and you can observe that the /base_link transform is now relative to Camera_1.
Setting Up Odometry#
To setup odometry for a robot, publish the odometry ROS message and its corresponding transforms.
The Turtlebot3 robot has the Articulation Root API applied on
/World/tb3_burger_processed/Geometry/base_footprint/base_linkand theIsaacRobotAPIapplied on/World/tb3_burger_processedwithisaac:physics:robotLinkspopulated, so no manual articulation-root setup is required.To set up the odometry publisher, in the Stage panel select the main robot prim
/World/tb3_burger_processedso the new Action Graph is created directly under it. Robot-local publishers such as odometry,odom->base_link, and robot-link TF act on the robot’s articulation as a whole, so they belong at the robot root rather than under a single link. Open the visual scripting editor by going to Window > Graph Editors > Action Graph and click New Action Graph; name itROS_OdomTF. The resulting graph path is/World/tb3_burger_processed/ROS_OdomTF. Compose an Action Graph that matches the following image.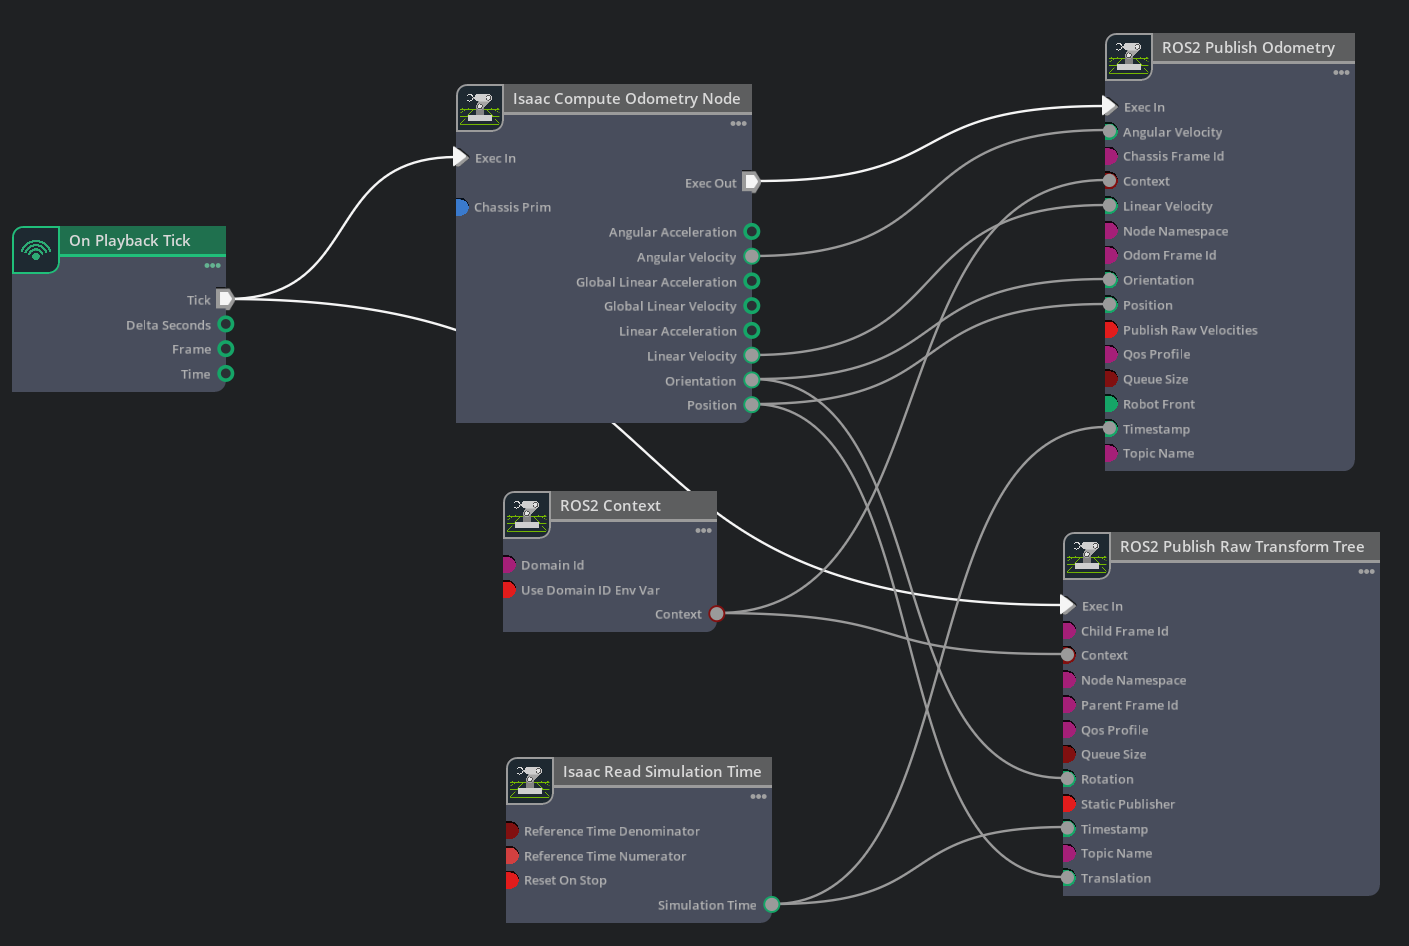
In the Property tab for the Isaac Compute Odometry Node:
Add the Turtlebot prim (that is,
/World/tb3_burger_processed) to its Chassis Prim input field. This node calculates the position of the robot relative to its start location. Its output will be fed into both a publisher for the/odomROS 2 topic, and a TF publisher that publishes the singular transform from/odomframe to/base_linkframe.
In the Property tab for the ROS2 Publish Raw Transform Tree node:
Set the childFrameId input field to
base_link.Set the parentFrameId input field to
odom. This will now enable publishing odom -> base_link frames in the transform tree.
In the Property tab for the ROS2 Publish Odometry node:
Set the chassisFrameId input field to
base_link.Set the odomFrameId input field to
odom. This will now enable publishing odom -> base_link frames in the transform tree.
Note
The ROS2 Publish Odometry node publishes full 3D velocity information. Both linear velocity and angular velocity are published with all three dimensions (x, y, and z), allowing for a more complete representation of the robot’s motion state.
At this point we are publishing odometry data and our transform tree only consists of odom -> base_link. We would also like to add the relevant robot prims under base_link to the transform tree. To do this, add an Isaac Compute Transform Tree node and a ROS 2 Publish Transform Tree node to the graph. Wire the Compute node’s outputs (execOut, parentFrames, childFrames, translations, orientations) into the matching inputs on the Publish node, and attach the Exec In, Context, and Timestamp fields on the Publish node similarly to the other nodes above.
In the Property tab for the Isaac Compute Transform Tree node:
Set the parentPrim input field to the path to your base_link inside your Turtlebot Prim:
/World/tb3_burger_processed/Geometry/base_footprint/base_link.Set the targetPrims input field to the TurtleBot root prim:
/World/tb3_burger_processed. The node expands this robot root and publishes transforms forbase_scan,caster_back_link,imu_link,wheel_left_link, andwheel_right_linkrelative tobase_link.
Keep the existing odometry,
odom->base_link, and robot-link TF publishers in/World/tb3_burger_processed/ROS_OdomTF. Do not add theworld->odompublisher inside the robot graph. That transform is scene-level ground truth because it describes where the robot’s odometry frame sits in the world. In a full navigation stack, a localization package such as Nav2 AMCL can publish the transform between a global frame and the odom frame.For this tutorial, create or update the world-scope ground-truth graph at
/World/ActionGraph_tf_ground_truth. If you completed the Transform Publisher section, update that existing graph instead of creating another graph. The sample scene atIsaac Sim > Samples > ROS2 > Scenario > turtlebot_tutorial.usduses/World/turtlebot3_burger_processed; if your imported robot is named/World/tb3_burger_processed, use the matching prim path from your stage. The node names in the sample graph are auto-generated and do not need to match the names in your graph.Add an Isaac Compute Transform Tree node:
Leave the parentPrim input field empty. With no parent prim, the computed parent frame is
world.Set the targetPrims input field to
/World/turtlebot3_burger_processed/Geometry/base_footprint. For a locally imported robot namedtb3_burger_processed, use/World/tb3_burger_processed/Geometry/base_footprintinstead.Connect the On Playback Tick node tick output to the execIn input.
Add a Get Array Index node for the translation:
Connect the Isaac Compute Transform Tree node translations output to the array input.
Leave the index input at
0. This selects the first translation from the computed transform arrays.
Add a Get Array Index node for the rotation:
Connect the Isaac Compute Transform Tree node orientations output to the array input.
Leave the index input at
0. This selects the first orientation from the computed transform arrays.
Add a ROS2 Publish Raw Transform Tree node:
Set the parentFrameId input field to
world.Set the childFrameId input field to
odom.Set the topicName input field to
tf.Connect the Isaac Compute Transform Tree node execOut output to the execIn input.
Connect the ROS2 Context node context output to the context input.
Connect the Isaac Read Simulation Time node simulationTime output to the timeStamp input.
Connect the translation Get Array Index node value output to the translation input.
Connect the rotation Get Array Index node value output to the rotation input.
Verify that the ground-truth graph is similar to the following:

Press Play and in a new ROS-sourced terminal run the following command:
ros2 run tf2_tools view_frames
Open the generated PDF file to observe the transform tree that you are publishing from Isaac Sim. Verify that it is similar to the one below.

For an example of all the publishers and subscribers setup in the Turtlebot ROS 2 tutorials, open the scene which can be found by going to the Isaac Sim Content browser and clicking Isaac Sim>Samples>ROS2>Scenario>turtlebot_tutorial.usd.
Graph Shortcuts#
The following menu shortcuts build transform and odometry graphs:
TF Publisher
For transform Publisher, go to Tools > Robotics > ROS 2 OmniGraphs > TF Publisher . If you don’t observe any ROS 2 graphs listed, you need to first enable the ROS 2 bridge. A popup box will appear asking for the parameters needed to populate the graphs. You must provide:
the Graph Path and Node Namespaces if you have one.
the Target Prim that contains the articulation root API if you want to get the full articulation chain in the transform, or the individual prims if you want to publish a single transform of the prim.
the parent prim that is used as the reference frame for the transforms. It is defaulted to "/World", but it could be any frame on stage.
If you already have a transform publisher and want to add more prims to publish, as long as they have the same reference prim, then you can check both the “Add to an existing graph” and “Add to an existing node” boxes, give the graph and node paths, and the new target prim to add to the existing graph. If you want to add to the same graph but have different reference prim, it will create a new transform node and use the existing tick, content, and timestamp nodes if they exist.
Odometry Publisher
For Odometry Publisher, go to Tools > Robotics > ROS 2 OmniGraphs > Odometry Publisher. A popup box will appear asking for the parameters needed to populate the graphs. You must provide:
the Graph Path and Node Namespaces if you have one.
the prim that contains the Articulation Root API, and the chassis prim, whose origin is used to calculate odometry.
Viewing the Transform Tree in Isaac Sim#
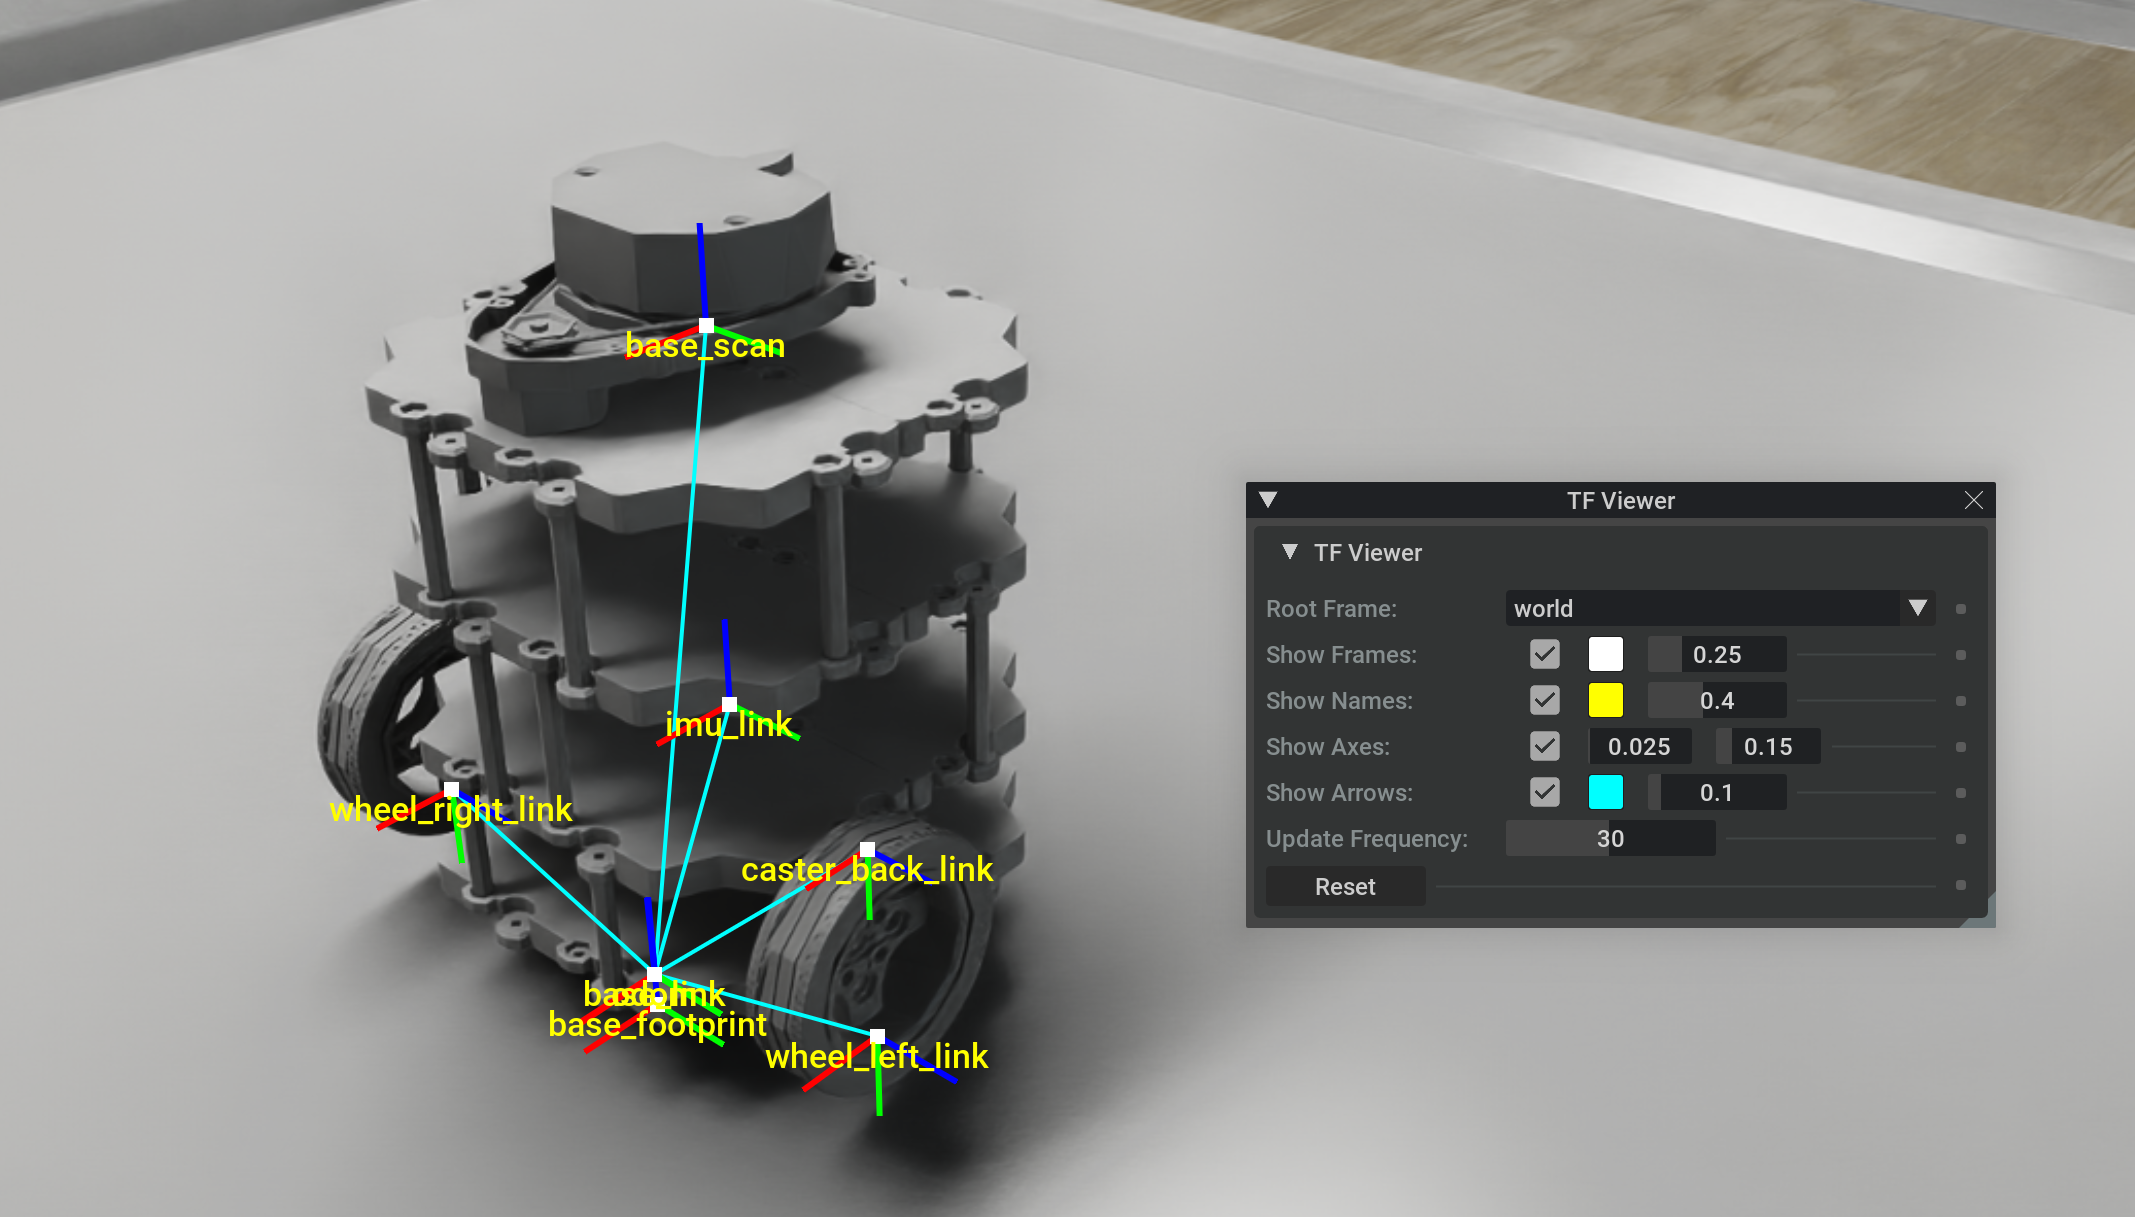
The Isaac Sim’s ransform viewer allows you to draw on the simulated scene itself in the viewport window and on the transform tree published (under /tf and /tf_static topics) by Isaac Sim and/or external ROS 2 nodes.
To begin, enable the Isaac Sim’s transform viewer extension using the Extension Manager by searching for
isaacsim.ros2.tf_viewer.After the extension is enabled, go to the top menu bar and click on Window > TF Viewer to open the transform viewer control window.

Window components:
Frame on which to compute the transformations.
Whether the frames (markers) are displayed. Marker color. Marker size (relative).
Whether the frames’ names are displayed. Text color. Text size (relative).
Whether the frames’ axes are displayed (RGB -> XYZ axes). Axis length (in meters). Axis thickness (relative).
Whether to show the connection between the child frames and the parent frames. Line color. Line thickness (relative).
Frame transformation update frequency (Hz). Higher frequency might reduce simulation performance.
Reset transformation tree (clear transformation buffers). Useful to clean
TF_OLD_DATAwarning, for example.
Note
Closing the transform viewer window stops the display and clears the viewport drawings.
To start the visualization, choose the appropriate root frame on which to compute the transformations (for example, World or world, according to the published transform tree specification).
Note
If the visualization (or a specific root frame) does not show even though there are publications under
/tfand/or/tf_statictopics:Make sure the simulation is running before opening the TF Viewer window
Close and reopen the TF Viewer window to update the transform subscriptions
Press the Reset button on the TF Viewer window to reset the transformation tree
Multiple Sensors in RViz2#
Note
In Windows 11, depending on your machine’s configuration some bandwidth-heavy topics might not be available to visualize in RViz2 in WSL.
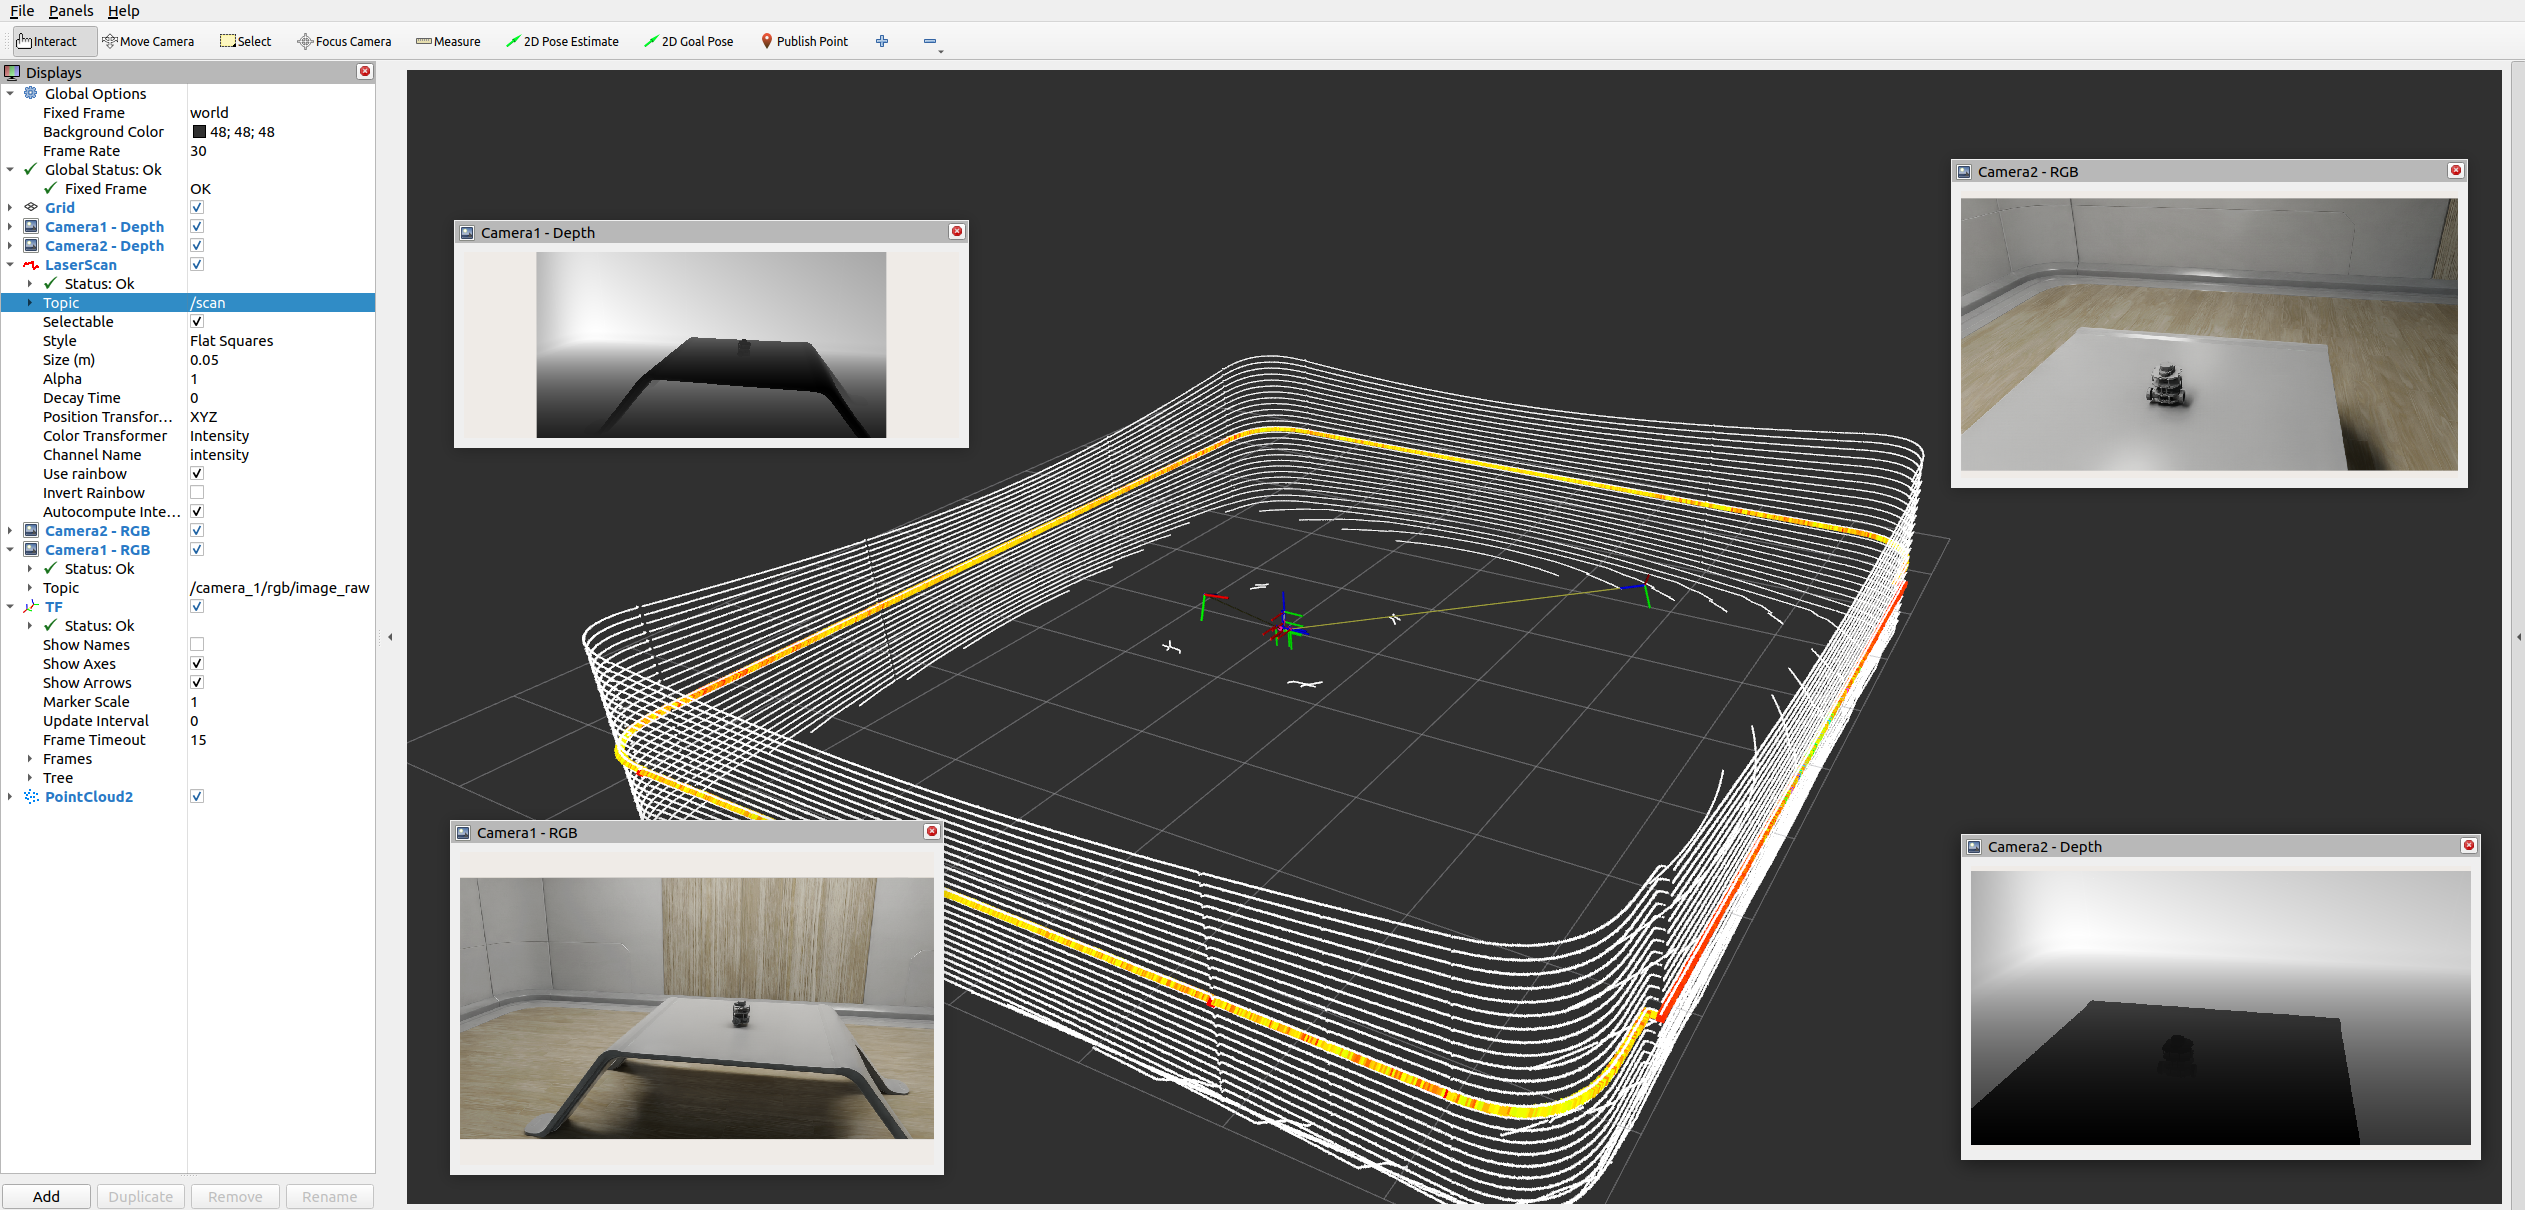
To display multiple sensors in RViz2, there are a few things that are important to make sure all the messages are synced up and timestamped correctly.
Simulation Timestamp
Use Isaac Read Simulation Time as the node that feeds the timestamp into all of the publishing nodes’ timestamps.
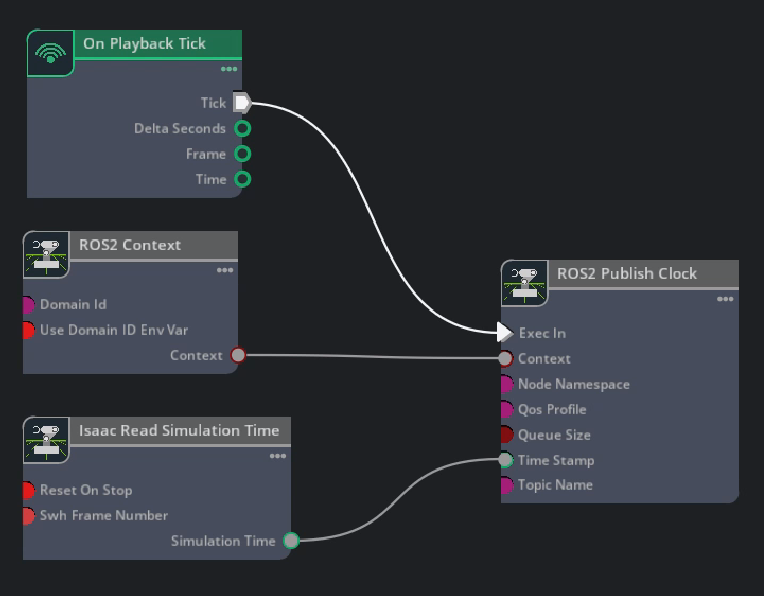
ROS 2 clock
To publish the simulation time to the ROS 2 clock topic, you can setup the graph as shown in the Running ROS 2 Clock Publisher tutorial:
frameId and topicName
To visualize all the sensors as well as the tf tree all at once inside RViz, the frameId and topicNames must follow a certain convention for RViz to recognize them all. The table below roughly describes these conventions. To observe the multi-sensor example below, consult the USD asset, which can be found by going to the Isaac Sim Content browser and clicking Isaac Sim>Samples>ROS2>Scenario>turtlebot_tutorial.usd.
Source
frameId
nodeNamespace
topicName
Type
Camera RGB
(device_name)_(data_type)
(device_name)/(data_type)
image_raw
rgb
Camera Depth
(device_name)_(data_type)
(device_name)/(data_type)
image_rect_raw
depth
Lidar
base_scan
scan
laser scan
Lidar
base_scan
point_cloud
point_cloud
TF
tf
tf
To observe the RViz image below, make sure the simulation is playing. In a ROS 2-sourced terminal, open with the configuration provided using the command:
ros2 run rviz2 rviz2 -d <ros2_ws>/src/isaac_tutorials/rviz2/camera_lidar.rviz
After the RViz window finishes loading, you can enable and disable the sensor streams inside the Display panel on the left hand side.
Important
Ensure that the use_sim_time ROS 2 param is set to true after running the RViz2 node.
This ensures that the RViz2 node is synchronized with the simulation data especially when RViz2 interpolates position of Lidar data points.
Set the parameter using the following command in a new ROS 2-sourced terminal:
ros2 param set /rviz use_sim_time true
Summary#
This tutorial covered:
Transform publisher to publish sensors and full articulation trees
Raw transform publisher to publish individual transforms
Odometry publisher and transform publishers setup for Turtlebot
Show the transform Viewer in the Isaac Sim’s viewport
Full 3D velocity (x, y, z) publishing for both linear and angular velocity in the odometry message
Next Steps#
Continue on to the next tutorial in our ROS 2 Tutorials series, ROS 2 Setting Publish Rates to learn how to set publish rates for ROS 2 OmniGraph nodes.
Further Learning#
Auto-generated topic namespaces — including the special “highest ancestor wins” rule used by ROS 2 Publish Transform Tree — are covered in Automatic ROS 2 Namespace Generation.