


RTX Sensors#
RTX sensors in Isaac Sim use the Omniverse RTX Renderer’s RTX Sensor SDK to sense the environment, enabling interaction with materials in visual and non-visual spectra. This means an RTX-based Lidar can model returns from light interaction with transparent or reflective surfaces, and an RTX-based Radar can model returns accounting for material emissivity and reflectivity in the radio spectrum.
Isaac Sim organizes utilities supporting RTX sensors into the isaacsim.sensors.experimental.rtx extension.
Deprecated since version 6.0: The isaacsim.sensors.rtx extension is deprecated. Use isaacsim.sensors.experimental.rtx instead.
The new extension provides equivalent sensor classes (Lidar/LidarSensor, Radar/RadarSensor,
plus the new Acoustic/AcousticSensor) with a uniform authoring/runtime split.
See RTX Sensors.
Getting Started#
To get started with RTX sensors:
Add a sensor to your scene: Use Create > Isaac > Sensors > RTX Lidar or RTX Radar from the menu, or use the Python APIs described in the sensor-specific pages below.
Collect data: Attach annotators to the sensor to extract point cloud data, scan buffers, or raw
GenericModelOutputdata.Visualize output: Use the Debug Draw Extension to visualize point clouds, or configure viewport debug views.
Integrate with ROS2: Follow the RTX Lidar ROS2 Tutorial to publish sensor data as
PointCloud2orLaserScanmessages.
Sensor Types#
Data Collection and Materials#
Advanced Topics#
Extension Architecture#
RTX sensors are built using the omni.sensors extension suite. To understand more about how RTX sensors are modeled,
and how to build your own, review the following documentation:
Sensor Processing Graphs (SPG)#
A Sensor Processing Graph (SPG) runs custom GPU code as post-processing passes over a
sensor’s render outputs (AOVs). This feature enables users to model sensor effects not
currently supported by RTX Sensor, to create custom output AOVs, and to fuse multiple AOVs together.
A graph is a set of shader nodes; each node is a UsdShade.Shader prim that references a CUDA source (.cu) file and an entry-point
function (subIdentifier) shared by the extern "C" kernel and a co-located Lua
launch script (<kernel>.cu.lua). Kernel compilation, launch configuration, and
semantic validation are owned by the omni.rtx.spg extension.
See also
omni.rtx.spg documentation for the graph runtime, kernel and Lua authoring conventions, and semantic details.
The isaacsim.sensors.experimental.rtx extension provides authoring helpers to assemble
the SPG USD prim structure from kernels you have written offline:
SPGNodedescribes a single shader node (CUDA kernel path,sub_identifier, opaqueinputs/outputs, and typedparams). Construction validates only that the.cufile and its co-located.cu.lualaunch script exist.author_spg()(inherited from the authoring base class) authors one shader prim per node onto a render product tied to the sensor, wires the requested connections using anomni.graph-style declarative(source, destination)list, and ensures the referencedRenderVarAOVs exist (creating a missing source AOV with a warning). Itsresolutionargument is(width, height)— note this is the opposite order ofCameraSensor.resolution, which is(height, width). It can optionally copy the kernel sources into a directory (copy_to) to help assemble a self-contained sensor asset.author_spgauthors USD only and performs no CUDA/Lua/SPG semantic validation; the graph is compiled and executed by theomni.rtx.spgruntime (pulled in transitively) at render time.
Custom output AOVs authored this way can be read back as arrays — without a viewport —
using a Replicator annotator created from the AOV
(omni.replicator.core.AnnotatorRegistry.register_annotator_from_aov with
is_gpu_enabled=True), or written to disk with a Replicator Writer.
Standalone examples#
Two runnable end-to-end walkthroughs live under
standalone_examples/api/isaacsim.sensors.experimental.rtx/:
spg_grayscale.py— authors a single-shader SPG that converts theLdrColorAOV to grayscale, then writes theLdrGrayscaleoutput AOV to disk via a ReplicatorWriter.spg_grayscale_invert.py— chains two shaders (grayscale, then invert with a typedstrengthparameter) and writes the finalLdrInvertedAOV.
Run either with the Isaac Sim Python environment, for example:
./python.sh standalone_examples/api/isaacsim.sensors.experimental.rtx/spg_grayscale.py
Each example renders the bundled Cornell box scene and writes its output AOV to
_example_output_isaacsim.sensors.experimental.rtx/. The expected results are shown below.

spg_grayscale.py — the LdrGrayscale output AOV (LdrColor converted to grayscale).#

spg_grayscale_invert.py — the LdrInverted output AOV (grayscale, then inverted).#
Important Settings#
The following settings affect RTX sensor behavior and performance:
Setting |
Default |
Description |
|---|---|---|
|
|
Keep Lidar return buffer on GPU for post-processing. Must be |
|
|
Keep Radar return buffer on GPU for post-processing. Must be |
|
|
Enable hit normal output. Increases VRAM usage. |
|
|
Enable non-visual materials using USD attributes. |
|
|
Specify the non-visual material USD attribute prefix. |
|
|
Use Hydra time ( |
|
|
Enable stable 128-bit object IDs for semantic segmentation. |
|
|
Enable Motion BVH for motion compensation and Doppler effects. |
Motion BVH#
RTX sensors use Motion BVH to improve accuracy when modeling motion-related sensor effects, for example, the motion of objects during sensor exposure, or the motion of the sensor itself as it collects data.
By default, Motion BVH is disabled in Isaac Sim to improve performance. The following RTX Sensor features are affected by Motion BVH:
RTX Lidar
Motion BVH must be enabled for RTX Lidar motion compensation to work correctly.
RTX Radar
Motion BVH must be enabled for the Doppler effect, and therefore RTX Radar entirely, to be modeled correctly.
How to Enable Motion BVH#
Note
Enabling Motion BVH can significantly increase rendering time by increasing VRAM usage for all sensors and must be left disabled when not needed.
There are two ways to enable Motion BVH:
In standalone Python workflows, you can enable Motion BVH by specifying
enable_motion_bvhasTruein theSimulationAppconstructor:
from isaacsim import SimulationApp

simulation_app = SimulationApp({"enable_motion_bvh": True})

simulation_app.close()
In all workflows, you can enable Motion BVH by specifying the following settings on the command line:
--/renderer/raytracingMotion/enabled=true \
--/renderer/raytracingMotion/enableHydraEngineMasking=true \
--/renderer/raytracingMotion/enabledForHydraEngines='0,1,2,3,4'
Auxiliary Output Level and the GenericModelOutput RenderVar#
RTX Lidar, Radar, and Acoustic sensors emit a GenericModelOutput (GMO) AOV. The
amount of auxiliary data carried in each GMO frame is controlled by the
_replicator:rendervar:GenericModelOutput:channels attribute on the sensor prim.
Setting the channels attribute in the UI#
To set _replicator:rendervar:GenericModelOutput:channels on an OmniRadar prim from
the Isaac Sim UI:
Select the prim in the Stage window.
Open the Property tab.
Expand the Array Properties widget.
Click Edit on the
_replicator:rendervar:GenericModelOutput:channelsrow.Set the first field in the dialog to
BASIC.Close the dialog to save the change.
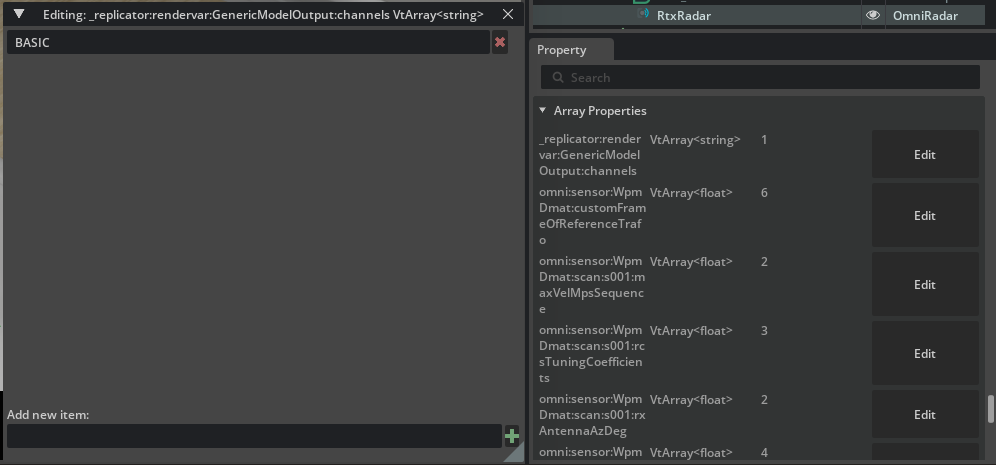
How the attribute flows to the RenderVar#
When omni.replicator.core adds a GenericModelOutput RenderVar to a render product
that is attached to an RTX sensor prim, it reads
_replicator:rendervar:GenericModelOutput:channels from the sensor prim and copies the
value onto the RenderVar’s channels attribute. The RTX Sensor SDK then uses that
value to decide which auxiliary fields to populate.
The aux_output_level constructor parameter on
isaacsim.sensors.experimental.rtx.Lidar,
isaacsim.sensors.experimental.rtx.Radar, and
isaacsim.sensors.experimental.rtx.Acoustic is a convenience that authors
_replicator:rendervar:GenericModelOutput:channels = [level] on the sensor prim. The
two paths are interchangeable; reading existing USD scenes is easier if you recognize
the underlying attribute.
Valid values are modality-specific:
Modality |
Valid values |
|---|---|
Lidar |
|
Radar |
|
Acoustic |
|
See RTX Sensor Annotators for the per-level field listing.
Migration from previous releases#
Earlier releases used per-modality USD attributes for the same purpose. These attributes have been removed from the schemas:
Old attribute (removed) |
Replacement |
|---|---|
|
|
|
|
USD assets shipped with Isaac Sim 6.0 have already been updated. Custom USD scenes carrying the old attributes need to be migrated; the old attributes are silently ignored by the new schemas.
Note
RtxCamera removes _replicator:rendervar:GenericModelOutput:channels from the
Camera prim during construction because cameras do not produce a GMO AOV. Camera
prims therefore do not participate in the propagation behavior described in
Known issue: last-attach-wins propagation of GMO channels.
Troubleshooting and Known Issues#
Common Issues#
- Annotators return empty data
Ensure the simulation timeline is playing. RTX Sensor Annotators rely on the timeline to collect data. Also verify that
--/app/sensors/nv/lidar/outputBufferOnGPUor--/app/sensors/nv/radar/outputBufferOnGPUis left at its default value offalse— annotators read return data from host buffers, so forcing the GPU-resident path will leave the annotator outputs empty.- Point cloud appears to “drag” behind moving objects
If the Lidar rotation rate is slower than the frame rate, accumulated scan data may contain returns from multiple frames. This is expected behavior for rotating Lidars. Consider using per-frame output instead of accumulated scans.
- Lidar scans are incomplete
Ensure
omni:sensor:Core:accumulateOutputsis set totrueon theOmniLidarprim.omni:sensor:tickRatemust equalomni:sensor:Core:scanRateBaseHzon theOmniLidarprim. See OmniLidar Tick Rate Must Equal scanRateBaseHz.- Camera gizmos can block RTX sensor rendering
RTX sensors may be blocked by camera gizmos (Show By Type > Cameras in the viewport eye menu). See Camera gizmos can block RTX sensor rendering.
- Radar simulation does not show Doppler effects
Motion BVH must be enabled for Doppler effects to be modeled correctly. See How to Enable Motion BVH.
- Timestamps are discontinuous after pause/resume
This should not occur if multi-tick rendering is enabled. If multi-tick rendering is disabled, the
GenericModelOutputAOV timestamp is independent of the animation timeline and continues to increase even when paused.
Known issue: last-attach-wins propagation of GMO channels#
Warning
The _replicator:rendervar:GenericModelOutput:channels attribute is currently
effectively global per render-product-attach event. When two RTX sensors on the
same stage author different values, only the last sensor to have a render product
attached “wins” - every subsequent GenericModelOutput RenderVar uses that
sensor’s channels value, regardless of which sensor prim it was created from.
Concrete example. Suppose you have one Lidar with aux_output_level="FULL" and
one Radar with aux_output_level="BASIC" on the same stage:
If the Radar render product is created second, every GMO consumer (Lidar and Radar) sees
BASICchannels. The Lidar silently loses itsFULL-level fields.If the Lidar render product is created second, the Radar GMO RenderVar inherits
FULL. The Radar pipeline does not recognizeFULLand produces no auxiliary data at all for that Radar (norv_ms, no intensity, etc.).
Recommended workarounds:
Keep all RTX sensors on a stage at the same
aux_output_level.Order render-product attachment so the sensor whose channels value you want to use is attached last.
Split sensors with conflicting auxiliary-output requirements across separate stages or
SimulationAppinstances.
This issue is tracked separately and will be addressed in a future release. Cameras are unaffected. See Auxiliary Output Level and the GenericModelOutput RenderVar for how the attribute is authored and how it flows to the RenderVar.
Known issue: RTX Lidar echoId is always zero#
In Isaac Sim 6.0 and 6.1, the RTX Lidar echoId field is always 0, even for
multi-echo Lidar profiles that report more than one return per emitted ray. This affects the
echoId field of the GenericModelOutput buffer and every consumer that forwards it,
including the echoId output of IsaacExtractRTXSensorPointCloud and the echo field of
ROS 2 point cloud messages. There is no workaround, so avoid grouping or filtering returns by
echoId until this is fixed. A fix is planned for a later release.
Performance Considerations#
VRAM Usage: Each RTX sensor requires GPU memory. Multiple sensors or high-resolution configurations increase VRAM usage.
Motion BVH: Enabling Motion BVH significantly increases VRAM usage and rendering time.
Normal Output: Enabling
--/app/sensors/nv/lidar/publishNormals=trueincreases VRAM usage.Stable IDs: Enabling
--/rtx-transient/stableIds/enabled=truehas minimal performance impact but requires additional processing for object ID resolution.
Hardware Requirements#
RTX sensors require an NVIDIA RTX GPU with ray tracing support. Performance scales with GPU capabilities, particularly:
VRAM capacity (affects number of sensors and resolution)
Ray tracing cores (affects simulation speed)