ROS 2 Custom C++ OmniGraph Node#
Learning Objectives#
In this example, you learn how to:
Write a custom C++ OmniGraph node to use with Isaac Sim.
Note
This tutorial is supported only on Linux with ROS 2 Humble.
Getting Started#
Prerequisite
Basic understanding of building ROS 2 packages.
Building a Custom Message Package#
To use our custom message with Isaac Sim, you must build the custom message package with ROS 2. Follow the custom message sample in the official ROS 2 documentation. The definition of the message is:
geometry_msgs/Point center
float64 radius
Follow the instructions on the ROS 2 Humble Documentation for Creating custom msg and srv files.
Note
You only need to complete the steps up to subsection 6. Confirm msg and srv creation.
Important
Follow the package and message naming terminologies provided in the official tutorials, they are important when you build your own C++ OmniGraph nodes.
Setting Up Kit Extension C++ Template#
To use the custom ROS 2 OmniGraph nodes, you must build your own extension, which contains the necessary C++ code. We strongly recommend reviewing Omniverse Kit Extension Template C++, the ReadMe provided with the repository is a good starting point for this.
Clone Omniverse Kit Extension Template C++ and switch to the
release/107.3.0branch (in the root folder:git checkout release/107.3.0).Run
./build.shinside the directory to build the sample extensions.Ensure that
./_build/linux-x86_64/release/omni.app.kit.dev.shworks as expected.Download a sample custom extension, which will be used for this tutorial:
Extract the
omni.example.cpp.omnigraph_node_rosfolder intosource/extensionsunder theKit Extension C++ template folder, which you cloned in the previous steps.Add the following lines at the end of the
deps/kit-sdk-deps.packman.xmlfile, before the</project>closing tag:<dependency name="system_ros" linkPath="../_build/target-deps/system_ros" tags="${config}"> <source path="<FULL_PATH_TO_THE_ROS_2_INSTALL>" /> </dependency> <dependency name="additional_ros_workspace" linkPath="../_build/target-deps/additional_ros" tags="${config}"> <source path="<FULL_PATH_TO_WORKSPACE_CREATED_ABOVE>/install/tutorial_interfaces" /> </dependency>
Update the source
pathaccording to your local setup. For example:<FULL_PATH_TO_THE_ROS_2_INSTALL>:/opt/ros/humble<FULL_PATH_TO_WORKSPACE_CREATED_ABOVE>:/home/user/ros2_ws
Adding this ensures that the
premake5.luafile can find the relevant ROS 2 headers and libraries on your system. These are needed for building your custom nodes.Run
./build.shto build your new extension with ROS 2 OmniGraph nodes.Important
Provide the complete paths for the
source_pathunder both the dependencies. This is needed to ensure the extension is built against your local ROS workspace and installation.
Adding the Extension to Isaac Sim#
To add the extension and corresponding nodes into Isaac Sim:
Source the
install/local_setup.bashof the workspace containing thetutorial_interfacespackage created above.Note
We do not source the ROS 2 installation. Doing so can cause symbol conflicts from differences in Python versions between the ROS 2 distributions (for example, Python 3.10 for Humble) and Isaac Sim (Python 3.11).
source install/local_setup.bash
Run Isaac Sim from this terminal.
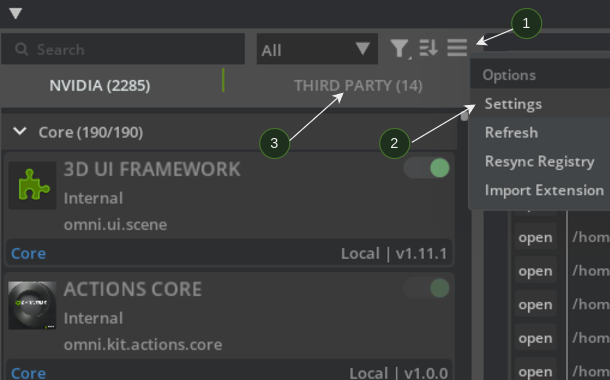
Go to Window>Extensions, look for the hamburger menu (1) to the right side of the search bar (just above Third Party tab). Click Settings (2).
Click the
+icon under Extension Search Paths and add the path to your built extension in the previous section (your built extensions are underkit-extension-template-cpp/_build/linux-x86_64/release/exts).Verify that your extensions are under the Third Party tab (3).
Enable the
Custom ROS2 OGN Example Extension.Note
If you observe an error, such as below, it is likely because your custom
tutorial_interfacespackage is not sourced correctly:Error: libtutorial_interfaces__rosidl_typesupport_c.so: cannot open shared object file: No such file or directory (Additional information might be available by running the process with the LD_DEBUG environment variable set)
Building the Action Graph and Running the Nodes#
Complete all the steps in the previous sections.
With the Custom ROS2 OGN Example Extension enabled, to create an ActionGraph with the new ROS 2 nodes:
Go to Window > Graph Editors > Action Graph:
Search for
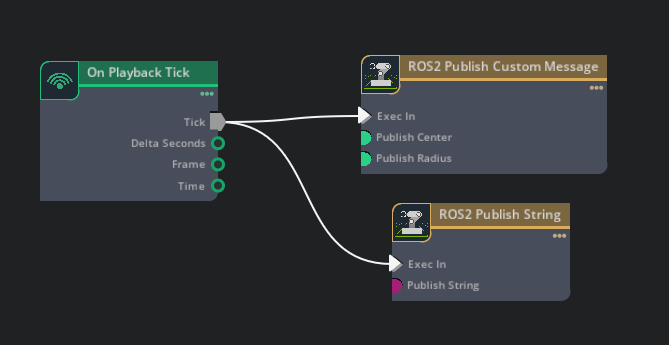
ROS 2in the Action Graph tab, drag both the nodes:ROS 2 Publish Custom MessageandROS 2 Publish Stringin the graph.Search for
Playback Tickand drag the node into the graph.Connect
Tickfrom theOn Playback Ticknode toExec Infor both the ROS 2 nodes.
Click Play on the scene and the nodes start publishing to ROS 2.
Verify the publishing, by opening a new terminal and sourcing your ROS 2 workspace in it. Then, verify that running
ros2 topic listshows the two available topics:/custom_node/my_string # This topic has a string being published /custom_node/sphere_msg # This topic has the custom "SphereMsg" created in step 1 being published
Deeper Dive into Nodes and Extension#
The
premake5.luahandles building of the extension, review the section, which handles the compiling and linking against the specified ROS install paths:
-- Build the C++ plugin that will be loaded by the extension.
project_ext_plugin(ext, ogn.plugin_project)
    -- It is important that you add all subdirectories containing C++ code to this project
    add_files("source", "plugins/"..ogn.module)
    add_files("nodes", "plugins/nodes")

    -- Add the standard dependencies all OGN projects have; includes, libraries to link, and required compiler flags
    add_ogn_dependencies(ogn)

    includedirs {
        -- System level ROS includes
        "%{target_deps}/system_ros/include/std_msgs",

        "%{target_deps}/system_ros/include/geometry_msgs",

        "%{target_deps}/system_ros/include/rosidl_runtime_c",

        "%{target_deps}/system_ros/include/rosidl_typesupport_interface",

        "%{target_deps}/system_ros/include/rcl",

        "%{target_deps}/system_ros/include/rcutils",

        "%{target_deps}/system_ros/include/rmw",

        "%{target_deps}/system_ros/include/rcl_yaml_param_parser",

        -- Additional sourced ROS workspace includes
        "%{target_deps}/additional_ros/include/tutorial_interfaces",
    }

    libdirs {
        -- System level ROS libraries
        "%{target_deps}/system_ros/lib",

        -- Additional sourced ROS workspace libraries
        "%{target_deps}/additional_ros/lib",
    }

    links{
        --  Minimal ROS 2 C API libs needed for your nodes to work
        "rosidl_runtime_c", "rcutils", "rcl", "rmw",

        -- For the simple string message, add the deps
        "std_msgs__rosidl_typesupport_c", "std_msgs__rosidl_generator_c",

        -- Add dependencies of the custom message with its libs
        "geometry_msgs__rosidl_typesupport_c", "geometry_msgs__rosidl_typesupport_c",
        "tutorial_interfaces__rosidl_typesupport_c", "tutorial_interfaces__rosidl_generator_c",
    }

    filter { "system:linux" }
        linkoptions { "-Wl,--export-dynamic" }

    cppdialect "C++17"
- The OmniGraph nodes are present under
plugins/nodes. TherclROS 2 API is used for creating and working with the ROS 2 components in the OmniGraph node: In the C++ Node,
compute()is called when theExec Incondition is true, this is where the node and publisher is initially created. The message is also published from this function.
- The OmniGraph nodes are present under
Summary#
This tutorial covered the following topics:
Building your own extension, which contains ROS 2 C++ OmniGraph nodes
Using these nodes with Isaac Sim
Next Steps#
Continue on to the next tutorial in the ROS2 Tutorials series, ROS 2 Launch to learn how to deploy Isaac Sim using ROS 2 Launch.