


ROS 2 installation#
Install Isaac Sim 6.2.0 using Workstation Setup, then select your configuration. Ubuntu 24.04 with Jazzy is recommended. The simulator includes ROS libraries for the default interfaces. External nodes need their own ROS environment; custom interfaces also need a build compatible with the simulator’s Python 3.12 runtime.
ROS 2 Setup
Default ROS Interfaces use the bundled message types. Custom ROS Interfaces require generated Python modules built for the simulator’s Python 3.12 runtime; keep native Python 3.10 ROS in a separate external-node terminal.
Warning
Humble on Ubuntu 24.04 is not supported. Select Jazzy, or use Humble on Ubuntu 22.04.
Note
This page documents the native Windows Pixi procedure for Jazzy. Release notes and newer workspace configurations include additional Humble/Pixi support, but the Humble Windows procedure is not verified here. Select Jazzy for this walkthrough, or WSL2 (deprecated) for the documented Humble path. See the workspace configurations.
Install ROS 2#
Follow the ROS 2 Jazzy Debian installation. In each external-node terminal, source ROS:
source /opt/ros/jazzy/setup.bash
Follow the ROS 2 Humble Debian installation. In each external-node terminal, source ROS:
source /opt/ros/humble/setup.bash
For external nodes, use Build external Jazzy nodes in Docker or an advanced Jazzy source build. Jazzy Debian packages are unavailable on Ubuntu 22.04. Only if you choose the native source-build alternative, source its completed installation in the external-node terminal:
source ~/ros2_jazzy/install/setup.bash
Pixi supplies native ROS 2 Jazzy and build dependencies. Install Windows 11 x64,
Git, Pixi 0.68.0 or later
(winget install prefix-dev.pixi), and MSVC Build Tools 2022
with Desktop development with C++. No separate system ROS or WSL is needed.
In PowerShell as Administrator, install WSL2 with Ubuntu 22.04. Skip installation if this WSL2 distribution already exists:
wsl --install -d Ubuntu-22.04
Restart Windows if prompted, then open the Ubuntu 22.04 app and complete its first-time user setup. For virtualization errors, follow the Windows virtualization instructions.
Check the distribution version in PowerShell:
wsl --list --verbose
If Ubuntu-22.04 shows version 1, convert it before continuing:
wsl --set-version Ubuntu-22.04 2
For future distributions,
wsl --set-default-version 2selects WSL2 by default.Inside WSL, install ROS 2 Humble.
In each WSL external-node terminal, source ROS:
source /opt/ros/humble/setup.bash
The simulator runs on Windows. This WSL workflow is deprecated; custom interfaces are not supported.
In PowerShell as Administrator, install WSL2 with Ubuntu 24.04. Skip installation if this WSL2 distribution already exists:
wsl --install -d Ubuntu-24.04
Restart Windows if prompted, then open the Ubuntu 24.04 app and complete its first-time user setup. For virtualization errors, follow the Windows virtualization instructions.
Check the distribution version in PowerShell:
wsl --list --verbose
If Ubuntu-24.04 shows version 1, convert it before continuing:
wsl --set-version Ubuntu-24.04 2
For future distributions,
wsl --set-default-version 2selects WSL2 by default.Inside WSL, install ROS 2 Jazzy.
In each WSL external-node terminal, source ROS:
source /opt/ros/jazzy/setup.bash
The simulator runs on Windows. This WSL workflow is deprecated; custom interfaces are not supported.
Build the ROS workspace#
The clone commands select the workspace release for Isaac Sim 6.2.0. If you already have a clone, follow Reuse an existing workspace clone before building.
Check Cross-product compatibility for the matching workspace release. Do not replace the release tag with the default branch and assume compatibility.
Build this workspace only for tutorials or packages you need. In the sourced external-node terminal:
Install the build tools.
sudo apt install python3-rosdep python3-colcon-common-extensions build-essential
Prepare rosdep. Run this initialization only if rosdep has not already been initialized:
sudo rosdep init
Update the dependency database, including when initialization was already done:
rosdep updateGet the workspace. For a new clone:
git clone --branch IsaacSim-6.2.0 --recurse-submodules https://github.com/isaac-sim/IsaacSim-ros_workspaces.git ~/IsaacSim-ros_workspaces
If you already have the repository, follow Reuse an existing workspace clone instead of cloning again.
Install package dependencies. Enter the workspace for the ROS distro sourced above:
cd ~/IsaacSim-ros_workspaces/${ROS_DISTRO}_ws
For custom interfaces, add your packages to
srcbefore installing dependencies and building.rosdep install --from-paths src --ignore-src --rosdistro "$ROS_DISTRO" -y
Build the workspace.
colcon buildActivate the built packages in this external-node terminal:
source install/local_setup.bash
In each new terminal, source ROS first, then
~/IsaacSim-ros_workspaces/<distro>_ws/install/local_setup.bash. For source-built ROS, use itsinstall/setup.bashfor the first step.
Build this workspace only for tutorials or packages you need. In the sourced external-node terminal:
Install the build tools.
sudo apt install python3-rosdep python3-colcon-common-extensions build-essential
Prepare rosdep. Run this initialization only if rosdep has not already been initialized:
sudo rosdep init
Update the dependency database, including when initialization was already done:
rosdep updateGet the workspace. For a new clone:
git clone --branch IsaacSim-6.2.0 --recurse-submodules https://github.com/isaac-sim/IsaacSim-ros_workspaces.git ~/IsaacSim-ros_workspaces
If you already have the repository, follow Reuse an existing workspace clone instead of cloning again.
Install package dependencies. Enter the workspace for the ROS distro sourced above:
cd ~/IsaacSim-ros_workspaces/${ROS_DISTRO}_ws
For custom interfaces, add your packages to
srcbefore installing dependencies and building.rosdep install --from-paths src --ignore-src --rosdistro "$ROS_DISTRO" -y
Build the workspace.
colcon buildActivate the built packages in this external-node terminal:
source install/local_setup.bash
In each new terminal, source ROS first, then
~/IsaacSim-ros_workspaces/<distro>_ws/install/local_setup.bash. For source-built ROS, use itsinstall/setup.bashfor the first step.
Build this workspace only for tutorials or packages you need. In the sourced external-node terminal inside WSL:
Install the build tools.
sudo apt install python3-rosdep python3-colcon-common-extensions build-essential
Prepare rosdep. Run this initialization only if rosdep has not already been initialized:
sudo rosdep init
Update the dependency database, including when initialization was already done:
rosdep updateGet the workspace. For a new clone:
git clone --branch IsaacSim-6.2.0 --recurse-submodules https://github.com/isaac-sim/IsaacSim-ros_workspaces.git ~/IsaacSim-ros_workspaces
If you already have the repository, follow Reuse an existing workspace clone instead of cloning again.
Install package dependencies. Enter the workspace for the ROS distro sourced above:
cd ~/IsaacSim-ros_workspaces/${ROS_DISTRO}_ws
Install the dependencies for the packages in
src.rosdep install --from-paths src --ignore-src --rosdistro "$ROS_DISTRO" -y
Build the workspace.
colcon buildActivate the built packages in this external-node terminal:
source install/local_setup.bash
In each new terminal, source ROS first, then
~/IsaacSim-ros_workspaces/<distro>_ws/install/local_setup.bash. For source-built ROS, use itsinstall/setup.bashfor the first step.
The native Jazzy workspace uses Python 3.12 and can also be sourced in the simulator terminal.
Alternative: build external packages with source-built Jazzy
Complete the linked native Jazzy source installation first. This uses native Python 3.10 for external nodes, separately from the simulator’s Python 3.12 build.
Build this workspace only for tutorials or packages you need. In the sourced external-node terminal:
Install the build tools.
sudo apt install python3-rosdep python3-colcon-common-extensions build-essential
Prepare rosdep. Run this initialization only if rosdep has not already been initialized:
sudo rosdep init
Update the dependency database, including when initialization was already done:
rosdep updateGet the workspace. For a new clone:
git clone --branch IsaacSim-6.2.0 --recurse-submodules https://github.com/isaac-sim/IsaacSim-ros_workspaces.git ~/IsaacSim-ros_workspaces
If you already have the repository, follow Reuse an existing workspace clone instead of cloning again.
Install package dependencies. Enter the workspace for the ROS distro sourced above:
cd ~/IsaacSim-ros_workspaces/${ROS_DISTRO}_ws
For custom interfaces, add your packages to
srcbefore installing dependencies and building.rosdep install --from-paths src --ignore-src --rosdistro "$ROS_DISTRO" -y
Build the workspace.
colcon buildActivate the built packages in this external-node terminal:
source install/local_setup.bash
In each new terminal, source ROS first, then
~/IsaacSim-ros_workspaces/<distro>_ws/install/local_setup.bash. For source-built ROS, use itsinstall/setup.bashfor the first step.
After this native build, skip the Docker procedure below. For default interfaces, continue to Launch the simulator; for custom interfaces, also complete Build simulator interfaces with Python 3.12 (x86_64) for the simulator.
Build external Jazzy nodes in Docker
Use this container for external Jazzy nodes on Ubuntu 22.04 unless you chose the native source-build alternative above. Skip this external-node build if you only need the custom Python 3.12 simulator interfaces below.
Install Docker Engine and configure Docker access for your account. Clone on the host if needed:
git clone --branch IsaacSim-6.2.0 --recurse-submodules https://github.com/isaac-sim/IsaacSim-ros_workspaces.git ~/IsaacSim-ros_workspaces
For an existing clone, follow Reuse an existing workspace clone on the host before mounting it. First configure Configure Fast DDS over UDP, then configure the host simulator for the same distro, domain, and transport. This container runs external nodes, not the simulator or custom-interface build. The WSL Docker workflow is not supported by this guide.
ros_distro=humble
ros_image=osrf/ros:humble-desktop
ros_distro=jazzy
ros_image=osrf/ros:jazzy-desktop
For aarch64 (DGX Spark), use ros_image=arm64v8/ros:jazzy instead.
Optional GUI applications in the container
This requires a working host X11/XWayland display and socket.
Before starting the container: run
xhost +si:localuser:rooton the host. Add-e DISPLAY -v /tmp/.X11-unix:/tmp/.X11-unix:rwbefore the image name in thedocker runcommand below.Inside the container: install
ros-${ROS_DISTRO}-rviz2if needed, source ROS, and runrviz2.After closing GUI apps: revoke display access on the host with
xhost -si:localuser:root.
Start the container from the host terminal. The mounts share your workspace and UDP profile with the container:
docker run -it --net=host --name ros_ws_docker \
  -e ROS_DOMAIN_ID=0 -e RMW_IMPLEMENTATION=rmw_fastrtps_cpp \
  -e FASTRTPS_DEFAULT_PROFILES_FILE=/fastdds.xml \
  -v "$HOME/.ros/fastdds.xml:/fastdds.xml:ro" \
  -v "$HOME/IsaacSim-ros_workspaces/${ros_distro}_ws:/${ros_distro}_ws" \
  "$ros_image" /bin/bash
In the container shell:
Activate ROS and enter the mounted workspace. Add any custom packages to its
srcdirectory before installing dependencies:source /opt/ros/$ROS_DISTRO/setup.bash cd /${ROS_DISTRO}_ws
Install the build tools.
apt-get update
apt-get install -y python3-rosdep python3-colcon-common-extensions build-essential
Prepare rosdep. If it has not already been initialized in this container, run:
rosdep initRefresh the dependency database:
rosdep updateInstall workspace dependencies.
rosdep install --from-paths src --ignore-src --rosdistro "$ROS_DISTRO" -y
Build the workspace.
colcon buildActivate the built packages in this container shell:
source install/local_setup.bash
Open additional shells with docker exec -it ros_ws_docker /bin/bash, then source
both /opt/ros/$ROS_DISTRO/setup.bash and /${ROS_DISTRO}_ws/install/local_setup.bash.
Verify with ros2 topic echo /clock while the simulator publishes.
See Reuse or save a ROS container to reopen or save this container.
Build simulator interfaces with Python 3.12 (x86_64)
With Docker Engine installed and
usable by your account, clone the workspace recursively
if needed and place custom packages under humble_ws/src. From the repository root:
cd ~/IsaacSim-ros_workspaces
./build_ros.sh -d humble -v 22.04
This produces both a Python 3.12 ROS installation and the custom workspace for the simulator. External nodes keep their separate native/container build.
Build simulator interfaces with Python 3.12 (x86_64)
With Docker Engine installed and
usable by your account, clone the workspace recursively
if needed and place custom packages under jazzy_ws/src. From the repository root:
cd ~/IsaacSim-ros_workspaces
./build_ros.sh -d jazzy -v 22.04
This produces both a Python 3.12 ROS installation and the custom workspace for the simulator. External nodes keep their separate native/container build.
In Command Prompt, clone to a short path to avoid Windows path-length failures:
git clone --branch IsaacSim-6.2.0 --recurse-submodules https://github.com/isaac-sim/IsaacSim-ros_workspaces.git C:\IsaacSim-ros_workspaces
cd /d C:\IsaacSim-ros_workspaces\jazzy_ws
In pixi.toml, set isaac_sim_package_path under [target.win.activation] to
your Isaac Sim binary installation or source build (default C:\isaacsim), then install the environment:
pixi install
Add custom packages to jazzy_ws/src before building. If they introduce
dependencies, update the manifest using the maintenance steps below, then run
pixi install again.
Build the workspace with the configured colcon build --merge-install task:
pixi run build
Subsequent pixi run or pixi shell
commands activate ROS and the built workspace automatically.
Optional: install Isaac Sim Python packages in Pixi
From jazzy_ws, install into Pixi’s Python environment:
pixi run python -m pip install "isaacsim[all,extscache,ros2]==6.2.0.0" --extra-index-url https://pypi.nvidia.com
This is not recorded in pixi.toml or pixi.lock; repeat it if you recreate
the environment. The sim task still launches the local installation configured
above. See Install Isaac Sim using PIP for Python-package usage.
Pixi maintenance and troubleshooting
Build fails: run
pixi installand resolve any errors, then runpixi run cleanfollowed bypixi run build.Add package.xml dependencies: run
pixi ros init --distro jazzy. Review the regenerated manifest to preserve Isaac Sim tasks and activation settings, then runpixi installand rebuild.Add packages directly: use
pixi add <package>for conda packages orpixi add --pypi <package>for PyPI.Unresolved dependencies / # NOT FOUND: check the names in
package.xml. Add a channel that supplies the package withpixi workspace channel add <channel-url>, or regenerate withpixi ros init --distro jazzy --channel <channel-url>. If appropriate, use the PyPI package instead or contribute the missing ROS package to RoboStack.ros2 command not found: use
pixi run ros2 ...or enterpixi shellbefore running ROS commands.Active ROS environment detected: start a clean terminal without manually sourced ROS or ROS environment overrides. Pixi manages activation itself.
Logger symlink warning (WinError 1314): a log-symlink privilege warning is harmless. Enable Windows Developer Mode to allow symlink creation without elevation.
See the Pixi channel command for channel configuration.
Included ROS packages
See the Humble packages and Jazzy packages. The sample packages include:
carter_navigationandiw_hub_navigation: robot navigation launch files and parameters.cmdvel_to_ackermann: Twist-to-Ackermann command conversion.custom_message: sample custom message interface.h1_fullbody_controller: H1 full-body controller launch files, parameters, and scripts.isaac_compressed_image_decoder: H.264/HEVC compressed image decoding to ROS images.isaac_moveit: MoveIt integration launch files and parameters.isaac_ros_navigation_goal: random or user-defined navigation goals.isaac_ros2_messages: services for poses, prims, and attributes.isaacsim_bringup: launch Isaac Sim as a ROS 2 node.isaac_tutorials: tutorial launch files, RViz configurations, and scripts.
The workspace dependency steps above install vision_msgs_package for bounding boxes and ackermann_msgs_package for Ackermann steering through rosdep or Pixi. No separate package installation is needed when using the tutorial workspace.
Launch the simulator#
Open a separate, clean simulator terminal with ROS_DISTRO unset.
For remote/container nodes, configure Configure Fast DDS over UDP first.
Do not source an incompatible Python 3.10 environment into this terminal.
If you built custom packages, activate the compatible Python 3.12 workspace first:
source /opt/ros/jazzy/setup.bash
source ~/IsaacSim-ros_workspaces/jazzy_ws/install/local_setup.bash
Launch Isaac Sim in this terminal; adjust ~/isaacsim if installed elsewhere.
Without a sourced ROS environment, the launcher
selects the bundled libraries; otherwise it preserves your environment:
~/isaacsim/isaac-sim.sh
Open a separate, clean simulator terminal with ROS_DISTRO unset.
Do not source an incompatible Python 3.10 environment into this terminal.
For remote/container nodes, configure Configure Fast DDS over UDP first.
Adjust the installation path if needed:
~/isaacsim/isaac-sim.sh
The launcher selects bundled Humble, Fast DDS, and the ROS bridge.
Ubuntu 22.04 defaults to Humble. In a fresh simulator terminal, select both the
Jazzy distro and bundled library path before launch. Set the library path once per
terminal; setting only ROS_DISTRO prevents automatic bundled-library setup.
For Docker nodes, configure Configure Fast DDS over UDP before launching.
Configure the simulator environment:
export isaac_sim_package_path="$HOME/isaacsim"
export ROS_DISTRO=jazzy
export RMW_IMPLEMENTATION=rmw_fastrtps_cpp
export LD_LIBRARY_PATH="$isaac_sim_package_path/exts/isaacsim.ros2.core/jazzy/lib${LD_LIBRARY_PATH:+:$LD_LIBRARY_PATH}"
Launch Isaac Sim in the same terminal:
"$isaac_sim_package_path/isaac-sim.sh"
Configure Configure Fast DDS over UDP first for remote/container nodes. Use a clean simulator terminal. Do not add bundled-library overrides or source Ubuntu 24.04 container binaries on the Ubuntu 22.04 host.
Activate the Python 3.12 build. Source ROS first, then the custom workspace:
cd ~/IsaacSim-ros_workspaces
source build_ws/humble/humble_ws/install/local_setup.bash
source build_ws/humble/isaac_sim_ros_ws/install/local_setup.bash
Launch Isaac Sim in the same terminal:
~/isaacsim/isaac-sim.sh
Configure Configure Fast DDS over UDP first for remote/container nodes. Use a clean simulator terminal. Do not add bundled-library overrides or source Ubuntu 24.04 container binaries on the Ubuntu 22.04 host.
Activate the Python 3.12 build. Source ROS first, then the custom workspace:
cd ~/IsaacSim-ros_workspaces
source build_ws/jazzy/jazzy_ws/install/local_setup.bash
source build_ws/jazzy/isaac_sim_ros_ws/install/local_setup.bash
Launch Isaac Sim in the same terminal:
~/isaacsim/isaac-sim.sh
Open three Command Prompt terminals in C:\IsaacSim-ros_workspaces\jazzy_ws.
Terminal 1 — start the Zenoh router. Leave it running:
pixi run zenoh
Terminal 2 — launch Isaac Sim. The sim task enables the bridge in your
configured local installation. Leave it running:
pixi run sim
Terminal 3 — run external nodes. Use pixi run ros2 commands for the verification below.
For Windows and WSL on the same machine, use WSL’s default NAT networking with explicit DDS peers. TCP port forwarding does not carry DDS UDP.
In WSL, find the Windows host address (the default gateway) and WSL’s IPv4 address on
eth0(omit the/prefixsuffix):ip -4 route show default ip -4 -brief address show eth0
Configure Configure Fast DDS over UDP in WSL. Replace the two address placeholders in the WSL profile below, then copy it to
C:\ros\fastdds.xmlon Windows, creating the directory if needed. Recheck the addresses after restarting WSL and update both copies if they change.In Administrator PowerShell, allow inbound UDP for the simulator. Adjust the executable path; for standalone Python, use
kit\python\kit.exe. Resolve any existing firewall Block rule for that executable first; block rules override allow rules.New-NetFirewallRule -DisplayName "Isaac Sim ROS UDP" -Direction Inbound -Action Allow -Protocol UDP -Program "C:\isaacsim\kit\kit.exe"
On Windows 11, also allow DDS through the WSL Hyper-V firewall for
ROS_DOMAIN_ID=0:New-NetFirewallHyperVRule -Name "IsaacSim-WSL-DDS" -DisplayName "Isaac Sim WSL DDS" -Direction Inbound -VMCreatorId '{40E0AC32-46A5-438A-A0B2-2B479E8F2E90}' -Protocol UDP -LocalPorts 7400-7649
This range covers the first 120 DDS participants. For another domain ID, add
250 * ROS_DOMAIN_IDto both port limits.
Use a fresh Windows Command Prompt or PowerShell terminal. Adjust the installation path below and set PATH once per terminal. These settings override the Windows Jazzy/Zenoh default.
Configure the Windows bridge environment:
set "isaac_sim_package_path=C:\isaacsim"
set "ROS_DISTRO=humble"
set "RMW_IMPLEMENTATION=rmw_fastrtps_cpp"
set "ROS_DOMAIN_ID=0"
set "FASTRTPS_DEFAULT_PROFILES_FILE=C:\ros\fastdds.xml"
set "PATH=%isaac_sim_package_path%\exts\isaacsim.ros2.core\%ROS_DISTRO%\lib;%PATH%"
Launch Isaac Sim in the same terminal:
"%isaac_sim_package_path%\isaac-sim.bat" --/isaac/startup/ros_bridge_extension=isaacsim.ros2.bridge
Configure the Windows bridge environment:
$env:isaac_sim_package_path = "C:\isaacsim"
$env:ROS_DISTRO = "humble"
$env:RMW_IMPLEMENTATION = "rmw_fastrtps_cpp"
$env:ROS_DOMAIN_ID = "0"
$env:FASTRTPS_DEFAULT_PROFILES_FILE = "C:\ros\fastdds.xml"
$env:PATH = "$env:isaac_sim_package_path\exts\isaacsim.ros2.core\$env:ROS_DISTRO\lib;$env:PATH"
Launch Isaac Sim in the same terminal:
& "$env:isaac_sim_package_path\isaac-sim.bat" --/isaac/startup/ros_bridge_extension=isaacsim.ros2.bridge
Configure the Windows bridge environment:
set "isaac_sim_package_path=C:\isaacsim"
set "ROS_DISTRO=jazzy"
set "RMW_IMPLEMENTATION=rmw_fastrtps_cpp"
set "ROS_DOMAIN_ID=0"
set "FASTRTPS_DEFAULT_PROFILES_FILE=C:\ros\fastdds.xml"
set "PATH=%isaac_sim_package_path%\exts\isaacsim.ros2.core\%ROS_DISTRO%\lib;%PATH%"
Launch Isaac Sim in the same terminal:
"%isaac_sim_package_path%\isaac-sim.bat" --/isaac/startup/ros_bridge_extension=isaacsim.ros2.bridge
Configure the Windows bridge environment:
$env:isaac_sim_package_path = "C:\isaacsim"
$env:ROS_DISTRO = "jazzy"
$env:RMW_IMPLEMENTATION = "rmw_fastrtps_cpp"
$env:ROS_DOMAIN_ID = "0"
$env:FASTRTPS_DEFAULT_PROFILES_FILE = "C:\ros\fastdds.xml"
$env:PATH = "$env:isaac_sim_package_path\exts\isaacsim.ros2.core\$env:ROS_DISTRO\lib;$env:PATH"
Launch Isaac Sim in the same terminal:
& "$env:isaac_sim_package_path\isaac-sim.bat" --/isaac/startup/ros_bridge_extension=isaacsim.ros2.bridge
Verify the connection#
In the simulator, choose Tools > Robotics > ROS 2 OmniGraphs > Clock > OK.
Press Play.
In the external-node terminal, echo
/clockusing the selected workflow below. Timestamps confirm publication. Use the same middleware andROS_DOMAIN_IDfor all participants, including any explicit ROS 2 Context node domain. The examples use domain0; choose another domain if needed and set the same value everywhere.
ros2 topic echo /clock
ros2 topic echo /clock
ros2 topic echo /clock
pixi run ros2 topic echo /clock
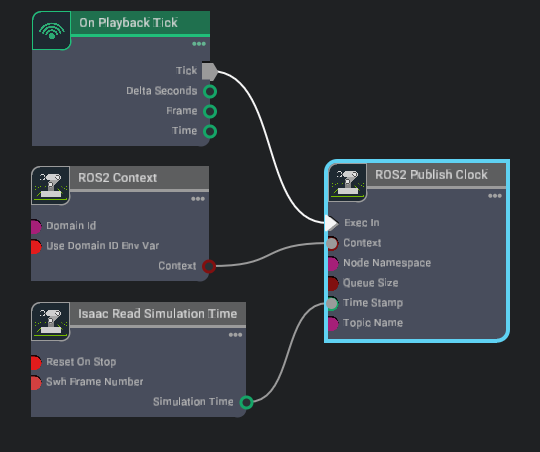
Example OmniGraph for publishing simulation time on /clock.#
See Isaac Sim OmniGraph Tutorial for working with ROS 2 OmniGraphs.
Additional options#
Reuse an existing workspace clone
Preserve any local work before switching releases. From the repository root,
check git status. Use a separate clone if you need to keep another release’s
build or local changes.
Fetch tags and select the release matching these docs:
git fetch --tags
git switch --detach IsaacSim-6.2.0
Initialize the selected release’s submodules before building (on the host for Docker):
git submodule update --init --recursive
Rebuild for the selected release; do not reuse incompatible build, install,
and log outputs. On Windows/Pixi, run pixi install, pixi run clean, then
pixi run build from the selected workspace. For colcon builds, move the old build
directories aside or use a fresh clone before rebuilding.
Standalone Python scripts
Scripts must enable isaacsim.ros2.bridge and update the application before
importing generated custom interfaces.
Use the simulator environment configured above and replace the app command with:
~/isaacsim/python.sh <path/to/standalone/script.py>
Use the simulator environment configured above and replace the app command with:
~/isaacsim/python.sh <path/to/standalone/script.py>
Keep the Zenoh router running. Open a clean terminal outside Pixi with
ROS_DISTRO unset. Activate only local_setup for custom packages; setup
would also import Pixi’s underlay. Skip activation if no custom packages are needed.
Adjust the workspace and simulator paths if necessary.
Activate custom packages, if needed:
call "C:\IsaacSim-ros_workspaces\jazzy_ws\install\local_setup.bat"
Run the script with the bundled launcher:
"C:\isaacsim\python.bat" "<standalone-script.py>"
Activate custom packages, if needed:
. "C:\IsaacSim-ros_workspaces\jazzy_ws\install\local_setup.ps1"
Run the script with the bundled launcher:
& "C:\isaacsim\python.bat" "<standalone-script.py>"
The launcher supplies bundled Jazzy/Zenoh, libraries, and package index when
ROS_DISTRO is unset; explicit settings are preserved.
In the configured Windows simulator terminal, keep the selected distro, library path, and Fast DDS settings. Replace the app command with:
"%isaac_sim_package_path%\python.bat" "<standalone-script.py>"
& "$env:isaac_sim_package_path\python.bat" "<standalone-script.py>"
Fast DDS networking for remote nodes and containers
Configure Fast DDS over UDP
Local native ROS nodes on the same Linux host normally need no extra network setup.
Single-host Linux uses Fast DDS shared memory by default. For remote machines,
containers, or WSL, allow DDS UDP traffic and create ~/.ros/fastdds.xml
(mkdir -p ~/.ros) with:
<?xml version="1.0" encoding="UTF-8"?>
<profiles xmlns="http://www.eprosima.com/XMLSchemas/fastRTPS_Profiles">
  <transport_descriptors>
    <transport_descriptor>
      <transport_id>UdpTransport</transport_id>
      <type>UDPv4</type>
    </transport_descriptor>
  </transport_descriptors>
  <participant profile_name="udp_transport_profile" is_default_profile="true">
    <rtps>
      <userTransports><transport_id>UdpTransport</transport_id></userTransports>
      <useBuiltinTransports>false</useBuiltinTransports>
    </rtps>
  </participant>
</profiles>
Before launching nodes, set these in every communicating Linux terminal:
export RMW_IMPLEMENTATION=rmw_fastrtps_cpp
export FASTRTPS_DEFAULT_PROFILES_FILE="$HOME/.ros/fastdds.xml"
export ROS_DOMAIN_ID=0
Copy the profile to each machine and use its local path. Windows bridge settings are in Launch the simulator.
Single-host Linux uses Fast DDS shared memory by default. For remote machines,
containers, or WSL, allow DDS UDP traffic and create ~/.ros/fastdds.xml
(mkdir -p ~/.ros) with:
<?xml version="1.0" encoding="UTF-8"?>
<profiles xmlns="http://www.eprosima.com/XMLSchemas/fastRTPS_Profiles">
  <transport_descriptors>
    <transport_descriptor>
      <transport_id>UdpTransport</transport_id>
      <type>UDPv4</type>
    </transport_descriptor>
  </transport_descriptors>
  <participant profile_name="udp_transport_profile" is_default_profile="true">
    <rtps>
      <userTransports><transport_id>UdpTransport</transport_id></userTransports>
      <useBuiltinTransports>false</useBuiltinTransports>
    </rtps>
  </participant>
</profiles>
Before launching nodes, set these in every communicating Linux terminal:
export RMW_IMPLEMENTATION=rmw_fastrtps_cpp
export FASTRTPS_DEFAULT_PROFILES_FILE="$HOME/.ros/fastdds.xml"
export ROS_DOMAIN_ID=0
Copy the profile to each machine and use its local path. Windows bridge settings are in Launch the simulator.
For Windows and WSL on the same machine, create ~/.ros/fastdds.xml
in WSL (mkdir -p ~/.ros). Replace WINDOWS_HOST_IP and WSL_IP
with the NAT addresses from Launch the simulator:
<?xml version="1.0" encoding="UTF-8"?>
<profiles xmlns="http://www.eprosima.com/XMLSchemas/fastRTPS_Profiles">
  <transport_descriptors>
    <transport_descriptor>
      <transport_id>UdpTransport</transport_id>
      <type>UDPv4</type>
      <maxInitialPeersRange>120</maxInitialPeersRange>
    </transport_descriptor>
  </transport_descriptors>
  <participant profile_name="udp_transport_profile" is_default_profile="true">
    <rtps>
      <builtin>
        <initialPeersList>
          <locator><udpv4><address>WINDOWS_HOST_IP</address></udpv4></locator>
          <locator><udpv4><address>WSL_IP</address></udpv4></locator>
        </initialPeersList>
      </builtin>
      <userTransports><transport_id>UdpTransport</transport_id></userTransports>
      <useBuiltinTransports>false</useBuiltinTransports>
    </rtps>
  </participant>
</profiles>
Before launching nodes, set these in every communicating Linux terminal:
export RMW_IMPLEMENTATION=rmw_fastrtps_cpp
export FASTRTPS_DEFAULT_PROFILES_FILE="$HOME/.ros/fastdds.xml"
export ROS_DOMAIN_ID=0
Copy the profile to each machine and use its local path. Windows bridge settings are in Launch the simulator.
External ROS nodes in Docker
Follow Build external Jazzy nodes in Docker in the workspace build steps above.
Install Docker Engine and configure Docker access for your account. Clone on the host if needed:
git clone --branch IsaacSim-6.2.0 --recurse-submodules https://github.com/isaac-sim/IsaacSim-ros_workspaces.git ~/IsaacSim-ros_workspaces
For an existing clone, follow Reuse an existing workspace clone on the host before mounting it. First configure Configure Fast DDS over UDP, then configure the host simulator for the same distro, domain, and transport. This container runs external nodes, not the simulator or custom-interface build. The WSL Docker workflow is not supported by this guide.
ros_distro=humble
ros_image=osrf/ros:humble-desktop
ros_distro=jazzy
ros_image=osrf/ros:jazzy-desktop
For aarch64 (DGX Spark), use ros_image=arm64v8/ros:jazzy instead.
Optional GUI applications in the container
This requires a working host X11/XWayland display and socket.
Before starting the container: run
xhost +si:localuser:rooton the host. Add-e DISPLAY -v /tmp/.X11-unix:/tmp/.X11-unix:rwbefore the image name in thedocker runcommand below.Inside the container: install
ros-${ROS_DISTRO}-rviz2if needed, source ROS, and runrviz2.After closing GUI apps: revoke display access on the host with
xhost -si:localuser:root.
Start the container from the host terminal. The mounts share your workspace and UDP profile with the container:
docker run -it --net=host --name ros_ws_docker \
  -e ROS_DOMAIN_ID=0 -e RMW_IMPLEMENTATION=rmw_fastrtps_cpp \
  -e FASTRTPS_DEFAULT_PROFILES_FILE=/fastdds.xml \
  -v "$HOME/.ros/fastdds.xml:/fastdds.xml:ro" \
  -v "$HOME/IsaacSim-ros_workspaces/${ros_distro}_ws:/${ros_distro}_ws" \
  "$ros_image" /bin/bash
In the container shell:
Activate ROS and enter the mounted workspace. Add any custom packages to its
srcdirectory before installing dependencies:source /opt/ros/$ROS_DISTRO/setup.bash cd /${ROS_DISTRO}_ws
Install the build tools.
apt-get update
apt-get install -y python3-rosdep python3-colcon-common-extensions build-essential
Prepare rosdep. If it has not already been initialized in this container, run:
rosdep initRefresh the dependency database:
rosdep updateInstall workspace dependencies.
rosdep install --from-paths src --ignore-src --rosdistro "$ROS_DISTRO" -y
Build the workspace.
colcon buildActivate the built packages in this container shell:
source install/local_setup.bash
Open additional shells with docker exec -it ros_ws_docker /bin/bash, then source
both /opt/ros/$ROS_DISTRO/setup.bash and /${ROS_DISTRO}_ws/install/local_setup.bash.
Verify with ros2 topic echo /clock while the simulator publishes.
See Reuse or save a ROS container to reopen or save this container.
Install Docker Engine and configure Docker access for your account. Clone on the host if needed:
git clone --branch IsaacSim-6.2.0 --recurse-submodules https://github.com/isaac-sim/IsaacSim-ros_workspaces.git ~/IsaacSim-ros_workspaces
For an existing clone, follow Reuse an existing workspace clone on the host before mounting it. First configure Configure Fast DDS over UDP, then configure the host simulator for the same distro, domain, and transport. This container runs external nodes, not the simulator or custom-interface build. The WSL Docker workflow is not supported by this guide.
ros_distro=humble
ros_image=osrf/ros:humble-desktop
ros_distro=jazzy
ros_image=osrf/ros:jazzy-desktop
For aarch64 (DGX Spark), use ros_image=arm64v8/ros:jazzy instead.
Optional GUI applications in the container
This requires a working host X11/XWayland display and socket.
Before starting the container: run
xhost +si:localuser:rooton the host. Add-e DISPLAY -v /tmp/.X11-unix:/tmp/.X11-unix:rwbefore the image name in thedocker runcommand below.Inside the container: install
ros-${ROS_DISTRO}-rviz2if needed, source ROS, and runrviz2.After closing GUI apps: revoke display access on the host with
xhost -si:localuser:root.
Start the container from the host terminal. The mounts share your workspace and UDP profile with the container:
docker run -it --net=host --name ros_ws_docker \
  -e ROS_DOMAIN_ID=0 -e RMW_IMPLEMENTATION=rmw_fastrtps_cpp \
  -e FASTRTPS_DEFAULT_PROFILES_FILE=/fastdds.xml \
  -v "$HOME/.ros/fastdds.xml:/fastdds.xml:ro" \
  -v "$HOME/IsaacSim-ros_workspaces/${ros_distro}_ws:/${ros_distro}_ws" \
  "$ros_image" /bin/bash
In the container shell:
Activate ROS and enter the mounted workspace. Add any custom packages to its
srcdirectory before installing dependencies:source /opt/ros/$ROS_DISTRO/setup.bash cd /${ROS_DISTRO}_ws
Install the build tools.
apt-get update
apt-get install -y python3-rosdep python3-colcon-common-extensions build-essential
Prepare rosdep. If it has not already been initialized in this container, run:
rosdep initRefresh the dependency database:
rosdep updateInstall workspace dependencies.
rosdep install --from-paths src --ignore-src --rosdistro "$ROS_DISTRO" -y
Build the workspace.
colcon buildActivate the built packages in this container shell:
source install/local_setup.bash
Open additional shells with docker exec -it ros_ws_docker /bin/bash, then source
both /opt/ros/$ROS_DISTRO/setup.bash and /${ROS_DISTRO}_ws/install/local_setup.bash.
Verify with ros2 topic echo /clock while the simulator publishes.
See Reuse or save a ROS container to reopen or save this container.
Reuse or save a ROS container
Resume the existing container. After exiting its shell, restart it from the host:
docker start -ai ros_ws_docker
If it is already running, open another shell with
docker exec -it ros_ws_docker /bin/bash. Do not repeat docker run with the
same name while that container exists.
In every new container shell, source ROS, then the mounted workspace:
source /opt/ros/$ROS_DISTRO/setup.bash
source /${ROS_DISTRO}_ws/install/local_setup.bash
Save installed dependencies as an image (optional). Exit the container shell so it stops, then run these commands on the host:
docker commit ros_ws_docker isaac_sim_ros_ws:latest
The image excludes bind-mounted files. Keep the host workspace and Fast DDS profile: they are still required when you reuse the image.
To replace the stopped container with one from the saved image, remove it:
docker rm ros_ws_docker
In the host terminal, set the distro and image variables from the selected Docker setup, then override the image:
ros_image=isaac_sim_ros_ws:latest
Repeat the selected Docker setup’s docker run command
with the same workspace/profile mounts
and network settings. Source ROS and the workspace in the new shell as above.
Cyclone DDS
Bundled Humble/Jazzy libraries include Cyclone DDS. Install it for external ROS
using the official Humble
or Jazzy instructions.
Set export RMW_IMPLEMENTATION=rmw_cyclonedds_cpp in all participating terminals
and restart nodes.
Bundled Humble/Jazzy libraries include Cyclone DDS. Install it for external ROS
using the official Humble
or Jazzy instructions.
Set export RMW_IMPLEMENTATION=rmw_cyclonedds_cpp in all participating terminals
and restart nodes.
Cyclone DDS is not supported for Windows WSL. The documented Pixi workflow uses Zenoh.
Zenoh
Pixi already configures Zenoh. Use Launch the simulator or the standalone instructions.
Zenoh in Windows WSL is untested; use Fast DDS.
Zenoh with Humble on Ubuntu 22.04 is untested; use Fast DDS or Cyclone DDS.
Linux bundled libraries do not include Zenoh; install or build it. See the ROS Zenoh reference.
Install Zenoh for the system ROS installation:
sudo apt install ros-jazzy-rmw-zenoh-cpp
Router terminal: source ROS and start the router. Leave it running:
source /opt/ros/jazzy/setup.bash
ros2 run rmw_zenoh_cpp rmw_zenohd
Simulator terminal: activate ROS and select Zenoh:
source /opt/ros/jazzy/setup.bash
export RMW_IMPLEMENTATION=rmw_zenoh_cpp
Launch Isaac Sim in that terminal:
~/isaacsim/isaac-sim.sh
External-node terminals: use the same ROS setup script and RMW setting before starting nodes.
Linux bundled libraries do not include Zenoh; install or build it. See the ROS Zenoh reference.
Ubuntu 22.04/Jazzy (untested): add Zenoh to the Python 3.12 build:
cd ~/IsaacSim-ros_workspaces/jazzy_ws/src
git clone -b jazzy https://github.com/ros2/rmw_zenoh.git
Rebuild the Python 3.12 environment on the host:
cd ~/IsaacSim-ros_workspaces
./build_ros.sh -d jazzy -v 22.04
Container setup: install Zenoh in the Jazzy container:
apt-get update
apt-get install -y ros-jazzy-rmw-zenoh-cpp
Router terminal (container): start the router and leave it running:
source /opt/ros/jazzy/setup.bash
ros2 run rmw_zenoh_cpp rmw_zenohd
Simulator terminal (host): open a clean terminal and activate the Python 3.12 build with Zenoh:
cd ~/IsaacSim-ros_workspaces
source build_ws/jazzy/jazzy_ws/install/local_setup.bash
source build_ws/jazzy/isaac_sim_ros_ws/install/local_setup.bash
export RMW_IMPLEMENTATION=rmw_zenoh_cpp
Launch Isaac Sim in that host terminal:
~/isaacsim/isaac-sim.sh
Additional container terminals must source ROS and the workspace and override
RMW_IMPLEMENTATION=rmw_zenoh_cpp before starting nodes.
Bridge startup and experimental distributions
Disable bridge startup with ~/isaacsim/isaac-sim.sh --/isaac/startup/ros_bridge_extension="".
Humble and Jazzy are tested. Other natively installed ROS distributions on
Ubuntu 22.04/24.04 are experimental: source a compatible environment before
launch; arbitrary distro/Python combinations are not guaranteed.
Disable bridge startup with ~/isaacsim/isaac-sim.sh --/isaac/startup/ros_bridge_extension="".
Humble and Jazzy are tested. Other natively installed ROS distributions on
Ubuntu 22.04/24.04 are experimental: source a compatible environment before
launch; arbitrary distro/Python combinations are not guaranteed.
Windows disables automatic bridge startup by default; the Pixi task and WSL commands above enable it explicitly.
For a persistent change, set isaac.startup.ros_bridge_extension = "" in
apps/isaacsim.exp.full.kit.
Next steps#
Continue to ROS 2 Reference Architecture for the bridge architecture and tutorials.