


Teleoperation Synthetic Data Generation#


Teleoperation in Isaac Sim lets you control robots with a VR headset and controllers, capture the resulting motion as demonstration data, and replay it to generate synthetic datasets for robot learning.
|
|
This tutorial covers the isaacsim.replicator.teleop and isaacsim.replicator.teleop.ui extensions. The runtime drives robot arms, grippers, floating end effectors, and mobile bases from VR controllers. The UI exposes that runtime in a Teleop window of collapsible panels. The isaacsim.replicator.episode_recorder extension handles recording, replay, and offline synthetic data generation.
Learning objectives#
After completing this tutorial, you will be able to:
Connect Isaac Sim to a CloudXR-capable VR headset through the Isaac Teleop runtime.
Configure the Floating, IK, Grasp, and Locomotion controllers from the Teleop window.
Operate a robot from VR controllers, or from on-screen markers and sliders in debug mode.
Save and reload complete teleop setups as YAML profiles.
Record teleop episodes to HDF5 with the Episode Recorder.
Distinguish HDF5 world-state replay from MCAP teleop-input replay and choose the appropriate workflow.
Replay recorded episodes through Replicator writers to generate synthetic datasets.
Getting started#
Prerequisites#
Isaac Sim built and launchable.
Isaac Teleop installed from PyPI:
python -m pip install "isaacteleop[cloudxr,retargeters]~=1.3.0"
A CloudXR-compatible VR headset on the same network as the host machine. Controller button mappings in this tutorial target the Meta Quest 3; other headsets may surface different button semantics through the same OpenXR actions.
A stage with a robot. Use one of the built-in scenario stages (for example
teleop_scenario_floating_xarm_dex3.usd) while learning the workflow.
Note
Debug mode replaces VR input with draggable USD markers and on-screen sliders. It does not require a headset, CloudXR, or the Isaac Teleop package. MCAP input replay still requires the Isaac Teleop package, but it does not require a headset or CloudXR. Skip the CloudXR steps below when using either of those modes. See Operate without VR (debug mode) and MCAP teleop-input replay.
Start CloudXR and connect the headset#
Start CloudXR in a separate terminal and keep it running:
python -m isaacteleop.cloudxr --accept-eula
Pair the headset at the Isaac Teleop Web Client.
Optional: before starting Isaac Sim from a terminal, source the env file (details):
source ~/.cloudxr/run/cloudxr.env
Running modes#
The teleop runtime works in two Isaac Sim launch configurations. Both load the Teleop UI and support every controller described in this tutorial. CloudXR must remain running in a separate terminal. Sourcing cloudxr.env only configures the process environment; it does not start the CloudXR runtime.
2D monitor (controller tracking only) — The desktop viewport renders the scene on a flat screen. Isaac Teleop creates the headless OpenXR session that supplies headset and controller tracking. Kit XR is not required, and Teleop does not require an XR profile anchor. Depth cues are harder to read on a flat monitor; use the Visual Cues panel to show drop lines from each controller down to a reference plane. This is the default mode and requires no special app:
./isaac-sim.sh
VR headset (stereo rendering) — Launches the XR VR experience app (
isaacsim.exp.base.xr.vr.kit). Kit owns the OpenXR session and theisaacsim.kit.xr.teleop.bridgeextension shares its handles with Isaac Teleop DeviceIO. The headset receives a stereo-rendered viewport for a first-person 3D view and exposes an in-headset Play / Stop UI equivalent to the desktop timeline buttons. The desktop window stays available for UI interaction:./isaac-sim.xr.vr.sh
OpenXR session ownership and anchor composition#
In the 2D monitor mode, Isaac Teleop owns its own OpenXR session. In the VR headset app, Kit XR owns the session and shares it with Isaac Teleop automatically — no extra configuration is required to switch between the two modes.
Both modes drive the same scene transform for robot targets, frame markers, and (in the VR headset app) Kit XR’s stereo rendering. Author any yaw correction between the physical space and the stage on a persistent scene Xform selected through Session > XR Anchor > Custom Anchor, not on the runtime marker hierarchy under /Teleop/Markers.
Tip
If VR controller directions in the scene do not match the physical controllers, first confirm Coordinate Frame is set to Isaac Sim (Z-up). A remaining mismatch is a scene-yaw calibration: create a persistent Xform such as /World/TeleopAnchorCorrection, author the required yaw there, and select it through Session > XR Anchor > Custom Anchor. Do not add the correction below /Teleop/Markers/TrackingOrigin because Teleop recreates that runtime hierarchy. Do not point Kit’s VR Profile directly at the correction prim; Teleop publishes the generated /World/XRAnchor that keeps rendering, markers, and robot targets registered.
Open the Teleop window#
The extensions are loaded automatically. Open the Teleop window from Tools > Replicator > Teleop:
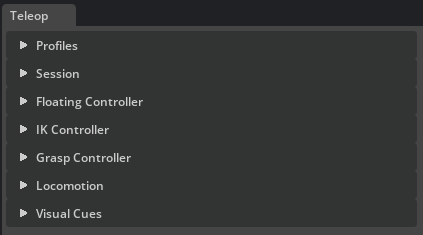
With the CloudXR runtime running and the headset connected, click Connect in the Session panel to start the teleop session.
Quick start#
Pair one of the built-in scenario stages with its matching profile, connect, and press Play. The profile resolves every controller against the stage, so no manual setup is needed.
Open one of the built-in scenario stages, for example
teleop_scenario_floating_xarm_dex3.usd.In the Teleop window’s Profiles panel, select the matching profile (
floating_xarm_dex3.yaml) and click Load. Every controller resolves against the stage and its Enable button activates.Expand Session and click Connect. Without a headset, expand Session > Debug and check Debug Mode instead.
Press Play on the timeline.
Move the VR controllers (or drag the on-screen markers in debug mode) to operate the robot.
A profile enables only the controllers its scenario needs:
Floating Controller — tracks a free rigid-body gripper or end effector to the VR controller pose.
IK Controller — drives an articulated arm through inverse kinematics so its end effector tracks the VR controller.
Grasp Controller — drives a conventional gripper from one trigger or retargets trigger and squeeze to a multi-finger hand.
Locomotion — moves the robot base or the VR origin from the thumbsticks.
For example, floating_xarm_dex3.yaml enables trigger-driven Floating, Grasp, and Locomotion controllers. Select floating_xarm_dex3_retargeted.yaml with the same stage to drive the right Dex3 index, middle, and thumb joints independently from trigger and squeeze. The IK profiles enable IK instead of Floating. See the workflow walkthrough for the detailed, step-by-step version, including recording and replay.
Overview#
The extension is split into two layers:
isaacsim.replicator.teleop— runtime that handles VR input, frame markers, and the four controllers (Floating, IK, Grasp, Locomotion), all managed byTeleopManager.isaacsim.replicator.teleop.ui— the Teleop window with collapsible panels for profiles, session setup, controller configuration, locomotion, and visual aids.
Every controller follows the same three-step lifecycle:
Apply validates the prim path and prepares the controller resources.
Enable arms the controller for the next Play.
Clear tears down the resources but keeps the prim path for quick reconfiguration.
Controllers are only active while the timeline is playing and deactivate automatically on Stop. Gains, rotation offsets, and speed sliders are live-editable during Play and persist across sessions. The complete state of every panel can be saved to a YAML profile from the Profiles panel.
The Episode Recorder window handles recording and replay. While a TeleopManager is alive, sessions opened from that window automatically capture teleop controller, aim-pose, and head-pose channels in addition to the articulation, rigid-body, and Xform channels selected in the UI. The recorded HDF5 files feed the offline synthetic-data pipeline. For scripted workflows, build_teleop_recorder returns an equivalent recorder preconfigured with both teleop and scene recordables.
There are two independent replay paths. The Episode Recorder replays HDF5 world state without stepping physics; this is the reproducible path for inspection and synthetic data generation. The teleop runtime can instead read an Isaac Teleop MCAP as its input source and run the configured controllers again. MCAP input replay is intended for input-pipeline testing and re-simulation, not bit-exact trajectory reproduction.
UI window overview#
The Teleop window contains collapsible panels, described below from top to bottom. The separate Episode Recorder window handles recording and replay; see Record and replay.
Profiles#
The Profiles panel saves and restores the complete state of every other panel as a single YAML file.
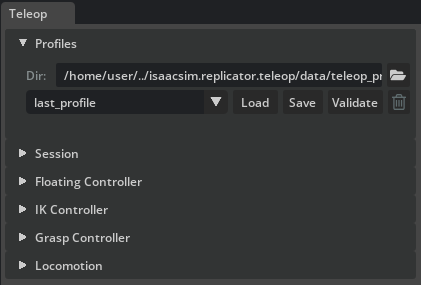
Dir — working directory for teleop profile files. Defaults to the built-in profiles shipped with the extension. Click the folder icon to browse for a custom directory.
Profile dropdown — lists all
.yamlfiles found in the working directory.Load — reads the selected profile and applies it to all panels. If the stage contains the referenced prims, controllers are resolved immediately; otherwise the UI fields are populated and unresolved paths are reported.
Save — opens an inline Name field and Confirm button. Enter a filename (without
.yaml) and click Confirm to write the current panel state to disk. If a file with that name already exists, an Overwrite profile dialog asks for confirmation; click Overwrite to replace it or Cancel to keep the existing file.Validate — checks all panel settings against the current stage and reports error and warning counts in the status line. For retargeted grasp, validation checks the retargeter kind and resolves every semantic alias through the grasp config to a controllable USD joint. Detailed issues are printed to the console.
Delete (trash icon) — permanently removes the selected profile file from disk.
Session#
The Session panel manages the VR connection, frame markers, the XR Anchor (custom-anchor prim plus headset offset and rotation), and the debug controls.
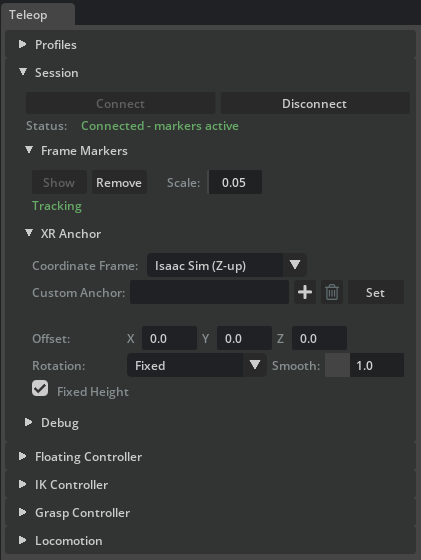
Connection#
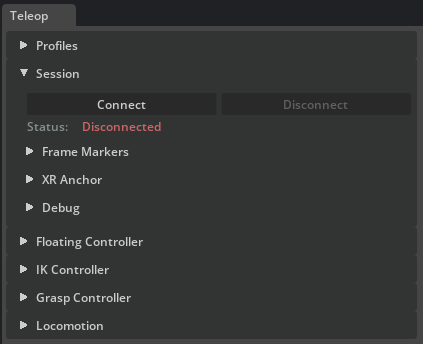
Connect / Disconnect — establishes or tears down the OpenXR teleop session. Requires CloudXR running in a separate terminal.
Status — displays the current connection state: red (Disconnected), green (Connected - markers active), or yellow (intermediate states such as No data).
Frame Markers#
The Frame Markers sub-section shows the live VR poses as four frame-axis prims under /Teleop/Markers/TrackingOrigin — the origin, Left, Right, and Head. Markers are created automatically on Connect and on enabling Debug Mode; you can also create or remove them manually here.
Show — creates the four frame-axis markers and begins streaming VR poses to them.
Remove — deletes the markers and stops tracking.
Scale — adjusts the visual axis length of every marker.
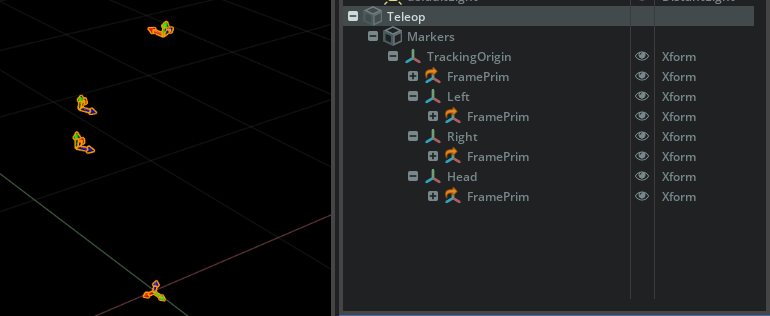
XR Anchor#
The XR Anchor sub-panel keeps frame markers and teleop pose tracking on one resolved scene transform, and publishes that transform to Kit XR when stereo rendering is active. Custom Anchor selects the read-only scene prim used as the reference by teleop pose composition, XR rendering, and locomotion. The offset, rotation, smoothing, and fixed-height controls are applied once to that shared transform, while Coordinate Frame converts incoming head and controller poses before teleop applies it. The naming mirrors Kit’s VR Profile menu, where the rendering anchor appears under Navigation Settings > Physical World USD Anchor > Custom USD Anchor.
Coordinate Frame — selects how incoming VR poses are converted:
Isaac Sim (Z-up) — applies a Y-up to Z-up rotation so poses match the Isaac Sim stage convention (default).
Raw (no conversion) — passes poses through unchanged.
Custom Anchor — scene prim that the VR headset, controllers, markers, and robot targets are anchored to. Click Set to validate the path and start live every-frame following of the prim’s world transform. Teleop reads this prim without rewriting its xform stack. After a custom path is active, the same row button changes to Clear. Clear reverts to the built-in origin marker under
/Teleop/Markers/; the typed path is preserved in the field. To retarget an active anchor, click Clear, edit the path if needed, and click Set again. Use the bin glyph in the row to clear the field text. Paths under the reserved/Teleop/Markers/namespace fall back to the built-in origin on Set.Offset — position offset in metres for the shared tracking origin (one row with X, Y, and Z fields). Without a Custom Anchor this places the built-in origin at an absolute world position. With a Custom Anchor, the offset is expressed in the resolved anchor’s local axes.
Rotation — how the shared tracking origin’s yaw uses the Custom Anchor prim:
Fixed — captures and holds the prim’s initial absolute yaw. This preserves an authored alignment correction while ignoring later prim turns.
Follow Prim — follows the prim’s current absolute yaw; roll and pitch are stripped to avoid VR discomfort.
Follow (Smoothed) — follows the current yaw with slerp damping.
Smooth — slerp time constant in seconds, used only in Smoothed mode. Lower values give snappier tracking; higher values are smoother.
Fixed Height — locks the final shared anchor Z to its initial value, preventing vertical bobbing while keeping rendered controllers, frame markers, and robot targets registered.
Note
In the stereo VR experience, the Teleop window temporarily owns Kit’s XR profile anchor settings under VR Profile > Navigation Settings > Physical World USD Anchor. Before a connection, it uses scene origin mode. On Connect, it switches Kit to custom anchor mode pointing at /World/XRAnchor and verifies that Kit accepted both settings. That generated prim lives only in an anonymous session layer and is removed on Disconnect. The path must therefore be free before connecting; Teleop refuses to overwrite a user-owned prim at /World/XRAnchor. On Disconnect, Kit returns to scene origin mode, and closing the Teleop window restores the XR settings that were active before you opened it. The 2D monitor mode does not require Kit XR or these profile settings.
Configure the scene reference through Session > XR Anchor > Custom Anchor, not by pointing Kit’s VR Profile directly at a scene prim or by authoring corrections under /Teleop/Markers (the extension recreates that hierarchy with each session). See the scene-yaw calibration tip for the persistent-Xform workflow. With Rotation = Fixed, the initial correction remains fixed and is applied consistently to Kit XR, markers, and teleop targets.
Coordinate Frame converts incoming OpenXR poses; it does not select or rotate Kit’s profile anchor. Kit’s profile-level Adjust for User Height setting under Navigation Settings is also independent — it shifts the camera at scene-entry time, while Fixed Height locks the shared resolved transform’s Z position to its first-frame value during the teleop session.
Debug#
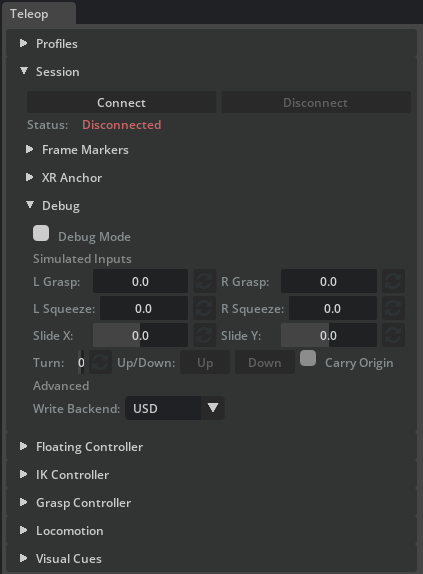

Debug mode replaces VR controller input with draggable USD markers and on-screen sliders, so every controller can be exercised without VR hardware. See debug mode for the step-by-step walkthrough.
|
|
Debug Mode checkbox — enables synthetic pose and slider input. Mutually exclusive with a live VR connection: disconnect first, or disable debug mode before connecting.
L Grasp / R Grasp — sliders (0–1) that simulate the VR trigger squeeze. Feed directly into the Grasp Controller as
trigger_value.L Squeeze / R Squeeze — sliders (0–1) that simulate the controller grip analog value. Retargeted grasp uses this independently from the trigger.
Slide X / Slide Y — sliders (-1 to 1) that simulate the left thumbstick for Locomotion lateral and forward/backward slide.
Turn — slider (-1 to 1) that simulates the right thumbstick for Locomotion yaw.
Up / Down — hold-buttons that simulate the right-side face buttons for vertical motion.
Carry Origin — checkbox that toggles Carry Tracking Space so locomotion co-moves the Session tracking-space prim with the robot base.
Write Backend — overrides the global
XformPrimbackend used for all teleop writes. Options: USD (plain attribute writes), USD-RT (Fabric hierarchy), Fabric (fastest path, requires Fabric Scene Delegate).
Visual Cues#
The Visual Cues panel adds drop lines for 2D teleoperation. Each side renders one vertical cylinder from a tracked world position down to a configurable Reference Z. The cylinder uses a 0.5-opacity emissive preview material by default and is marked not to cast shadows; it does not add a light to the scene. Cues are viewport aids only: they live in an anonymous session sublayer under /Teleop/VisualCues/, are not saved with the root stage, and are not automatically included by the Episode Recorder’s default /World discovery. They can still be recorded if /Teleop or the cue prims are selected explicitly.
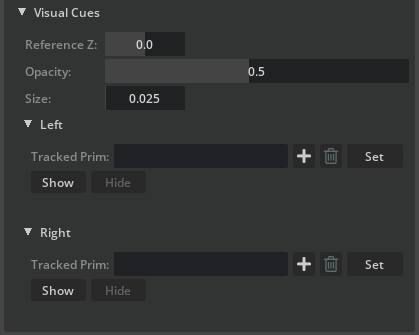
Global controls:
Reference Z — world Z height where cue cylinders end (default
0.0).Opacity — transparency of the cue geometry.
Size — uniform scale used to derive the cue-cylinder thickness.
Each side (Left / Right) has its own sub-panel:
Tracked Prim — optional prim override. Leave empty to auto-link to VR controller input (OpenXR aim pose after tracking-space offset). In debug mode, auto-link follows the Left/Right debug marker world poses instead. Click Set to apply a manual Xform prim path; clear the field and click Set again to restore auto-link.
Show / Hide — create or remove the drop line for that side. Frame markers are not required: cues can be visible while Frame Markers are hidden, as long as controller or debug input is available (or a Tracked Prim override is set).
Drop lines do not drive robot motion. They only reflect where the operator is pointing.
Floating Controller#

The Floating Controller drives a free rigid body so that it tracks the VR controller pose using velocity-based PD control. Use it for end effectors or grippers that are not part of an articulation chain. Each side (Left / Right) has its own collapsible sub-panel.
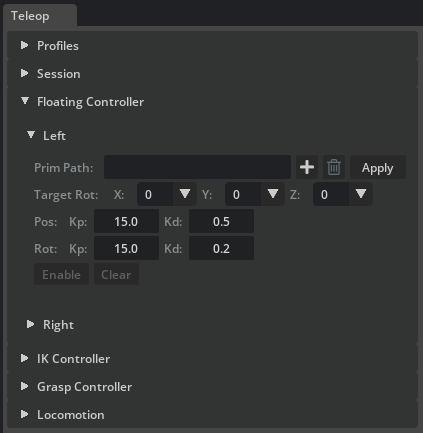
The target prim must be a rigid body. To control an articulated gripper with the Floating Controller, attach the articulation root joint to a rigid body and point the Floating Controller at that rigid body. The gripper articulation is then carried along as a child, while the Grasp Controller independently drives its finger joints.
Prim Path — the rigid body prim to drive. Click the + button to pick the prim from the viewport, or paste the path. Click Apply to validate. The path field, + button, and trash button are locked once configured; click Clear to reconfigure.
Target Rot (one row with X, Y, and Z combos) — per-axis local rotation offset in 90-degree increments (-180, -90, 0, +90, +180). Different grippers and end effectors have different local-frame conventions; these offsets align the controlled body so that its forward axis matches the VR controller pointing direction. For example, a gripper whose local Z points sideways instead of forward can be corrected with a 90-degree Y offset. Adjustable during Play and saved in teleop profiles.
Pos Kp / Kd — position proportional and derivative gains. Higher Kp makes the body snap to the target faster; Kd damps oscillations.
Rot Kp / Kd — orientation proportional and derivative gains. Same principle as position gains, applied to rotational tracking.
Enable / Disable — arms or disarms the controller for the next Play. Status transitions: Configured → Standby → Active (on Play).
Clear — destroys the controller resources while keeping the prim path.
IK Controller#

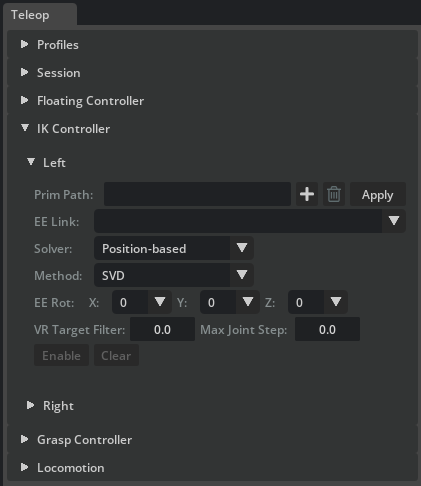
The IK Controller drives an articulated robot arm through inverse kinematics so that its end effector tracks the VR controller pose. Each side (Left / Right) has its own collapsible sub-panel.
The target prim must be an articulation. The IK solver operates on the joint chain from the articulation root down to the selected end-effector link. For a typical setup — for example a UR3e arm with a gripper attached — select the wrist link as the end effector so that IK solves only for the arm joints. The gripper joints are then driven separately by the Grasp Controller.
Articulation and end effector#
Prim Path — the articulation root prim. Click Apply to validate. On success the EE Link dropdown is populated with all body links in the kinematic chain.
EE Link — selects which link in the chain is the IK target. Choose the last arm link (for example the wrist) to exclude gripper joints from the IK solve. The last link in the chain is selected by default.
Clear — destroys the solver and articulation resources; the prim path is preserved for quick reconfiguration.
Solver selection#
Solver dropdown — chooses the IK backend. Each solver can be hot-swapped during Play without stopping the timeline:
Solver
Description
Position-based
Single-step Jacobian differential IK. Supports a configurable Method dropdown.
Velocity-based
Velocity-space IK with a proportional Gain slider that controls tracking aggressiveness. Also supports a Method dropdown.
Levenberg-Marquardt
Multi-iteration damped least-squares per frame. No method or gain controls.
PINK
Task-based QP IK using a Pinocchio backend with joint-limit enforcement and posture regularisation. Exposes additional tuning described below.
Method dropdown — visible only for Position-based and Velocity-based solvers. Selects the Jacobian inversion strategy:
Damped LS — most stable default; handles singularities well.
Pseudoinverse — direct tracking when well-conditioned; less stable near singularities.
Transpose — cheapest update; can be gain-sensitive.
SVD — robust singular-value filtering; typically the heaviest compute.
Rotation offset and tuning#
EE Rot (one row with X, Y, and Z combos) — per-axis local rotation offset in 90-degree increments (-180, -90, 0, +90, +180). Same purpose as Target Rot for the Floating Controller: align the IK target so the robot’s tool tip or gripper faces the same direction as the VR controller. Adjustable at runtime and saved in profiles.
VR Target Filter — exponential moving average (EMA) low-pass filter on the incoming VR target pose. Range 0.0–0.95. Higher values reduce jitter but add delay. Default 0.0 (no filtering).
Max Joint Step — safety clamp on the maximum joint-angle change per simulation step (radians). Prevents sudden joint jumps without acting as a true velocity limit. Default 0.0 (disabled).
Gain — (Velocity-based solver only) proportional gain controlling how aggressively the end effector tracks the VR target. Values of 1–5 give smooth conservative tracking; 10–20 are fast; above 30 may oscillate.
PINK-specific tuning#
These controls appear only when the PINK solver is selected:
Task Gain — PINK
FrameTaskresponse gain. Higher values make tracking more aggressive; lower values soften it.Posture — posture regularisation cost. Higher values keep the arm closer to its current pose; lower values give the end-effector task more freedom.
QP dropdown — quadratic-program solver backend. Use to compare solve quality and performance across backends.
LM Damp —
FrameTaskLevenberg-Marquardt damping. Higher values improve stability in difficult configurations but slow response.
Enable and status#
Enable / Disable — arms or disarms the IK controller for the next Play. During Play the status shows Active when the target is reachable and Out of reach when the VR target leaves the arm’s workspace. Tracking resumes automatically when the target returns to a reachable pose.
Grasp Controller#

The Grasp Controller maps the VR trigger’s analog value (0 = open, 1 = fully closed) to gripper joint drive targets. Grippers vary widely — a parallel-jaw gripper has a single drive joint, while a multi-finger hand can have a dozen joints across several fingers — so the controller relies on a YAML config file that defines the mapping from the linear 0–1 trigger value to each joint’s target position. Each side (Left / Right) has its own collapsible sub-panel with independent configuration.
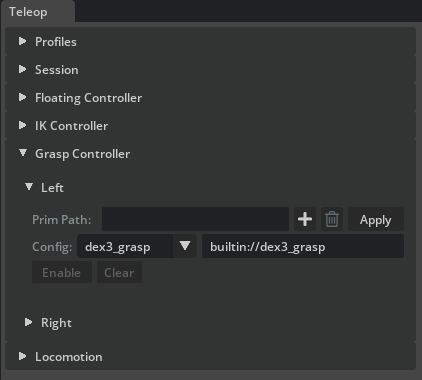
Prim Path — the gripper articulation prim. Click Apply to validate the path and load the currently selected config in one step. The field is locked after configuration; click Clear to reconfigure.
Config dropdown — selects a built-in grasp configuration shipped with the extension. Selecting an entry immediately updates the path field next to it and resets the side to
Config changed - click Apply, so Apply must be clicked again before Enable becomes available.Config path field (the editable text field next to Config) — full path or
builtin://URI to a grasp config YAML. Type a custom path here to use your own config file for a custom gripper or grasp style. Editing this field also requires another Apply click.Enable / Disable — arms or disarms trigger tracking for this side.
Clear — destroys grasp resources while keeping the paths for quick reconfiguration.
During Play, trigger pressure is read from the VR controller or from the L Grasp / R Grasp debug sliders. For each joint listed in the config, the controller interpolates linearly between the open and closed target values based on the current trigger value.
Retargeted multi-finger grasp#
Teleop profiles can opt a hand into retargeted grasp drive. This is controller-input retargeting, not tracked hand-skeleton retargeting: it expands the two controller analog values into semantic finger activations. Live OpenXR, debug controls, and MCAP replay all provide the same controller snapshots and therefore execute the same mapping.
The supported trihand retargeter computes the following normalized activations:
Semantic output |
Controller input |
Activation |
|---|---|---|
|
Trigger relative to squeeze |
|
|
Stronger of trigger or squeeze |
|
|
Stronger of trigger or squeeze |
|
|
Trigger |
|
|
Squeeze |
|
The profile’s joint_aliases maps these seven semantic outputs to robot-specific USD joint names. The selected grasp config then converts each normalized activation through that joint’s target_range. This keeps robot topology and limits out of the retargeter. Grasp-config angular targets are expressed in degrees; the controller converts them internally when the articulation tensor backend requires radians.
grasp:
  right:
    enabled: true
    prim_path: /World/Robot/right_hand
    config_path: builtin://dex3_grasp
    drive_mode: retargeted
    retargeter_kind: trihand
    joint_aliases:
      thumb_rotation: right_hand_thumb_0_joint
      thumb_proximal: right_hand_thumb_1_joint
      thumb_distal: right_hand_thumb_2_joint
      index_proximal: right_hand_index_0_joint
      index_distal: right_hand_index_1_joint
      middle_proximal: right_hand_middle_0_joint
      middle_distal: right_hand_middle_1_joint
Use drive_mode: trigger (the default) for conventional grippers where one trigger value should drive every configured joint. Select the built-in floating_xarm_dex3_retargeted.yaml profile with teleop_scenario_floating_xarm_dex3.usd for the ready-to-run example. Its Dex3 config intentionally keeps right_hand_thumb_0_joint at target_range: [0, 0]; the thumb-rotation alias is validated and written, but that joint remains fixed until a nonzero range is supplied by another grasp config.
Validate reports actionable errors when the retargeter is unsupported, a semantic alias is unknown, an alias target is absent from the grasp config, or the matching USD joint is not controllable below the grasp prim. In debug mode, use both the Grasp and Squeeze sliders to test the complete mapping without Isaac Teleop, CloudXR, or a headset. Automated tests additionally exercise synthetic routing, USD DriveAPI writes, measured articulation motion, and all seven aliases against the real Dex3 asset.
Config file format#
Each config file lists the joints to drive, the input range, and the corresponding target range. Revolute-joint target ranges are angles in degrees; prismatic-joint target ranges are distances in stage linear units. Author custom config files to support your own grippers or to define alternative grasp styles on the same hand — for example, a pinch grasp vs. a full-palm grasp on a five-finger hand.
Simple gripper — xarm_grasp.yaml maps a single drive joint:
joints:
  - name: "drive_joint"
    input_range: [0.0, 1.0]
    target_range: [0.0, 48.0]
The optional drive mapping overrides USD drive properties only for the matched joint. Omit it when the authored asset gains should be used unchanged.
The Script Editor floating-gripper example uses the gripper selected by GRIPPER_NAME. Change only that constant to switch between "xarm" and "dex3"; the GRIPPERS side assignment and the rest of the scenario remain unchanged. The editable constants are passed explicitly to run_example_async, so callers can also invoke the example with a different assignment, target rotation, motion tolerance, random seed, or capture configuration. TARGET_ROTATION_DEGREES = (90, 0, 0) keeps the gripper horizontal and points the target prim’s blue axis toward world +Y; use -90 degrees on X for world -Y. The example composes this target orientation with the selected YAML’s rotation_offset_degrees, rotates the asset-frame tcp.translation into world space, and subtracts that root-to-grasp-center vector from every desired TCP position. Each built-in definition creates a named Tcp Xform beneath its configured base link, so the same stored frame drives motion and camera aiming. For xArm, asset-local +Z consequently maps to world +Y and places the floating root 0.15 m toward world -Y instead of world -X. The Dex3 TCP is 0.08 m forward and 0.05 m lateral in the palm frame. The generated scene places TableCube below /World/Objects and uses its world-space bounding box to sample the red cube on the left half and the taller blue cube on the right half. RNG_SEED makes those placements repeatable and the sampled ranges adapt when the table dimensions change. The gripper starts near the front of the table along world -Y, and its visual cue extends to the floor. After the scene settles, the example queries the cube poses and passes the resulting TCP positions as explicit arguments to the goto helper; this query is the only USD-ground-truth adapter and can be replaced by an external perception system. The sequence moves above the blue cube, descends while open, closes and lifts, moves above the red cube, descends, releases, and returns the gripper to its initial pose. Fewer PHASE_SAMPLES values make each move faster but less smooth, while a smaller POSITION_TOLERANCE is stricter and can make it slower. GRASP_HEIGHT_OFFSET selects an object-specific upper grasp band so the fingertips remain above the support. The wider red cube is the blue cube’s placement support. SceneCameraTop is two metres above the combined cube center and looks straight down. TCPCameraTop is offset along world +Z and uses the gripper’s finger-forward direction as image-up. TCPCameraSide is offset horizontally perpendicular to finger-forward and keeps world +Z as image-up. These directions come from the shared target frame rather than asset-local xArm or Dex3 axes. TCP_CAMERA_DISTANCE controls both distances. When adding another gripper, measure the asset offsets from its USD rather than changing the common target-building logic.
Multi-finger hand — dex3_grasp.yaml maps seven joints across three fingers, each with its own target range:
joints:
  - name: "right_hand_index_0_joint"
    input_range: [0.0, 1.0]
    target_range: [0.0, 90.0]
  - name: "right_hand_index_1_joint"
    input_range: [0.0, 1.0]
    target_range: [0.0, 80.0]
  - name: "right_hand_middle_0_joint"
    input_range: [0.0, 1.0]
    target_range: [0.0, 90.0]
  - name: "right_hand_middle_1_joint"
    input_range: [0.0, 1.0]
    target_range: [0.0, 80.0]
  - name: "right_hand_thumb_0_joint"
    input_range: [0.0, 1.0]
    target_range: [0.0, 0.0]
  - name: "right_hand_thumb_1_joint"
    input_range: [0.0, 1.0]
    target_range: [0.0, -60.0]
  - name: "right_hand_thumb_2_joint"
    input_range: [0.0, 1.0]
    target_range: [0.0, -60.0]
Locomotion#

The Locomotion controller moves a prim using VR thumbstick and face-button input. Horizontal movement is projected onto the world ground plane using the prim’s heading, so axes remain correct regardless of the target prim’s local-frame orientation.
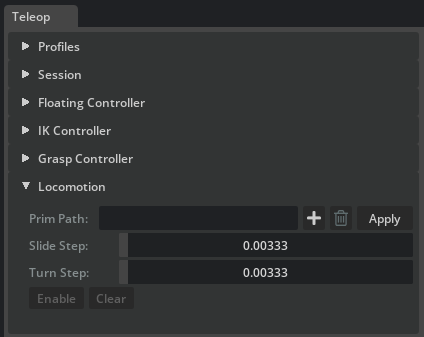
Two drive modes control how the base is moved:
Teleport (kinematic) — writes the base world pose each frame. Because this is a Universal Scene Description (USD) hierarchy operation, every descendant prim (arms, grippers, whether rigid bodies or articulations) rides along even when it is only parented to the base and not physically jointed. No physics is involved.
Velocity (physics) — commands a linear and angular velocity on a dynamic, non-kinematic rigid-body base so PhysX integrates the motion, producing real contacts and collisions. Only the base itself moves; attached payloads follow solely when they are physically jointed to it. A plain
Xform(such as the VR origin marker) or a kinematic body cannot be velocity-driven and falls back to Teleport.
The default Auto mode selects Velocity for a dynamic rigid-body target and Teleport otherwise.
Two workflows are supported:
Robot base — set the prim path to a robot base link. Thumbstick input moves the robot, and attached arms and grippers follow. Toggle Carry Tracking Space (left primary button) to co-move the VR origin with the robot.
VR origin — set the prim path to the built-in tracking-space origin marker (
/Teleop/Markers/TrackingOrigin). Carry is implicit because the locomotion prim is the VR origin. Use this for floating grippers that have no physical base.
Custom Anchors are read without changing their authored xform operations. Carry Tracking Space is therefore available for a custom anchor only when it already has writable xformOp:translate, xformOp:orient, and xformOp:scale operations. For a matrix-, pivot-, or rotateXYZ-authored reference, use a separate writable Xform as the Custom Anchor when carry is required.
Controls:
Prim Path — the prim to move. Click Apply to validate.
Drive Mode — Auto, Teleport (kinematic), or Velocity (physics). Auto resolves to Velocity for a dynamic rigid-body target and Teleport otherwise.
Slide Step — slide distance per app update at full input (Teleport mode). Drives left-thumbstick translation (forward, backward, lateral) and the right face-button vertical motion.
Turn Step — turn angle per app update at full right-thumbstick yaw input (Teleport mode).
Lin Speed — maximum base linear speed in metres per second at full input (Velocity mode).
Ang Speed — maximum base yaw rate in radians per second at full right-thumbstick yaw input (Velocity mode).
Enable / Disable — arms or disarms locomotion for the next Play.
Clear — destroys the configured state while keeping the prim path.
During Play the controller reads the following VR inputs:
Left thumbstick — forward/backward (Y) and left/right (X) slide in the world ground plane.
Right thumbstick — left/right yaw turn.
Right face buttons —
A(primary) moves down,B(secondary) moves up along world Z (Meta-style controller layout).Left primary face button (
Xon Meta-style controllers) — toggles Carry Tracking Space mode. When active, locomotion also moves the Tracking Space prim with the base, including turn rotation around the base pivot. When the locomotion prim is the tracking-space origin, carry is implicit and the toggle has no additional effect.
Record and replay (Episode Recorder)#
The Episode Recorder window (isaacsim.replicator.episode_recorder.ui, opened from Tools > Replicator > Episode Recorder) records per-physics-step simulation state to multi-episode HDF5 files and replays them through the Kit timeline. It works on any stage. When a TeleopManager is alive, teleop controller, aim-pose, and head-pose channels are appended to every session opened from the window via install_teleop_session_injector.
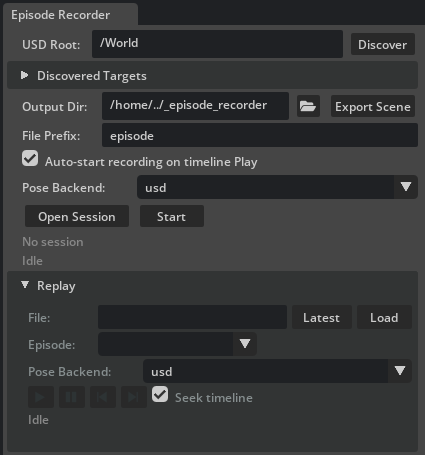
A recording session is one HDF5 file that contains many episodes. Episodes auto-start on timeline Play and auto-end on timeline Stop. The window buttons, the VR recording button, and any scripted caller add a manual start, end, or toggle edge on top of that, all driving the same underlying session.
Targets and output#
USD Root — prim path scanned by the discovery helpers.
/Worldis a sensible default.Discover — lists every articulation (via
ArticulationRootAPI), rigid body (viaRigidBodyAPI), and plain Xform prim under the root. Plain Xforms are always included, so a locomotion-driven robot-base cube, a hand-placed tracker, or a visual tool tip under an articulation show up without extra opt-in.Discovered Targets (collapsible, scrollable) — the articulations and prims found under the root. Tick the boxes for every target you want recorded; each tick maps to a group or dataset inside the HDF5 file.
Output Dir — directory where the HDF5 file is written. Defaults to
<cwd>/_episode_recorder; created if missing.Export Scene (next to the Output Dir field) — writes a flattened USD of the current stage as
<output_dir>/stage_snapshot.usdtogether withstage_snapshot.sidecar.json. The snapshot is scene-level, so one click per scene is enough: subsequent Open Session calls detect the file and stamp its basename into the HDF5stage_snapshotattribute automatically.File Prefix — filename prefix. The final path is
{prefix}_{timestamp}.hdf5.Auto-start recording on timeline Play — when checked (default), pressing Play automatically starts a new episode. Uncheck it to record only when Start / End (or the VR button) is pressed; the timeline can play without any episode being captured.
Pose Backend (record side) — selects the backend used by the recorder’s per-tick batch
XformPrim.get_world_poses()read. Options: usd (default; pure USD reads), usdrt (Fabric Scene Delegate viaIFabricHierarchy), fabric (Fabric Scene Delegate direct). The Fabric-backed options are safe speedups when Fabric Scene Delegate is enabled and fall back tousdwith a carb warning when it is disabled. Distinct from the Write Backend in the Teleop Session > Debug panel, which controls the teleop write path.
Session and episode control#
Open Session / Close Session — single toggle button. On open, the recorder creates the HDF5 file, subscribes to simulation events, and the filename appears below. All configuration options are locked while a session is open.
Start / End — single toggle button that manually starts or ends an episode inside the open session. Only enabled while a session is open. Also driven by the VR left-Y button (see below) and, when Auto-start recording on timeline Play is enabled, by the timeline PLAY / STOP hooks.
Binding badge — small dotted label rendered next to Start / End. Lights up green and lists every external input (for example a
VRRecordingButtonattached byTeleopManager) currently wired to this recorder. The tooltip enumerates each binding’s label and the command it dispatches (start/end/toggle). Empty when no external bindings are active.Status label — colour-coded feedback below the buttons:
Idle (dim).
Session open - N articulation(s), M prim(s) (yellow).
Recording episode #K (green).
Standby - K episode(s) captured (yellow).
Session closed (K episode(s)) (green).
Errors and warnings are shown in red and yellow.
Replay#
The Replay sub-section (collapsible, collapsed by default) plays any previously recorded HDF5 back through the Kit timeline. Replay is mutually exclusive with recording: while a session is open the Replay controls are locked, and while replay is attached the recording controls are locked.
The transport row uses Kit timeline-style glyph buttons rather than text labels: play / stop, pause, step-backward, and step-forward.
File — full path to an HDF5 session file. Use Latest to fill in the newest
{prefix}_*.hdf5in the current Output Dir.Load — opens the HDF5 and populates the Episode dropdown with every episode name and its frame count. The info label next to the dropdown shows
success=True/Falsefor the selected episode, so abandoned takes are visible at a glance. After load, a red warning row appears below the status if any prim paths referenced by the HDF5 do not resolve on the current stage — open the matching scene (or the exportedstage_snapshot.usd) before starting the replay.Pose Backend (replay side) — selects the backend used by the replayer’s per-tier batch pose write. Options match the record-side selector (usd / usdrt / fabric).
usdis the recommended default — the ancestry-ordered tier split plus USD writes is what avoids parent-lag stutter on articulations nested under moving xforms.usdrtandfabricare reserved for benchmarking flat scenes and may exhibit a one-frame parent-lag on nested hierarchies. Applied on Load.Play / Stop glyph — drives
EpisodeReplayer.start_replay. Each Kit app update applies one recorded frame and seeks (never plays) the Kit timeline to the recordedsim_time, so any stage-authored USD animations play back in lockstep without stepping physics. Pose writes land in an anonymous USD sublayer so the root stage is never mutated. Stopping (or reaching the last frame in non-loop mode) pops that sublayer, returning every prim to its pre-replay pose; the HDF5 session stays loaded so a fresh replay can be started immediately.Pause glyph — pauses the replay on the current frame; the last applied frame stays on the stage. Pressing it again resumes from where it left off. The Stop glyph still pops the anonymous sublayer.
Step Backward / Step Forward glyphs — apply the previous or next recorded frame and auto-pause the replay. Use them to inspect the recording one frame at a time or to seek to a specific moment before resuming.
Seek timeline — when checked (default), each applied frame also seeks the Kit timeline to that frame’s recorded
sim_timeso stage-authored USD animations stay in sync with the recording. Uncheck it to replay only the recorded prim poses and leave the timeline untouched.Progress label — below the replay status, shows the currently applied frame as
Frame X / N. The same counter is emitted to the terminal at one-second intervals and on the first and last frame.
Replay is pure-USD and timeline-seeking only — the replayer never plays the timeline and never calls into the physics engine. Teleop controllers (Floating, IK, Grasp, Locomotion) stay dormant during replay, which avoids the Simulation view object is invalidated errors that playing the timeline against a stopped simulation would otherwise trigger. The start / stop lifecycle emits [EpisodeRecorder][UI] Replay: starting (episode ..., N frames, file=...) and Replay: stopped (reason=user | finished | stage_closed) on the terminal, plus a periodic Replay: frame X/N progress line.
For replay to work, every prim path recorded in the HDF5 must exist on the loaded stage. The Replay panel uses a lenient replayer (ReplayPolicy(strictness="best_effort")) that skips missing paths with a warning rather than erroring. To guarantee a reproducible setup, click Export Scene once before recording; the resulting stage_snapshot.usd can be opened on any machine to reproduce the authored stage before replaying.
HDF5 file layout#
Each session produces one HDF5 file with one group per episode. Datasets are preallocated per episode and trimmed to their true length on end_episode.
<file>.hdf5                             # one file per open_session()
├── @schema_version, @created_at, manifest/, ...  # file-level attrs + manifest
├── @stage_snapshot                     # optional, set by Export Scene
└── episodes/
    ├── episode_00000/                  # @episode_index, @started_at, @ended_at,
    │   │                               # @num_frames, @success (optional),
    │   │                               # @user_metadata (optional, JSON)
    │   ├── meta/time/
    │   │   ├── sim_time            (N,)     float64
    │   │   ├── physics_step        (N,)     int64
    │   │   └── wall_time           (N,)     float64
    │   ├── state/<name>/                  # articulation, xform, or rigid body (UI naming)
    │   │   ├── positions           (N, L, 3)  float32   # articulation: per-link world position
    │   │   ├── orientations        (N, L, 4)  float32   # articulation: per-link wxyz
    │   │   ├── position            (N, 3)     float32   # xform / rigid body
    │   │   └── orientation         (N, 4)     float32   # wxyz
    │   └── teleop/                        # present when a TeleopManager/session injector is active
    │       ├── <side>/{trigger, squeeze, thumbstick_x, thumbstick_y}     (N,)    float32
    │       ├── <side>/{primary_click, secondary_click, thumbstick_click} (N,)    uint8
    │       ├── <side>/aim_position          (N, 3)  float32   # record_aim_pose=True
    │       ├── <side>/aim_orientation       (N, 4)  float32   # wxyz
    │       └── head/{position, orientation} (N, 3 | 4)  float32   # record_head_pose=True
    ├── episode_00001/ ...
    └── episode_00002/ ...
For articulations, L is the number of recorded links (the articulation root plus every UsdGeom.Xformable descendant). The link list is frozen on Open Session and stored in the manifest so the replayer binds to the same prim set. There are no DOF, velocity, or drive-target channels: every gripper-drive joint is reproduced through its child link’s recorded world pose, so replaying open / closed grippers works without running any teleop logic.
EpisodeReplayer.list_episodes iterates the episodes/episode_NNNNN groups for per-episode playback.
Recorded data vs. replayed data#
The recorder captures two kinds of data per frame:
World state (under
state/<name>/, one HDF5 group per recorded articulation, Xform, or rigid body) — the world pose of every recorded prim. For articulations, this is the per-link pose array; for rigid bodies and Xforms, the single root pose. This is the only data the replayer applies.Teleop input channels (under
teleop/<side>/..., present when aTeleopManagersession injector is active at record time) — trigger, squeeze, thumbstick, and button clicks from live, debug, or MCAP input. Live and MCAP sources also populate optional raw aim-pose and head-pose channels. Debug marker poses are available through typedTeleopFrameobservers but are not copied into the legacy raw pose recordables, so those HDF5 pose channels contain their invalid zero defaults in debug mode. These datasets are retained for offline analysis and policy learning.EpisodeReplayerdoes not apply them, and an Episode Recorder HDF5 file is not an Isaac Teleop MCAP.
Aim-pose and head-pose capture is controlled by the carb settings /persistent/exts/isaacsim.replicator.teleop/record/record_aim_pose and .../record_head_pose (both default True). Toggle them from the Script Editor (carb.settings.get_settings().set_bool(...)) before opening a session if you want to skip them.
On replay, EpisodeReplayer.apply_frame writes the recorded world pose of every prim (and every articulation link) into an anonymous USD sublayer through XformPrim.set_world_poses. No physics is stepped, no DOFs are written, no IK is solved, no trigger command is re-dispatched, no OpenXR input is consumed. The teleop controllers (Floating, IK, Grasp, Locomotion) stay dormant. Replay is strictly a USD-pose playback.
Optional: add camera and attribute channels from Python#
For the standard teleop workflow, use the Episode Recorder window described above. Its Discover action covers the world-state targets most users need: articulations, rigid bodies, and plain Xforms. Use the Python API only when the HDF5 session also needs a channel that the window cannot configure, such as camera intrinsics or an arbitrary USD attribute. These channels extend the HDF5 recording; they do not change controller retargeting and are unrelated to MCAP input capture.
The helper below accepts paths to prims that already exist on the open stage and returns an unopened EpisodeRecorder. It does not create or modify stage prims:
# SPDX-FileCopyrightText: Copyright (c) 2026 NVIDIA CORPORATION & AFFILIATES. All rights reserved.
# SPDX-License-Identifier: Apache-2.0

import isaacsim.core.experimental.utils.app as app_utils

app_utils.enable_extension("isaacsim.replicator.teleop")

from isaacsim.replicator.episode_recorder import (  # noqa: E402
    AttributeRecordable,
    CameraRecordable,
    EpisodeRecorder,
)
from isaacsim.replicator.teleop import TeleopManager, build_teleop_recorder  # noqa: E402


def build_recorder_with_extra_channels(
    output_dir: str,
    *,
    teleop_manager: TeleopManager,
    robot_prim_path: str,
    wrist_camera_prim_path: str,
    key_light_prim_path: str,
) -> EpisodeRecorder:
    """Build an unopened teleop recorder for prims that already exist on the stage."""
    recorder = build_teleop_recorder(
        output_dir=output_dir,
        teleop_manager=teleop_manager,
        articulations={"robot": robot_prim_path},
    )
    recorder.add(
        CameraRecordable(
            group="cameras/wrist",
            prim_path=wrist_camera_prim_path,
        )
    )
    recorder.add(
        AttributeRecordable(
            group="env/light_intensity",
            prim_path=key_light_prim_path,
            attribute_name="inputs:intensity",
        )
    )
    return recorder
build_teleop_recorder adds the robot world-state channels plus the teleop controller, aim-pose, and head-pose channels. The two subsequent add calls demonstrate the optional channels:
CameraRecordablecaptures the camera world pose and USD intrinsics (focal length, horizontal and vertical aperture, and clipping range) on every recorded frame. Resolution is stored once in the session manifest. During HDF5 replay, the recorded camera trajectory is re-authored with the other world state, so a Replicator render product attached to that camera follows it.AttributeRecordablecaptures one USD attribute per frame. The example records a distant light’sinputs:intensityattribute; material parameters and custom authored attributes follow the same pattern.
Add every recordable before calling EpisodeRecorder.open_session because opening the session freezes the HDF5 manifest. A scripted caller then owns the lifecycle: call open_session(), call start_episode() before running the teleop motion, call end_episode() after the motion, and finally call close_session(). Keep the supplied TeleopManager alive until the recorder is closed so its input channels remain valid.
The Episode Recorder window installs a timeline controller that maps Play and Stop to episode boundaries when auto-start is enabled. build_teleop_recorder() returns the recorder itself, without that UI controller, so a standalone script should use explicit start_episode() and end_episode() calls unless it installs equivalent timeline or command-bus handling.
Third-party extensions can instead add channels to every session opened from the UI window by registering a session injector with register_session_injector. This is the same mechanism install_teleop_session_injector uses to contribute teleop controller, aim-pose, and head-pose channels.
MCAP teleop-input replay#
MCAP input replay is separate from the HDF5 pose replay above. McapTeleopFrameProvider reads an MCAP produced by Isaac Teleop and supplies the same TeleopFrame contract as live OpenXR input. A headset, CloudXR process, and OpenXR runtime are not required.
Use TeleopManager.connect with input_mode="mcap_replay" and mcap_path set to the input file. This first release is a scripted transport API, not a Teleop-window replay mode: construct one manager, attach and configure its controllers programmatically, open the matching USD stage, and play the Kit timeline. Loading a profile YAML only returns a profile dataclass; it does not apply that profile to a standalone manager. Each Kit app update while the timeline is playing advances the MCAP source by one input frame, after which the manager performs its normal coordinate conversion and controller updates, plus marker updates when a markers manager and live tracking have been configured. Stopping the timeline pauses input consumption. Calling TeleopManager.execute_command with TeleopCommand.RESET closes and reopens the MCAP at its beginning.
By default, replay expects a ControllerTracker mapped to the Isaac Teleop channel base controllers and a HeadTracker mapped to head. Create the file with those mappings in Isaac Teleop’s McapRecordingConfig workflow, or pass mcap_recording_path when connecting a live TeleopManager. Existing recording files are rejected unless mcap_recording_overwrite=True is explicit. For files with different base names, construct McapTeleopFrameProvider with controller_channel and head_channel and pass it to TeleopManager.connect_provider. Low-level MCAP recording spans the entire live connection, including time when the Kit timeline is stopped; it is not divided into Episode Recorder episodes.
The MCAP does not encode Isaac Sim timeline transitions. Consequently, frames recorded while physics was stopped cannot be identified automatically during replay, where input is consumed only while the timeline plays. Trim or align the recording, or capture a separate timeline-state sidecar, when those inactive intervals matter.
Because physics and IK execute again, the resulting robot trajectory can differ from the original recording. The MCAP provider is caller-paced and does not currently provide timestamp pacing, seek, loop, or reliable automatic end-of-file detection. Stop or disconnect it explicitly. The Replay controls in the Episode Recorder window continue to accept HDF5 files and perform pure USD-pose playback; they do not open MCAP files.
Collect live input for a retargeting test#
An MCAP contains raw Isaac Teleop controllers and head channels. It does not contain retargeted joint targets or simulation poses. During replay, trigger and squeeze pass through the selected profile, aliases, and grasp ranges again; this is why MCAP replay tests the retargeting path end to end.
Start CloudXR in a separate terminal, connect the headset web client, and leave the Kit timeline stopped. The low-level recording spans the live connection rather than timeline episodes.
Disconnect the Teleop window if it already owns a live connection. MCAP capture is currently a Script Editor API rather than a field in the Teleop window or Episode Recorder.
Open Window > Script Editor, paste the following snippet, review
MCAP_PATHandRECORD_SECONDS, setRUN_EXAMPLE = True, and run it:# SPDX-FileCopyrightText: Copyright (c) 2026 NVIDIA CORPORATION & AFFILIATES. All rights reserved. # SPDX-License-Identifier: Apache-2.0 import asyncio import time from pathlib import Path import isaacsim.core.experimental.utils.app as app_utils app_utils.enable_extension("isaacsim.replicator.teleop") from isaacsim.replicator.teleop import TeleopManager # noqa: E402 # Review the path and duration, then set this to True in the Isaac Sim Script Editor. RUN_EXAMPLE = False MCAP_PATH = Path("/tmp/teleop_retargeting_input.mcap") RECORD_SECONDS = 20.0 async def record_teleop_input_mcap(path: Path, duration_seconds: float) -> None: """Record raw live controller/head input for a fixed duration.""" path = path.expanduser() path.parent.mkdir(parents=True, exist_ok=True) manager = TeleopManager() connected = manager.connect( input_mode="live", mcap_recording_path=str(path), mcap_recording_overwrite=True, ) if not connected: manager.destroy() raise RuntimeError("Live teleop connection failed; check the terminal for CloudXR/OpenXR details") print(f"[TeleopMCAP] Recording {duration_seconds:.1f} seconds to {path}") try: deadline = time.monotonic() + duration_seconds while time.monotonic() < deadline: await app_utils.update_app_async() finally: manager.disconnect() manager.destroy() print(f"[TeleopMCAP] Finished: {path} ({path.stat().st_size} bytes)") if RUN_EXAMPLE: asyncio.ensure_future(record_teleop_input_mcap(MCAP_PATH, RECORD_SECONDS))
During the capture, leave the right controller neutral briefly, sweep the right trigger from 0 to 1 and back, sweep the right squeeze from 0 to 1 and back, then press both together. This separates the index, middle, and thumb responses during replay.
Wait for
[TeleopMCAP] Finishedin the console. The file is finalized byTeleopManager.disconnectand the message reports its byte size.
Replay through the Dex3 retargeter#
Open
teleop_scenario_floating_xarm_dex3.usdand keep the timeline stopped. Do not connect the Teleop window; the script creates the manager that owns the MCAP provider and grasp controller.In the Script Editor, paste the following snippet, set
MCAP_PATHto the recorded file, setRUN_EXAMPLE = True, and run it:# SPDX-FileCopyrightText: Copyright (c) 2026 NVIDIA CORPORATION & AFFILIATES. All rights reserved. # SPDX-License-Identifier: Apache-2.0 from pathlib import Path import isaacsim.core.experimental.utils.app as app_utils app_utils.enable_extension("isaacsim.replicator.teleop") from isaacsim.replicator.teleop import ( # noqa: E402 GraspController, TeleopCommand, TeleopManager, get_builtin_teleop_profiles_dir, load_grasp_config, load_teleop_profile, scan_teleop_profiles, ) # First open teleop_scenario_floating_xarm_dex3.usd, review this path, and then # set RUN_EXAMPLE to True in the Isaac Sim Script Editor. RUN_EXAMPLE = False MCAP_PATH = Path("/tmp/teleop_retargeting_input.mcap") PROFILE_NAME = "floating_xarm_dex3_retargeted" def start_retargeted_grasp_replay( mcap_path: Path, ) -> tuple[TeleopManager, GraspController]: """Configure the built-in Dex3 retargeting profile and connect MCAP input.""" profiles = dict(scan_teleop_profiles(get_builtin_teleop_profiles_dir())) profile, profile_errors = load_teleop_profile(profiles[PROFILE_NAME]) if profile is None or profile_errors: raise RuntimeError(f"Could not load {PROFILE_NAME}: {profile_errors}") side = profile.grasp.right grasp_config, config_errors = load_grasp_config(side.config_path) if grasp_config is None or config_errors: raise RuntimeError(f"Could not load grasp config: {config_errors}") grasp = GraspController() configured = grasp.configure( side.prim_path, "right", grasp_config, drive_mode=side.drive_mode, retargeter_kind=side.retargeter_kind, joint_aliases=side.joint_aliases, ) if not configured: raise RuntimeError("Dex3 retargeted grasp did not configure; verify that the matching stage is open") grasp.set_side_tracking_enabled("right", True) manager = TeleopManager() manager.set_grasp_controller(grasp) manager.set_grasp_tracking(True) if not manager.connect( on_status_changed=lambda status: print(f"[TeleopMCAP] {status}"), input_mode="mcap_replay", mcap_path=str(mcap_path.expanduser()), ): manager.destroy() raise RuntimeError("MCAP replay connection failed; check the file path and Isaac Teleop installation") return manager, grasp def rewind_retargeted_grasp_replay(manager: TeleopManager) -> None: """Stop the timeline and reopen the MCAP at its first input frame.""" success, message = manager.execute_command(TeleopCommand.RESET) if not success: raise RuntimeError(message) def stop_retargeted_grasp_replay(manager: TeleopManager) -> None: """Stop the timeline, disconnect MCAP input, and release controllers.""" manager.execute_command(TeleopCommand.DISCONNECT) manager.destroy() if RUN_EXAMPLE: mcap_replay_manager, mcap_grasp_controller = start_retargeted_grasp_replay(MCAP_PATH) print("[TeleopMCAP] Connected. Press Play to consume MCAP frames; Stop pauses replay.")
Confirm the console reports all seven Dex3 joints mapped and
Connected (MCAP replay). Press Play to consume one MCAP input frame per Kit app update.Verify that the right index joints follow the recorded trigger, the middle joints follow squeeze, and the thumb flexion follows the stronger of the two. The built-in thumb-rotation target remains fixed as described above.
Press Stop to pause without consuming frames. Call
rewind_retargeted_grasp_replay(mcap_replay_manager)to reopen the MCAP at its first frame, then press Play for another pass. Callstop_retargeted_grasp_replay(mcap_replay_manager)when finished.
MCAP replay requires the Isaac Teleop Python package because it supplies DeviceIO and ReplaySession. It does not require a running CloudXR process, OpenXR runtime, or headset. For CI, use a committed fixture MCAP or the existing synthetic controller tests; live collection itself remains a hardware step.
Teleop profiles#
A teleop profile is a single YAML file that captures the complete state of every panel in the Teleop window. Use the Profiles panel at the top of the Teleop window to save, load, and delete profiles. Built-in profiles ship with the extension under source/extensions/isaacsim.replicator.teleop/data/teleop_profiles/; point the Dir field at a custom folder to manage your own profiles alongside the built-in ones.
When loaded, a profile applies every section in order: session globals first, then each controller panel. If the referenced prims exist on the current stage, the controllers resolve and are ready to Enable immediately. If the stage does not match (different robot or missing prims), the UI fields are still populated and the unresolved paths are reported in the status line.
Built-in profiles#
The extension ships six built-in profiles covering floating and IK control, trigger and retargeted grasp, and teleport or velocity locomotion:
Profile |
Matching stage |
Configuration |
|---|---|---|
|
|
Solo floating xArm gripper (right side); VR-origin locomotion. |
|
|
Bimanual floating grippers (xArm left + Dex3 right); VR-origin locomotion. |
|
|
Same floating setup; right Dex3 uses TriHand trigger/squeeze retargeting. |
|
|
Single UR3e arm with xArm gripper (right side); robot-base locomotion. |
|
|
Bimanual UR3e arms (xArm gripper left + Dex3 right); robot-base locomotion. |
|
|
Same bimanual IK setup; dynamic |
The primary bimanual floating and IK profiles are described in detail below; their retargeting and velocity variants change only the grasp or locomotion sections described above.
Bimanual floating grippers (VR origin locomotion)#
floating_xarm_dex3.yaml configures a dual floating-gripper setup. The Floating Controller drives each gripper as a free rigid body, and Locomotion targets the VR origin marker so that thumbstick input repositions the entire VR workspace.
Session — global settings that apply before any controller is configured:
session:
  coordinate_system: isaac_sim       # Z-up coordinate conversion
  tracking_space_enabled: false
  tracking_space_path: ''            # empty = built-in origin marker
  marker_scale: 0.05
  anchor_x: 0.0
  anchor_y: 0.0
  anchor_z: 0.0
  anchor_rotation_mode: fixed
  anchor_smoothing: 1.0
  anchor_fixed_height: true
Floating — per-side rigid-body controller with PD gains and rotation offsets. Both sides are enabled, each pointing at a different gripper root prim:
floating:
  left:
    enabled: true
    settings:
      prim_path: /World/teleop_xarm_dex3/.../xarm_gripper_rigid_root
      pos_kp: 20.0
      pos_kd: 0.5
      orient_kp: 20.0
      orient_kd: 0.2
      target_rot_x_deg: 180
      target_rot_y_deg: 0
      target_rot_z_deg: 90
  right:
    enabled: true
    settings:
      prim_path: /World/teleop_xarm_dex3/.../dex3_1_r_rigid_root
      pos_kp: 20.0
      pos_kd: 0.5
      orient_kp: 20.0
      orient_kd: 0.2
      target_rot_x_deg: -90
      target_rot_y_deg: 0
      target_rot_z_deg: 90
IK — neither side is enabled because the grippers are floating rigid bodies rather than articulations. The section is still present with defaults so that loading the profile resets any prior IK configuration.
Grasp — maps each side to a gripper articulation prim and a built-in grasp config. builtin:// paths resolve to YAML files shipped with the extension:
grasp:
  left:
    enabled: true
    prim_path: /World/teleop_xarm_dex3/.../xarm_gripper
    config_path: builtin://xarm_grasp
  right:
    enabled: true
    prim_path: /World/teleop_xarm_dex3/.../dex3_1_r
    config_path: builtin://dex3_grasp
Locomotion — drives the built-in tracking-space origin so that thumbstick input moves the entire teleop workspace (VR-origin workflow):
locomotion:
  enabled: true
  settings:
    prim_path: /Teleop/Markers/TrackingOrigin
    linear_step: 0.003333333333333333
    angular_step: 0.003333333333333333
Dual-arm IK (robot-base locomotion)#
ik_dual_ur3_xarm_dex3.yaml configures a dual UR3e arm setup where each arm is driven by the PINK IK solver. Locomotion targets the robot’s root prim so that thumbstick input moves the entire robot base.
IK — both sides are enabled with the PINK solver. Each side points at a different UR3e arm within the dual-arm assembly. The ee_rot_* offsets align each end effector’s local frame with the VR controller pointing direction. The PINK solver does not use a Jacobian-inversion method; for the Position-based and Velocity-based solvers, add method: damped-least-squares | pseudoinverse | transpose | singular-value-decomposition to the side’s settings.
ik:
  left:
    enabled: true
    settings:
      robot_path: /World/teleop_dual_ur3_xarm_dex3/dual_arm/left_arm_ur3e_xarm/ur3e
      ee_link: wrist_3_link
      solver: pink
      gain: 5.0
      vr_target_filter: 0.0
      max_joint_step: 0.0
      pink_qp_solver: osqp
      pink_task_gain: 0.5
      pink_posture_cost: 0.001
      pink_lm_damping: 1.0
      ee_rot_x_deg: 180
      ee_rot_y_deg: 0
      ee_rot_z_deg: 90
  right:
    enabled: true
    settings:
      robot_path: /World/teleop_dual_ur3_xarm_dex3/dual_arm/right_arm_ur3e_dex3/ur3e
      ee_link: wrist_3_link
      solver: pink
      gain: 5.0
      vr_target_filter: 0.0
      max_joint_step: 0.0
      pink_qp_solver: daqp
      pink_task_gain: 0.5
      pink_posture_cost: 0.001
      pink_lm_damping: 1.0
      ee_rot_x_deg: 180
      ee_rot_y_deg: 0
      ee_rot_z_deg: -180
Floating — disabled because the arms are articulations controlled by IK.
Grasp — same gripper mapping as the floating profile, with each side pointing at the corresponding gripper articulation.
Locomotion — drives the robot root prim so that thumbstick input moves the dual-arm assembly as a whole (robot-base workflow). Carry Tracking Space can be toggled to co-move the VR origin with the robot:
locomotion:
  enabled: true
  settings:
    prim_path: /World/teleop_dual_ur3_xarm_dex3
    linear_step: 0.003333333333333333
    angular_step: 0.003333333333333333
Built-in scenario stages#
Each built-in profile pairs with a matching stage on the Isaac Sim assets server. Open the stage on the Kit timeline, load the profile from the Profiles panel, and every controller resolves immediately and is ready to Enable.
All four scenario stages live under the same path on the assets server:
https://omniverse-content-production.s3-us-west-2.amazonaws.com
/Assets/Isaac/6.1/Isaac/Samples/Replicator/Teleop/
Scenario |
Stage filename |
|---|---|
Floating, solo (right xArm) |
|
Floating, bimanual (xArm left + Dex3 right) |
|
IK, solo (xArm on UR3e, right side) |
|
IK, bimanual (xArm left + Dex3 right on dual UR3e) |
|
Workflow walkthrough#
This section expands the quick start into the full workflow: configuring from a profile, connecting in VR or debug mode, operating each controller, and recording and replaying an episode. To capture data, open an Episode Recorder session before pressing Play.
Configure with a built-in profile#
Open Tools > Replicator > Teleop.
Open one of the built-in scenario stages above.
In the Profiles panel, the Dir field defaults to the built-in profile directory. Pick the profile that matches the stage from the dropdown and click Load. The Floating Controller, IK Controller, Grasp Controller, and Locomotion panels are configured against the loaded stage and their Enable buttons become available.
Click Validate to confirm the status line reports
0 error(s), 0 warning(s). Unresolved prim paths are listed in the console.
To configure controllers manually for a custom robot, work through each panel as described in the UI window overview. The lifecycle is the same for every controller: enter the prim path, click Apply, tune as needed, and click Enable.
Connect to VR#
Confirm CloudXR is running in a separate terminal (
python -m isaacteleop.cloudxr --accept-eula).Pair the headset web client, then click Connect. The status turns green (Connected - markers active) and four frame markers appear under
/Teleop/Markers/TrackingOrigin.Move the VR controllers. The Left and Right markers track in real time.
If Connect fails, check the terminal for CloudXR hints, restart the CloudXR terminal if needed, then retry.
Operate without VR (debug mode)#
Use debug mode when no headset is available, when iterating on tuning, or when running headless. Debug mode and VR mode are mutually exclusive — disconnect VR before enabling debug, and uncheck Debug Mode before clicking Connect.
Expand Session > Debug and check Debug Mode. Frame markers appear in the viewport, the Connect button is disabled, and the simulated input controls below become active.
Drag the Left, Right, or Head marker in the viewport to set its pose; drag the TrackingOrigin parent to move all four markers together. The marker hierarchy mirrors a real VR tracking space.
Operate the robot#
Press Play on the Kit timeline. Each enabled controller transitions to Active. The mapping between input and controller is:
Controller |
VR input |
Debug input |
|---|---|---|
Floating / IK |
Move the controller; the rigid body or end effector tracks the pose. |
Drag the Left or Right frame marker. |
Grasp |
Squeeze the trigger (0 = open, 1 = closed). |
Move the L Grasp or R Grasp slider. |
Locomotion (slide) |
Push the left thumbstick (forward, back, lateral); right face buttons A / B drive Z down / up. |
Move the Slide X / Slide Y sliders; hold Up / Down. |
Locomotion (turn) |
Push the right thumbstick left or right. |
Move the Turn slider. |
Locomotion (carry tracking space) |
Press the left primary face button (X on Meta) to toggle. |
Click the Carry Origin toggle. |
Gains, rotation offsets, and step sliders are live-editable during Play. Save the tuned state to a profile via Profiles > Save when finished. Press Stop to deactivate every controller.
To run only one side, configure the side you want and click Clear on the other; the cleared side ignores its VR controller / marker.
Record an episode#
The Episode Recorder window captures simulation state and (when a TeleopManager is alive) teleop input channels. See Record and replay for the full UI reference.
Open Tools > Replicator > Episode Recorder. Keep the Teleop window open so the session injector remains active.
Set USD Root to
/World, click Discover, and tick the targets to record (the robot, any tracked Xforms).Optional — click Export Scene once to write
stage_snapshot.usdnext to the HDF5 output. Replays on a different machine can use this snapshot as a portable stage.Click Open Session. The configuration controls lock and the filename appears below the buttons.
Press Play on the timeline. With Auto-start recording on timeline Play checked (the default), the status turns green with
Recording episode #1. Operate the robot. Press Stop to end the episode. Repeat for additional episodes.To toggle recording manually from VR, press the left-Y button on the Meta Quest controller. Each rising edge starts or ends an episode.
Click Close Session when done.
Replay an HDF5 episode#
Expand the Replay sub-section in the Episode Recorder window.
Click Latest to fill in the most recent HDF5 file in the Output Dir, then click Load. The Episode dropdown lists every episode with its frame count and
successflag.Select an episode and click the play glyph in the transport row. The Kit timeline seeks to each frame’s recorded
sim_time. Every prim moves through its recorded trajectory; teleop controllers stay dormant.Use the pause and step-backward / step-forward glyphs to scrub. Uncheck Seek timeline to leave the Kit timeline alone (useful when the stage has no authored animation).
Click the stop glyph to revert the stage to its pre-replay pose. The HDF5 stays loaded so a fresh replay can start immediately.
For replay to work, every prim path recorded in the HDF5 must exist on the loaded stage. If the original stage is unavailable, open the stage_snapshot.usd written by Export Scene.
To re-run the controller stack from an Isaac Teleop MCAP instead of previewing recorded world poses, use the scripted MCAP input replay workflow. The Episode Recorder Replay panel does not open MCAP files.
Synthetic data generation from recorded episodes#
The HDF5 UI replay covered in Record and replay is a quick visual preview driven by the Kit timeline. For offline synthetic data generation, drive EpisodeReplayer frame by frame and call rep.orchestrator.step_async at the frames selected for capture. This detaches recording time from rendering time, so an expensive writer or DLSS mode can run without slowing teleop and without time drift.
Prerequisites#
An HDF5 session produced by the Episode Recorder window (or any
EpisodeRecordersubclass).A USD stage to replay against. Every prim path in the HDF5 must resolve on this stage. Point
STAGE_URLat the assets-server path of the original scene, or at an exported snapshot — click Export Scene in the Episode Recorder window or callexport_stage_snapshotfrom a script to producestage_snapshot.usdnext to the HDF5.Isaac Sim running. A VR or CloudXR connection is not required for replay.
What the script does#
The script opens STAGE_URL (resolved through get_assets_root_path), resolves the cameras listed in CAMERA_PATHS (falling back to a default camera if none resolve), attaches a BasicWriter (RGB PNGs) to the camera render products, and replays every recorded frame. It calls rep.orchestrator.step (or step_async in the Script Editor variant) only at up to NUM_CAPTURES evenly spaced frames. Outputs land under _out_sdg_teleop_replay/ next to the current working directory.
Before running either variant below, edit HDF5_PATH and STAGE_URL at the top of the script to point at your recorded session and its matching USD stage.
The example can be run as a standalone application using the following commands in the terminal (on Windows use python.bat instead of python.sh):
./python.sh standalone_examples/api/isaacsim.replicator.teleop/sdg_teleop_replay.py
Full Standalone Script
import os

from isaacsim import SimulationApp

simulation_app = SimulationApp(launch_config={"headless": False})

import carb.settings
import omni.kit.app
import omni.replicator.core as rep
import omni.usd
from isaacsim.core.utils.extensions import enable_extension

# Enable the teleop extension before importing modules it owns and before resolving its data path.
# It also transitively pulls in `isaacsim.replicator.episode_recorder`, which is not part of the base kit.
enable_extension("isaacsim.replicator.teleop")

from isaacsim.replicator.episode_recorder import EpisodeReplayer
from isaacsim.storage.native import get_assets_root_path
from pxr import UsdGeom

# Resolve the bundled golden HDF5 episode shipped with the isaacsim.replicator.teleop extension tests.
_TELEOP_EXT_PATH = (
    omni.kit.app.get_app().get_extension_manager().get_extension_path_by_module("isaacsim.replicator.teleop")
)

# Path to the USD stage to replay against; every prim path in the HDF5 must resolve on this stage.
STAGE_URL = "/Isaac/Samples/Replicator/Teleop/teleop_scenario_floating_xarm_dex3.usd"
HDF5_PATH = os.path.join(
    _TELEOP_EXT_PATH,
    "isaacsim",
    "replicator",
    "teleop",
    "tests",
    "data",
    "_episode_recorder",
    "episode_floating_xarm_dex3.hdf5",
)
CAMERA_PATHS = [
    "/World/teleop_xarm_dex3/gripper_origin_xform/xarm_gripper_root_xform/xarm_gripper/xarm_gripper_base_link/xarm_view_cam",
    "/World/teleop_xarm_dex3/gripper_origin_xform/dex3_1_r_root_xform/dex3_1_r/right_hand_palm_link/dex3_view_cam",
]
EPISODE_INDEX = 0
RESOLUTION = (512, 512)
NUM_CAPTURES = 10  # Number of frames to capture, evenly distributed across the episode


def run_example() -> None:
    """Replay a recorded teleoperation episode and capture SDG frames."""
    print("[TeleopReplay] Starting replay example")
    if not HDF5_PATH:
        print("[TeleopReplay] HDF5 path not provided, exiting")
        return
    if not os.path.isfile(HDF5_PATH):
        print(f"[TeleopReplay] HDF5 session file does not exist: '{HDF5_PATH}', exiting")
        return
    print(f"[TeleopReplay] HDF5 session: {HDF5_PATH}")

    # Load the authored USD stage so every prim path in the HDF5 resolves.
    assets_root_path = get_assets_root_path()
    if assets_root_path is None:
        print("[TeleopReplay] Could not find Isaac Sim assets folder, exiting")
        return
    stage_path = assets_root_path + STAGE_URL
    print(f"[TeleopReplay] Opening stage: {stage_path}")
    omni.usd.get_context().open_stage(stage_path)
    print("[TeleopReplay] Stage opened")

    # Drive writers manually via rep.orchestrator.step, not via timeline play.
    rep.orchestrator.set_capture_on_play(False)

    # Set DLSS to Quality mode (2) for best SDG results (Options: 0 (Performance), 1 (Balanced), 2 (Quality), 3 (Auto)
    carb.settings.get_settings().set("rtx/post/dlss/execMode", 2)

    # Resolve CAMERA_PATHS to UsdGeom.Camera prims; fall back to a default (5,5,5)
    # camera looking at the origin when CAMERA_PATHS is empty or none resolve.
    stage = omni.usd.get_context().get_stage()
    valid_camera_paths: list[str] = []
    for path in CAMERA_PATHS:
        prim = stage.GetPrimAtPath(path) if path else None
        if prim is None or not prim.IsValid():
            print(f"[TeleopReplay] Camera path '{path}' not found in stage, skipping")
            continue
        if not prim.IsA(UsdGeom.Camera):
            print(f"[TeleopReplay] Prim at '{path}' is not a UsdGeom.Camera (type={prim.GetTypeName()}), skipping")
            continue
        valid_camera_paths.append(path)

    render_products = []
    if valid_camera_paths:
        print(f"[TeleopReplay] Using {len(valid_camera_paths)} scene camera(s): {valid_camera_paths}")
        for i, cam_path in enumerate(valid_camera_paths):
            render_products.append(rep.create.render_product(cam_path, RESOLUTION, name=f"ReplayRP_{i}"))
    else:
        if CAMERA_PATHS:
            print(
                "[TeleopReplay] No valid scene cameras found in CAMERA_PATHS, falling back to default (5,5,5) camera."
            )
        cam = rep.functional.create.camera(position=(5, 5, 5), look_at=(0, 0, 0), name="ReplayCamera")
        render_products.append(rep.create.render_product(cam, RESOLUTION, name="ReplayRP"))
    print(f"[TeleopReplay] Created {len(render_products)} render product(s) at resolution {RESOLUTION}")

    # BasicWriter for RGB PNGs writing straight into the output directory.
    out_dir = os.path.join(os.getcwd(), "_out_sdg_teleop_replay")
    print(f"[TeleopReplay] Output directory: {out_dir}")

    basic_backend = rep.backends.get("DiskBackend")
    basic_backend.initialize(output_dir=out_dir)
    basic_writer = rep.writers.get("BasicWriter")
    basic_writer.initialize(backend=basic_backend, rgb=True)
    basic_writer.attach(render_products)
    print(f"[TeleopReplay] BasicWriter attached -> {out_dir}")

    # Prepare the episode and capture one RGB frame per recorded frame.
    print(f"[TeleopReplay] Preparing episode {EPISODE_INDEX}")
    try:
        replayer = EpisodeReplayer(HDF5_PATH)
        # Start replay with seek_timeline=True to match recorded sim_time, then pause to manually step and capture.
        replayer.start_replay(episode=EPISODE_INDEX, seek_timeline=True)
        replayer.pause_replay()
    except Exception as exc:
        print(f"[TeleopReplay] Could not start replay for episode {EPISODE_INDEX} from '{HDF5_PATH}': {exc}, exiting")
        return
    num_frames = replayer.num_frames(EPISODE_INDEX)
    if num_frames <= 0:
        print(f"[TeleopReplay] Episode {EPISODE_INDEX} has no frames in '{HDF5_PATH}', exiting")
        replayer.close()
        return
    # Replay every frame so the user can watch the full episode, but only trigger a writer capture
    # on NUM_CAPTURES indices evenly distributed across the episode (e.g. every 10% for NUM_CAPTURES=10).
    num_captures = min(NUM_CAPTURES, num_frames)
    capture_set = {(i * num_frames) // num_captures for i in range(num_captures)}
    print(f"[TeleopReplay] Replaying episode {EPISODE_INDEX}: capturing {len(capture_set)} of {num_frames} frames")

    capture_count = 0
    for f in range(num_frames):
        if f > 0:
            replayer.step_frame(1)
        if f in capture_set:
            rep.orchestrator.step(delta_time=0.0, pause_timeline=False)
            capture_count += 1
            print(f"[TeleopReplay] Captured {capture_count}/{len(capture_set)} (frame {f + 1}/{num_frames})")
        else:
            simulation_app.update()

    # Wait for the data to be written to disk and clean up resources.
    print("[TeleopReplay] Waiting for writers to flush...")
    rep.orchestrator.wait_until_complete()
    basic_writer.detach()
    for rp in render_products:
        rp.destroy()
    replayer.close()
    print(f"[TeleopReplay] Done. Output: {out_dir}")


# Run the example
run_example()
Paste the snippet below into the Script Editor (Window > Script Editor).
Full Script Editor Script
import asyncio
import os

import carb.settings
import isaacsim.core.experimental.utils.app as app_utils
import isaacsim.core.experimental.utils.stage as stage_utils
import omni.replicator.core as rep

# Enable the teleop extension before importing modules it owns and before resolving its data path.
# It also transitively pulls in `isaacsim.replicator.episode_recorder`, which is not part of the base kit.
app_utils.enable_extension("isaacsim.replicator.teleop")

from isaacsim.replicator.episode_recorder import EpisodeReplayer  # noqa: E402
from isaacsim.storage.native import get_assets_root_path_async  # noqa: E402
from pxr import UsdGeom  # noqa: E402

# Resolve the bundled golden HDF5 episode shipped with the isaacsim.replicator.teleop extension tests.
_TELEOP_EXT_PATH = app_utils.get_extension_path("isaacsim.replicator.teleop")

# Path to the USD stage to replay against; every prim path in the HDF5 must resolve on this stage.
STAGE_URL = "/Isaac/Samples/Replicator/Teleop/teleop_scenario_floating_xarm_dex3.usd"
HDF5_PATH = os.path.join(
    _TELEOP_EXT_PATH,
    "isaacsim",
    "replicator",
    "teleop",
    "tests",
    "data",
    "_episode_recorder",
    "episode_floating_xarm_dex3.hdf5",
)
CAMERA_PATHS = [
    "/World/teleop_xarm_dex3/gripper_origin_xform/xarm_gripper_root_xform/xarm_gripper/xarm_gripper_base_link/xarm_view_cam",
    "/World/teleop_xarm_dex3/gripper_origin_xform/dex3_1_r_root_xform/dex3_1_r/right_hand_palm_link/dex3_view_cam",
]
EPISODE_INDEX = 0
RESOLUTION = (512, 512)
NUM_CAPTURES = 10  # Number of frames to capture, evenly distributed across the episode


async def run_example_async():
    print("[TeleopReplay] Starting replay example")
    if not HDF5_PATH:
        print("[TeleopReplay] HDF5 path not provided, exiting")
        return
    if not os.path.isfile(HDF5_PATH):
        print(f"[TeleopReplay] HDF5 session file does not exist: '{HDF5_PATH}', exiting")
        return
    print(f"[TeleopReplay] HDF5 session: {HDF5_PATH}")

    # Load the authored USD stage so every prim path in the HDF5 resolves.
    assets_root_path = await get_assets_root_path_async()
    if assets_root_path is None:
        print("[TeleopReplay] Could not find Isaac Sim assets folder, exiting")
        return
    stage_path = assets_root_path + STAGE_URL
    print(f"[TeleopReplay] Opening stage: {stage_path}")
    opened, stage = await stage_utils.open_stage_async(stage_path)
    if not opened or stage is None:
        print(f"[TeleopReplay] Could not open stage: {stage_path}")
        return
    print("[TeleopReplay] Stage opened")

    # Drive writers manually via rep.orchestrator.step, not via timeline play.
    rep.orchestrator.set_capture_on_play(False)

    # Set DLSS to Quality mode (2) for best SDG results (Options: 0 (Performance), 1 (Balanced), 2 (Quality), 3 (Auto)
    carb.settings.get_settings().set("rtx/post/dlss/execMode", 2)

    # Create a default camera if no valid cameras are found in CAMERA_PATHS
    valid_camera_paths: list[str] = []
    for path in CAMERA_PATHS:
        prim = stage.GetPrimAtPath(path) if path else None
        if prim is None or not prim.IsValid():
            print(f"[TeleopReplay] Camera path '{path}' not found in stage, skipping")
            continue
        if not prim.IsA(UsdGeom.Camera):
            print(f"[TeleopReplay] Prim at '{path}' is not a UsdGeom.Camera (type={prim.GetTypeName()}), skipping")
            continue
        valid_camera_paths.append(path)

    render_products = []
    if valid_camera_paths:
        print(f"[TeleopReplay] Using {len(valid_camera_paths)} scene camera(s): {valid_camera_paths}")
        for i, cam_path in enumerate(valid_camera_paths):
            render_products.append(rep.create.render_product(cam_path, RESOLUTION, name=f"ReplayRP_{i}"))
    else:
        if CAMERA_PATHS:
            print(
                "[TeleopReplay] No valid scene cameras found in CAMERA_PATHS, falling back to default (5,5,5) camera."
            )
        cam = rep.functional.create.camera(position=(5, 5, 5), look_at=(0, 0, 0), name="ReplayCamera")
        render_products.append(rep.create.render_product(cam, RESOLUTION, name="ReplayRP"))
    print(f"[TeleopReplay] Created {len(render_products)} render product(s) at resolution {RESOLUTION}")

    # BasicWriter for RGB PNGs writing straight into the output directory.
    out_dir = os.path.join(os.getcwd(), "_out_sdg_teleop_replay")
    print(f"[TeleopReplay] Output directory: {out_dir}")

    basic_backend = rep.backends.get("DiskBackend")
    basic_backend.initialize(output_dir=out_dir)
    basic_writer = rep.writers.get("BasicWriter")
    basic_writer.initialize(backend=basic_backend, rgb=True)
    basic_writer.attach(render_products)
    print(f"[TeleopReplay] BasicWriter attached -> {out_dir}")

    # Prepare the episode and capture one RGB frame per recorded frame.
    print(f"[TeleopReplay] Preparing episode {EPISODE_INDEX}")
    try:
        replayer = EpisodeReplayer(HDF5_PATH)
        # Start replay with seek_timeline=True to match recorded sim_time, then pause to manually step and capture.
        replayer.start_replay(episode=EPISODE_INDEX, seek_timeline=True)
        replayer.pause_replay()
    except Exception as exc:
        print(f"[TeleopReplay] Could not start replay for episode {EPISODE_INDEX} from '{HDF5_PATH}': {exc}, exiting")
        return
    num_frames = replayer.num_frames(EPISODE_INDEX)
    if num_frames <= 0:
        print(f"[TeleopReplay] Episode {EPISODE_INDEX} has no frames in '{HDF5_PATH}', exiting")
        replayer.close()
        return
    # Replay every frame so the user can watch the full episode, but only trigger a writer capture
    # on NUM_CAPTURES indices evenly distributed across the episode (e.g. every 10% for NUM_CAPTURES=10).
    num_captures = min(NUM_CAPTURES, num_frames)
    capture_set = {(i * num_frames) // num_captures for i in range(num_captures)}
    print(f"[TeleopReplay] Replaying episode {EPISODE_INDEX}: capturing {len(capture_set)} of {num_frames} frames")

    capture_count = 0
    for f in range(num_frames):
        if f > 0:
            replayer.step_frame(1)
        if f in capture_set:
            await rep.orchestrator.step_async(delta_time=0.0, pause_timeline=False)
            capture_count += 1
            print(f"[TeleopReplay] Captured {capture_count}/{len(capture_set)} (frame {f + 1}/{num_frames})")
        else:
            await app_utils.update_app_async()

    # Wait for the data to be written to disk and clean up resources.
    print("[TeleopReplay] Waiting for writers to flush...")
    await rep.orchestrator.wait_until_complete_async()
    basic_writer.detach()
    for rp in render_products:
        rp.destroy()
    replayer.close()
    print(f"[TeleopReplay] Done. Output: {out_dir}")


# Run the example
asyncio.ensure_future(run_example_async())
Adapt the script to your pipeline by swapping or adding Replicator writers (depth, semantic segmentation, instance segmentation, normals, motion vectors, Cosmos video, and so on) or by inserting randomizers between step_frame and rep.orchestrator.step to produce scene variants per recorded trajectory.