Make sure to source your ROS 2 installation from the terminal before running Isaac Sim. If sourcing ROS 2 is a part of your bashrc then Isaac Sim can be run directly.
If using multiple systems, set the FASTRTPS_DEFAULT_PROFILES_FILE environment variable as per instructions in ROS and ROS 2 Installation before launching Isaac Sim, as well as any terminal where ROS messages will be sent or received, and ROS2 Extension is enabled.
Note
In Windows 10 or 11, depending on your machine’s configuration, RViz2 may not open properly.
In order for external ROS2 nodes to synchronize with simulation time, a clock topic is usually used. Many ROS2 nodes such as RViz2 use the parameter use_sim_time which if set to True will indicate to the node to begin subscribing to the /clock topic and synchronizing to the published simulation time.
You can either set this parameter in a ROS2 launch file or set the parameter using the following command in a new ROS2-sourced terminal:
ros2paramset/node_nameuse_sim_timetrue
Make sure to replace /node_name with whatever node you are currently running. If setting using the terminal, the node must already be running first before setting the parameter.
Go to Window > Graph Editors > Action Graph to create an Action graph.
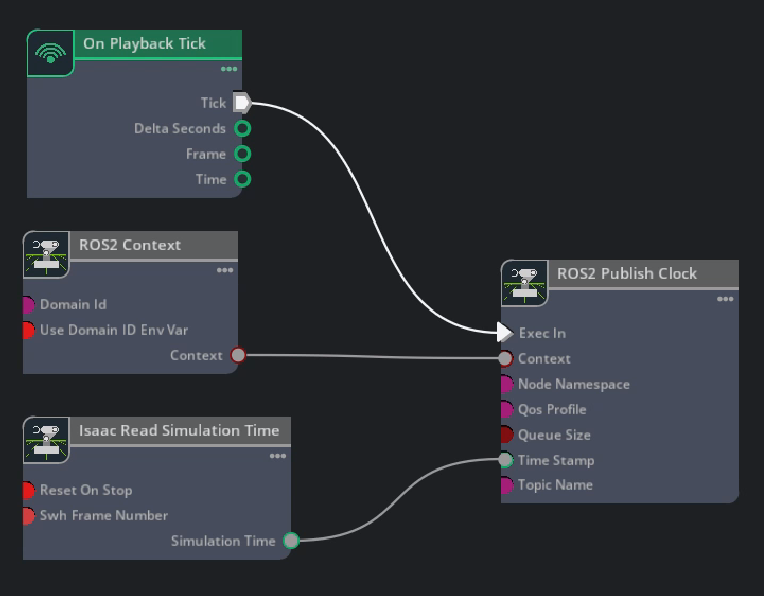
Add the following OmniGraph nodes into the Action graph:
On Playback Tick node to execute other graph nodes every simulation frame.
ROS2 Context node to create a context using either the given Domain ID or the ROS_DOMAIN_ID environment variable.
Isaac Read Simulation Time node to retrieve current simulation time. Note: By default the simulation time increases monotonically, meaning regardless of whether simulation is stopped and re-played, the time will continue incrementing. This is mainly to prevent issues that may arise with the time jumping back when simulation resets. You can set resetOnStop to True if you would like the clock to start from 0 every time simulation is reset.
ROS2 Publish Clock node to publish simulation time to the /clock topic.
Start RViz in a new ROS2-sourced terminal.
ros2runrviz2rviz2
Take note of the ROS Time and ROS Elapsed times listed in the bottom of the RViz window. These are currently displaying the wall time and should match the Wall Time and Wall Elapsed fields.
In a new ROS2-sourced terminal set the use_sim_time parameter to true for the RViz node. Ensure that simulation is stopped in Isaac Sim.
ros2paramset/rvizuse_sim_timetrue
Notice in RViz that ROS Time and ROS Elapsed are now both 0.
In Isaac Sim click Play.
In RViz, the ROS Time is now identical to the simulation time published from Isaac Sim over the /clock topic.
While publishing the simulation time is the most common workflow, there may be certain workflows that require certain messages to contain system time. To publish system time over the clock topic follow these steps:
Go to Window > Graph Editors > Action Graph to create an Action graph.
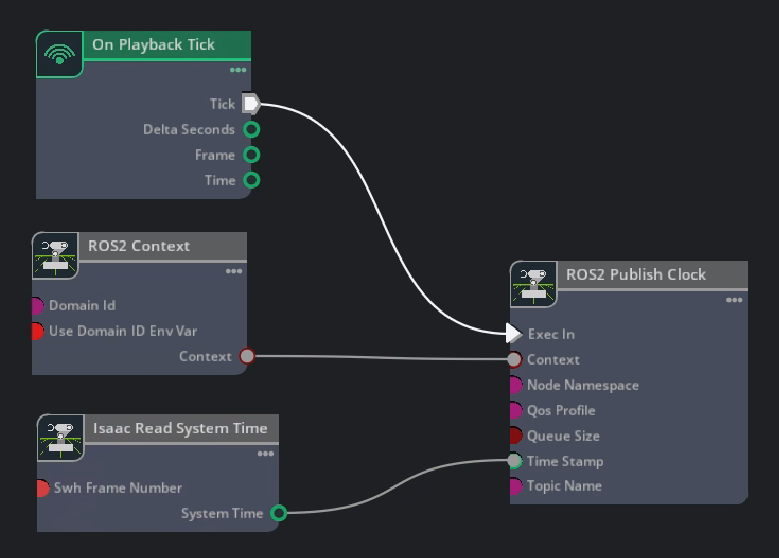
Add the following OmniGraph nodes into the Action graph:
On Playback Tick node to execute other graph nodes every simulation frame.
ROS2 Context node to create a context using either the given Domain ID or the ROS_DOMAIN_ID environment variable.
Isaac Read System Time node to retrieve current system time.
ROS2 Publish Clock node to publish simulation time to the /clock topic.
In Isaac Sim click Play. To see the system timestamp published from Isaac Sim over the /clock topic run the following command in a ROS-sourced terminal:
ros2topicecho/clock
Camera Helper and RTX Lidar nodes
In upcoming tutorials you will see the ROS 2 Camera Helper node and the ROS2 RTX Lidar Helper node. As both of these nodes automatically generate a sensor publishing pipeline, to use system timestamps for their publishers, ensure that their useSystemTime input field is set to True.
Open a new stage. Go to Window > Graph Editors > Action Graph to create an Action graph.
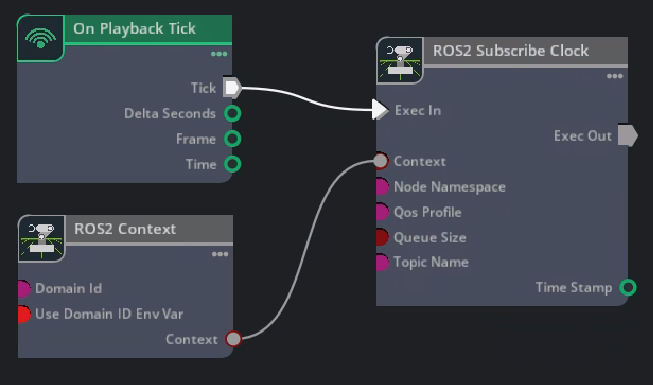
Add the following OmniGraph nodes into the Action graph:
On Playback Tick node to execute other graph nodes every simulation frame.
ROS2 Context node to create a context using either the given Domain ID or the ROS_DOMAIN_ID environment variable.
ROS2 Subscribe Clock node to subscribe to external timestamp data.
Start simulation by clicking Play. Select the ROS2 Subscribe Clock node inside the action graph to view its timeStamp output in the Property window. The timestamp should be currently 0.
In a new ROS2-sourced terminal run the following command to manually publish a clock message once:
The timeStamp value in the ROS2 Subscribe Clock OmniGraph node should change to 1.2.
Change the previous command with different sec and nanosec values to see those values being reflected in the timeStamp field of the ROS2 Subscribe Clock OmniGraph node.
We provide a menu shortcut to build a clock graph within just a few clicks. Go to Tools > Robotics > ROS 2 OmniGraphs > Clock. If you don’t see any ROS2 graphs listed, you need to enable the ROS2 bridge. A popup box will appear asking for the parameters needed to populate the graphs. Provide the graph path and click OK, a graph publishing the simulated clock should appear on the stage.