10.9. Agent Simulation Synthetic Data Generation
10.9.1. Overview
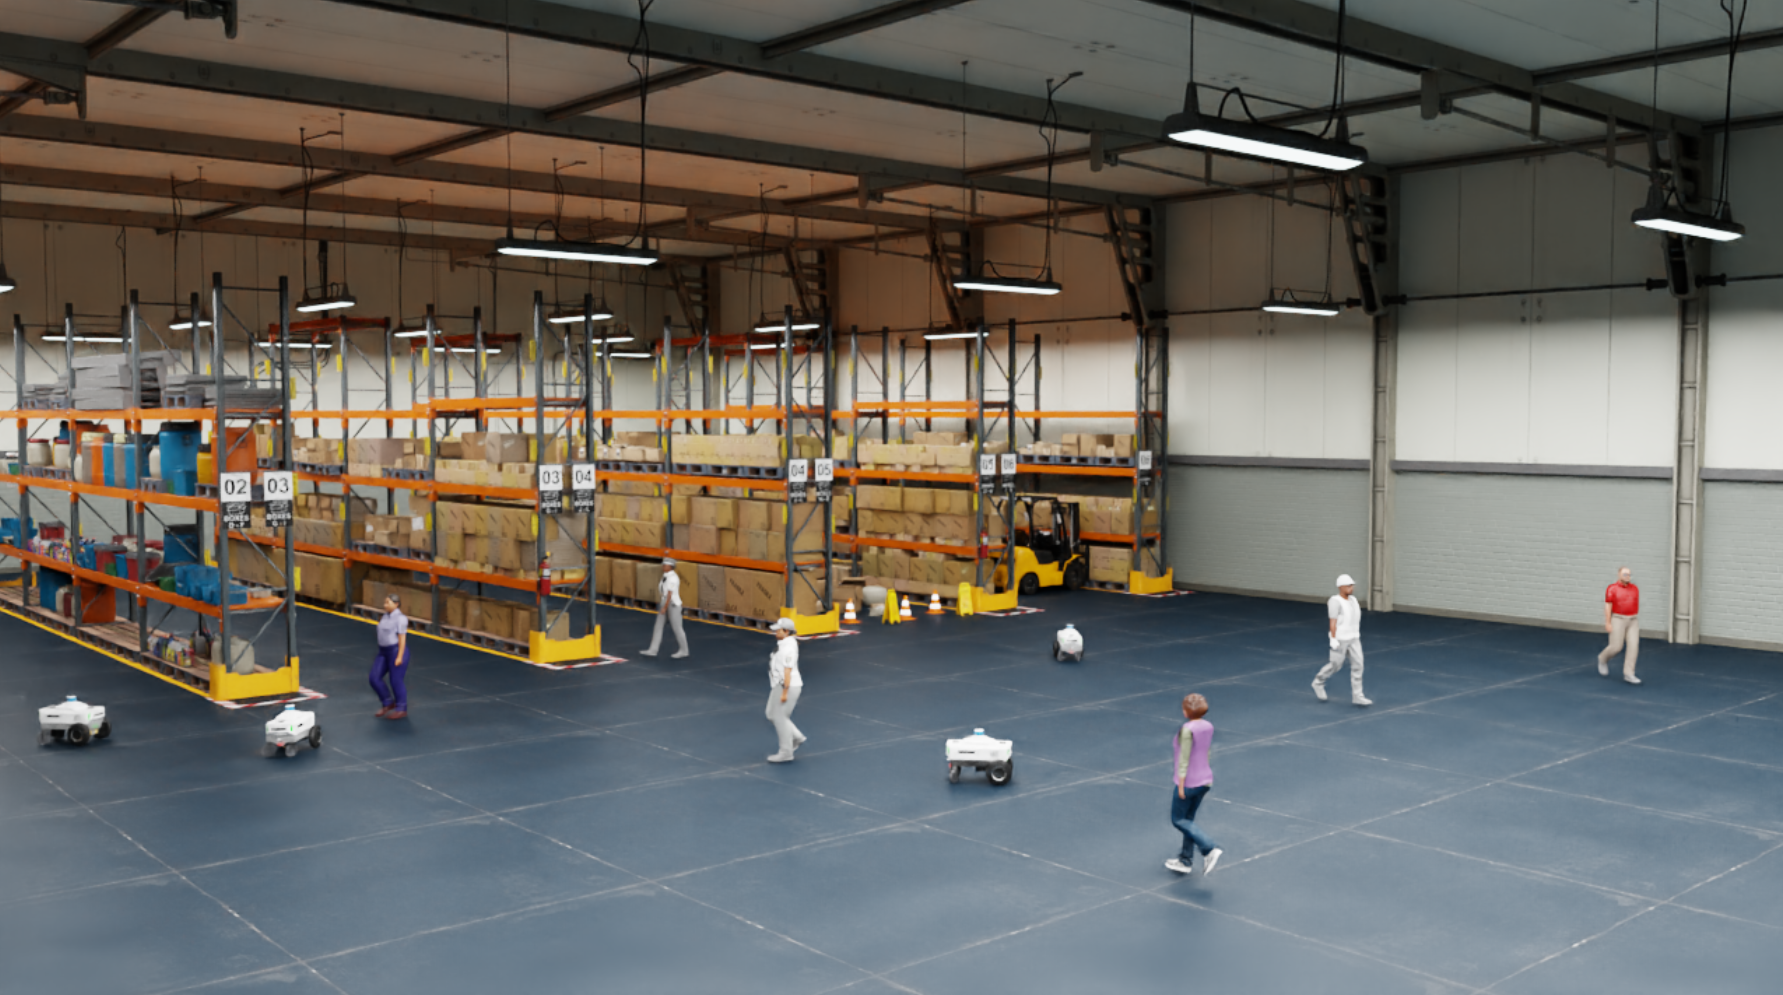
The Omni.Replicator.Character (ORC) extension is designed to generate synthetic data across a variety of environments. It provides controls over environments, cameras, agents through the use of configuration and command files. Its primary objective is to provide a GPU-accelerated, computational solution to the data acquisition problem in AI model training & app development.
Warning
Omni.Replicator.Character is in Beta. For more information on pre-release and beta terms, refer to the Omniverse License Agreement.
10.9.2. Enable Omni.Replicator.Character
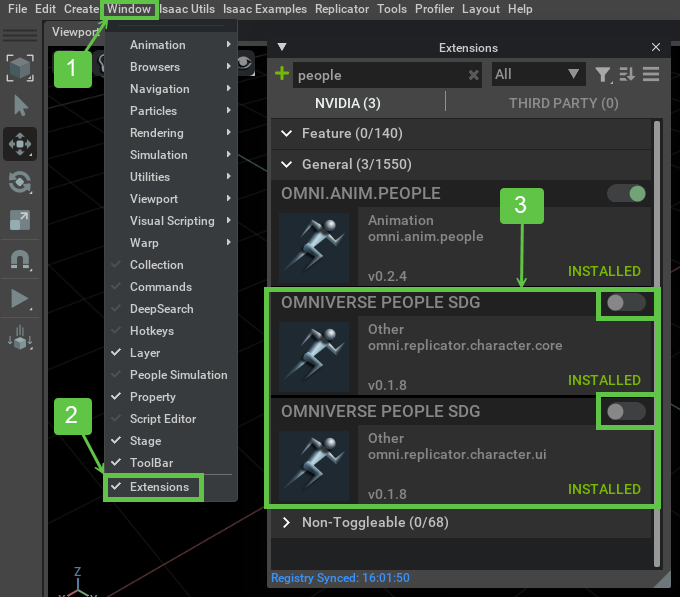
Open the extension manager - Window > Extensions. In the extension manager, search for “people” and enable the omni.replicator.character.core and omni.replicator.character.ui extension.
The ORC UI panel is accessible by Window > PeopleSDG > Configuration Panel and it will be on the right side of the screen when open.

To make sure all the features of ORC can work correctly, please make sure that omni.anim.graph.core, omni.anim.navigation.core, omni.anim.people, and omni.replicator.core are installed and updated to the latest version.
Note
Click the auto-load button in the extension manger to have the extension auto-loaded on startup.
Due to extension dependencies, the user may need to restart the Isaac Sim app.
10.9.3. Getting Started
To quickly launch the data generation with ORC, load the a .yaml configuration file, or use the default configuration file that comes with the extension, then follow the steps below. For a more detailed walkthrough, please refer to the Basic Usage section.
Enable the ORC extension and open the UI panel
Load the configuration file or use the default configuration file
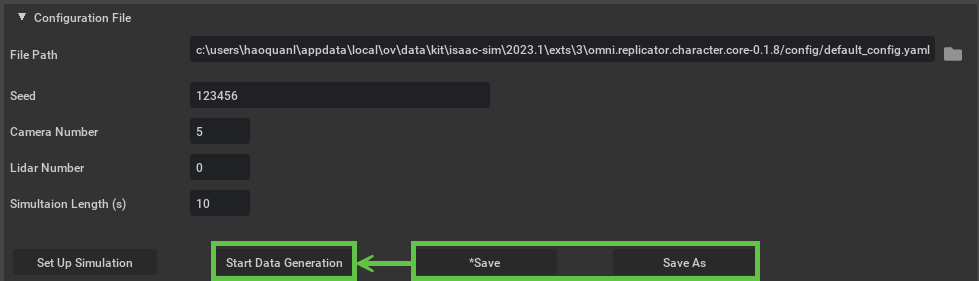
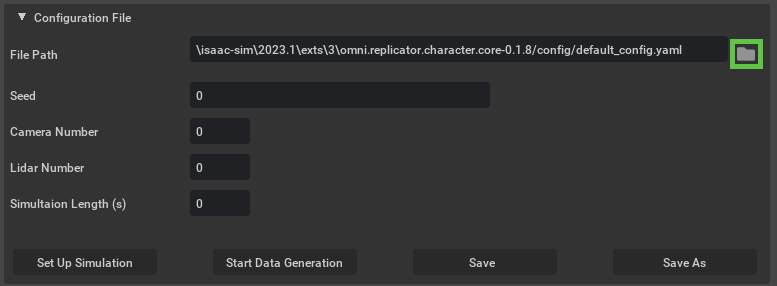
Click the Set Up Simulation button from the Configuration File panel and it will start loading simulation assets, which may take a while.

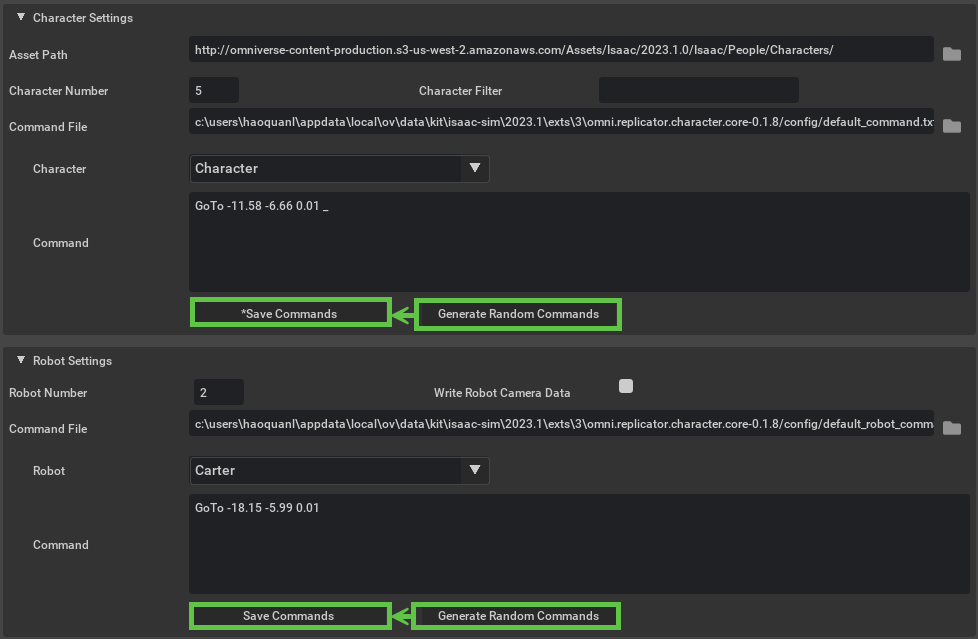
Click the Generate Random Commands button from the Character Settings panel.
Click the Save Commands button from the Character Settings panel. If there are robots in the stage, repeat step 5 and 6 for the robots.
[Optional] Click the Save or Save As button from the Configuration File panel if the user wants the configuration for this simulation to be saved.
Click the “Start Data Generation” button and the simulation will start, which may take a while to finish
The output data can be found from output_dir according to the Replicator Settings panel.

10.9.4. Terminology
Omni.Replicator.Character.Core
The core extension that manages the simulation state. It contains the essential API and modules for setting up the scene, running the simulation, and capturing the data. Its modules can be called independently.
Omni.Replicator.Character.UI
The UI extension for ORC. When this extension loads, the core extension will be loaded automatically. This extension contains the UI components for easy interaction with the extension.
Configuration File
A .yaml file that contains configuration data that defines the key components of a simulation, including the randomization seed, duration of the simulation, number of the agents, output format, etc. To use our extension, the user needs to load a configuration file or use the UI to generate a .yaml file first.
Command File
A .txt file that contains commands for the agents. The agents (characters, robots) perform actions based on the given commands. Our extension controls the agents through the omni.anim.people extension. Different agents have different command files.
Agent
Agents are controlled by the respective command files and perform actions in the simulation. Currently our extension supports characters (human) and robots (Isaac Nova Carter) as agents.
Seed
Randomization seed. Given the same seed, the extension can generate the same randomized result for camera and agent location and agent behaviors. With the same seed and the same sequence of operations, the same data is guaranteed to be generated.
Replicator (Omni.Replicator)
The data capturing extension that our extension is based on. More information about the Replicator extension can be found in Replicator Official Documentation.
Omni.Anim.People
The underlying extension for controlling the agents. It is a command-based system that drives the behavior of the agents. More information can be found in the Official Omni.Anim.People documentation
10.9.5. Configuration File
camera_num can be below the simulation_length). Properties not listed in the format will be ignored by our extension. The default values for each field are shown in the above image.[Isaac Sim Path] is the path to where the Isaac Sim app is, and it can be retrieved by printing get_assets_root_path() with the Isaac Sim script editor.omni.replicator.character:
version: 0.1.0
global:
seed: 123456
camera_num: 5
lidar_num: 0
simulation_length: 10
scene:
asset_path: [Isaac Sim Path]/Isaac/Environments/Simple_Warehouse/full_warehouse.usd
character:
asset_path: [Isaac Sim Path]/Isaac/People/Characters/
command_file:
filters:
num: 5
robot:
command_file:
num: 0
write_data: false
replicator:
writer: TaoWriter
parameters:
output_dir:
rgb: True
bbox: True
semantic_segmentation: False
video: False
10.9.5.1. Minimum Configuration File
omni.replicator.character and the version of the extension. The version in the config file must match the major version of the current extension. (i.e. 0.1.12 will work with 0.1.11 but 0.0.12 won’t work with 0.1.12). Please refer to Semantic Versioning for the version convention. Other fields have default values and will be automatically generated with the default values if not provided.core/config/default_config.yaml) and is automatically loaded when the extension starts. When no command file is specified in the config file, we will create ‘default_command.txt’ and ‘default_robot_command.txt’ at the system default location and add its path to the config file.omni.replicator.character:
version: 0.1.0
10.9.5.2. Global
10.9.5.2.1. seed
The random seed that will be used in all the randomization features. The same seed will guarantee the reproducibility of the same output. If the seed section is left empty, the current system time will be used as the seed.
10.9.5.2.2. camera_num
10.9.5.2.3. lidar_num
The number of lidar cameras to be captured for data. It works the same way as camera_num
10.9.5.2.4. simulation_length
simulation_length long.10.9.5.3. Scene
10.9.5.3.1. asset_path
The path to the scene environment USD. It must contain the environment of the simulation, but it can also contain some characters and cameras to be used for data generation. If the user likes the randomized result for a certain scene, it can be saved as USD and be reused again by providing its path to this field.
10.9.5.4. Character
10.9.5.4.1. num
10.9.5.4.2. asset_path
The path to the character asset folder. It should be a directory that stores the USD files for the character assets. Sub-directory is allowed, and custom assets are allowed.
10.9.5.4.3. command_file
The path to the command file that controls the behavior of the characters. It should be a .txt file with each line starting with the name of the character and followed by the name of the command and the parameters for this command.
10.9.5.4.4. filters
,.[Isaac Sim Path]/Isaac/People/Characters/filter.json for an example filter file.10.9.5.5. Robot
10.9.5.5.1. num
10.9.5.5.2. command_file
The path to the command file that controls the behavior of the robots. It should be a .txt file with each line starting with the stage name of the robot and followed by the name of the command and the parameters for this command.
10.9.5.5.3. write_data
A Boolean value that determines whether to write the camera output data for the robots. If this is set to true, ORC will output the data for the first two cameras on each robot. If this is set to false, the robots will still be controlled according to the command file, but their cameras won’t write any data.
10.9.5.6. Replicator
10.9.5.6.1. writer
10.9.5.6.2. parameters
10.9.6. Basic Usage
10.9.6.1. Data Generation From UI
Follow the Enable Omni.Replicator.Character to install the app and necessary extensions.
Enable the UI extension (
omni.replicator.character.ui).Once the extension is enabled, a default config file is already loaded into the UI and the default values will be reflected in the UI accordingly.
To load a different configuration file, click the folder icon next to the “File Path” text field in the Configuration File panel or directly enter the path to the config file in the “File Path” text field.
Modify simulation properties in the UI.
All the fields in the configuration file can be directly edited through the UI, which each UI panel represents a section in the config file. Please refer to the Configuration File to learn what each field means.
When changes in the UI are made, “*” symbol will appear on the Save File button. Changes will not be written to the config file until the Save File button is clicked. However, when click Set Up Simulation or Start Data Generation buttons, it will use the configuration set from the UI, even if the changes are not saved to the configuration file.
When modifying commands, “*” symbol will appear on the Save Commands button instead. This is because modifications in the command file do not reflect on the config file itself. When clicking Save File on the Configuration File panel, it will also trigger the command files to be saved.
We provide a Generate Random Commands button to generate random commands for agents in the scene. (When click Save Commands, it will overwrite the existing commands in the command file)
Assets (scene, characters, cameras) will not be loaded until the Set Up Simulation button is clicked.
Extension will spawn characters If there are not enough characters in the scene.
Extension will spawn cameras to make sure there are enough cameras in the scene as well.
If there are more characters or cameras in the scene already, our extension will not remove any assets and will use the first N cameras for the data output.
When there are unsaved changes, Set Up Simulation and Start Data Generation button will run according to the information displayed in the UI rather than the configuration file on disk.
Click the Set Up Simulation button to load the simulation assets and wait the loading to finish. Loading may take a while depending on the complexity of the assets.
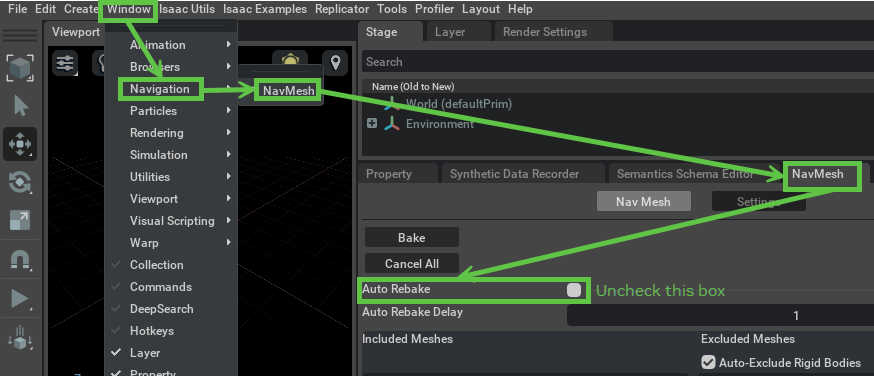
Warning
Before setting up the simulation, please go to Window -> Navigation -> NavMesh and turn off Auto Rebake in the NavMesh settings. Otherwise, loading and running the simulation may get stuck if there are robots present in the stage.
Click the Generate Random Commands button from the Character Settings panel.
ORC provide a command editor for each agent. The user can select the agent name on the tab, and use the text editor to edit the command for it.
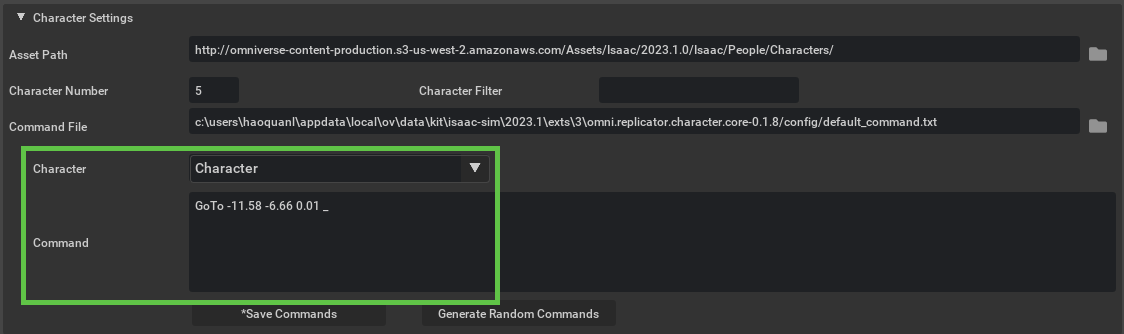
Click the Save Commands button from the Character Settings panel. If there are robots in the stage, repeat step 6 and 7 for the robots.
[Optional] Click the Save or Save As button from the Configuration File panel if the user wants the configuration for this simulation to be saved.
Saving the configuration file will also trigger the command files to be saved
Once the assets have been loaded and modified, and the command files have been generated and saved, press the Start Data Generation button in the “Configuration File” panel to start recording data.
Agents will start executing commands and Replicator will start recording data.
The simulation will automatically stop when enough data has been generated to cover the simulation time set in the config file.
Wait for the data generation to finish. Depending on the number of agents, the complexity of the environment, and the number of cameras, this may take a very long time.
The output data can be found from output_dir according to the Replicator Settings panel.
10.9.6.2. Data Generation From Script
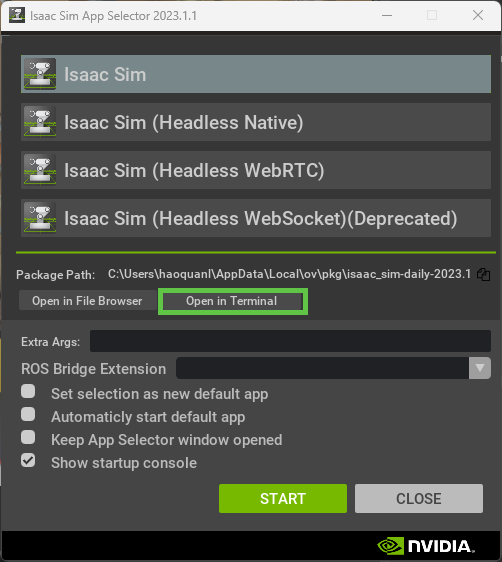
./python.sh tools/isaac_people/sdg_scheduler.py -c [config file path] -n [num_of_run].\python.bat tools/isaac_people/sdg_scheduler.py -c [config file path] -n [num_of_run]./python.sh tools/isaac_people/sdg_scheduler.py -c tools/isaac_people/config.yaml -n 1The parameters in above command:
config file path: config file location. It can be a single config file or a folder of config files.
num_of_run: this is an optional parameter. The script will have 1 run for each config file by default. If the number of runs is larger than 1, the script will increase “output_dir” in each config file automatically to avoid writing in the same location.